HondaBook.ru
Auto companies Volkswagen Auto companies Ford Auto companies Lada Auto companies Skoda Auto companies BMW Auto companies Mazda Auto companies Peugeot
English Русский
Български
Беларускі
Український
Српски
Hrvatski
Română
Polski
Slovenský
Magyar
Bookmark Contacts Sitemap   


Accord Civic Fit / Jazz CR-V HR-V Others Articles
Fit 1 (2001-2008)

Disassembling and assembling the rear brake pad support (Honda Fit 1)

  • Main
  • Honda Fit
  • 1 (2001-2008)
  • Chassis and running gear
  • Brake system
  • Disassembling and assembling the rear brake pad support
0
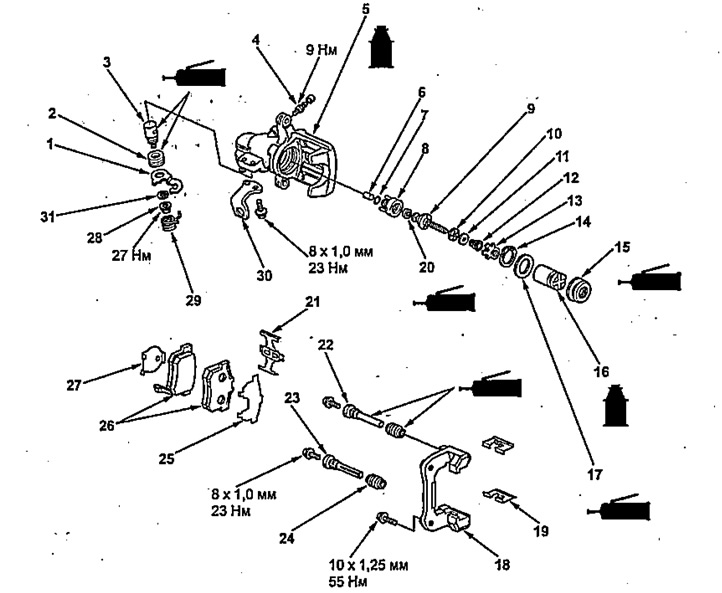
Brake caliper.

Brake caliper.
1 - parking brake drive lever,
2 - lever axle boot,
3 - parking brake drive lever axis,
4 - bleed nipple,
5 - support,
6 - pin,
7 - O-ring seal,
8 - bushing,
9 - adjusting bolt,
10 - bearing,
11 - spacer,
12 - regulator spring,
13 - spring seat,
14 - retaining ring,
15 - anther,
16 - piston,
17 - piston cuff,
18 - caliper bracket,
19 - retaining plate insert,
20 - cap,
21 - brake shoe spring,
22 - guide pin "B",
23 - guide pin "A",
24 - anther,
25 - outer gasket,
26 - brake shoe,
27 - internal gasket,
28 - nut,
29 - return spring,
30 - bracket,
31 - spring washer.


Note: disassemble and assemble the brake caliper using the brake caliper assembly drawing as a guide.


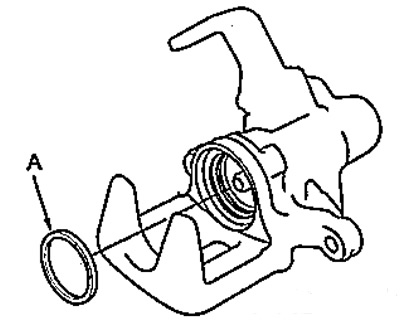
1. Remove the spring (A).
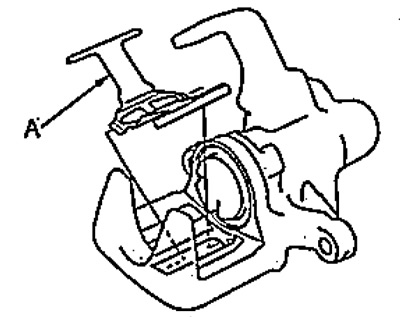
1. Remove the spring (A).


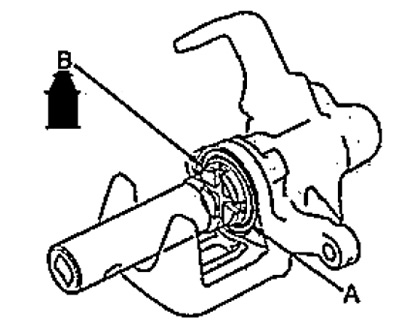
2. Using the special tool, rotate the piston to the left and remove the piston (B) and dust boot (A).
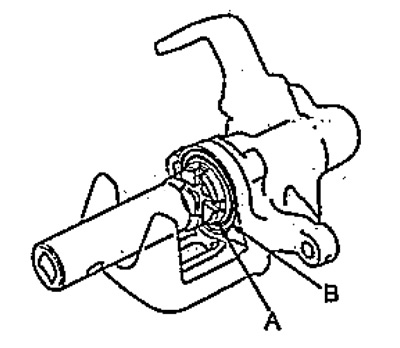


2. Using the special tool, rotate the piston to…


3. Remove the piston seal (A).

3. Remove the piston seal (A).


4. Install the special tool (A) into the caliper cylinder as shown in the figure.
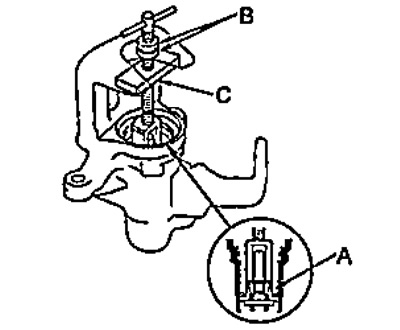
4. Install the special tool (A) into the caliper…


5. Install the plate so that the plate (C) of the special tool rests against the caliper, then tighten the nuts (B).

6. Turn the nut (F) of the special tool 0.25 - 0.5 turns to the right to compress the spring (B) of the regulator.
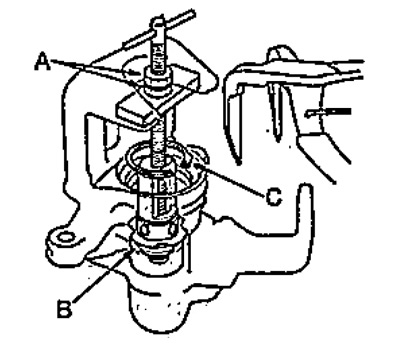


6. Turn the nut (F) of the special tool 0.25 -…


7. Using a special tool, remove the retaining ring (C).

8. While holding the lower nut of the special tool, tighten the upper nut to secure the position.

9. Remove the special tool, spring seat (C), adjuster spring (B), spacer (D), bearing (A), adjusting bolt (E) and cap (F).
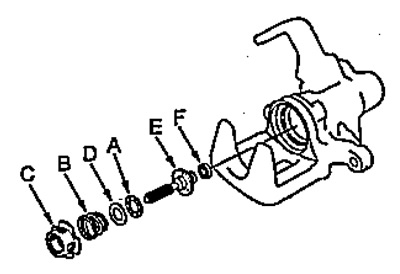
9. Remove the special tool, spring seat (C),…


10. Remove the bushing (A), pin (B) and O-ring (C).
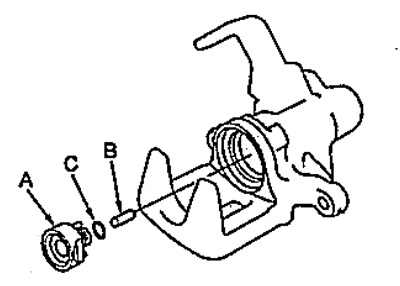
10. Remove the bushing (A), pin (B) and O-ring…


11. Remove the return spring (A) and the parking brake actuator lever assembly with the lever shaft (B).


Note: Do not remove the nut (C) without removing the parking brake lever from the caliper. Remove the lever, clamp it in a vice, and then remove the nut.
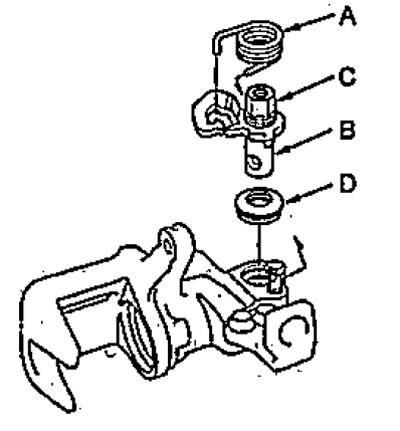

Note: Do not remove the nut (C) without removing…


12. Remove the boot (D) of the parking brake drive lever shaft.

Note:
  • Installation is carried out in the reverse order of removal.

When installing:
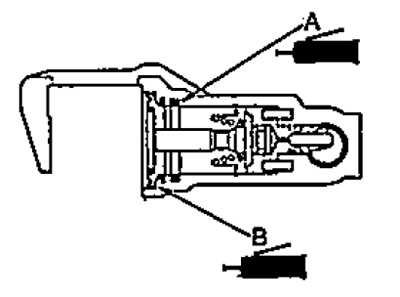
  • apply special brake grease to the sealing cuff (A) and dust boot (B);
  • apply brake fluid to the piston.


apply brake fluid to the piston.


[Information obtained from this source hondabook]
This article is available at: russian, bulgarian, belarusian, ukrainian, serbian, croatian, romanian, polish, slovak, hungarian
This information has been verified: Varvara Vereshchagina
Share with friends:
◀ Previous
Fit 1: Brake system
Next ▶

Installing the rear brake pad support
Removal the rear brake pad support
Replacing rear brake pads
Rear disc brakes — check
Disassembling and assembling the front brake pad support
Rear drum brakes — check
Replacing the rear drum brake pads
Removal and installation of rear drum brakes
Disassembly and assembly of the working brake cylinder
Parking brake — checking and adjusting
See also other articles from Honda manuals:
Rear Disc Brake Caliper — Removal and Installation Honda Accord 3 (1985-1989)
Replacing the shoes of the rear wheel drum brake mechanisms Honda Civic 6 (1995-2000)
Metering valve (rear brake pressure regulator) Honda CR-V 1 (1995-2001, petrol)
Replacing the rear door support pillar Honda HR-V 1 (1998-2006, petrol)
Disassembling and assembling the rear seat cushion frame assembly Honda Avancier 1 (1999-2003, petrol)
Link in different formats to this article
Comments and feedback from visitors
No comments yet


How much will 47 + 34 ?


Fit 1 (2001-2008) 
  • General information
  • User manual
  • Maintenance
  • Power unit
  • Engine repair
  • Cooling and lubrication system
  • Injection and power system
  • Control system
  • Engine electrical equipment
  • Transmission
  • Clutch
  • Mechanical gearbox
  • Automatic gearbox
  • Variator (CVT)
  • Drive shafts and gearbox
  • Chassis and running gear
  • Car suspension
  • Steering
  • Brake system
  • Body and interior
  • Exterior (external elements)
  • Interior (internal elements)
  • Doors, locks and windows
  • Heater and air conditioner
  • Safety system
  • Electrical equipment
  • Equipment and devices
  • Wiring diagrams (since 06.2001)
  • Wiring diagrams (since 06.2004)
HondaBook.ru © 2018–2026 • Mobile version • Sitemap: EN BG BY UA RS HR RO PL SK HU • Feedback • Driver Information • Search system • Bookmark
Accord 3 (1985-1989) • Accord 6 (1997-2002) • Civic 3 and 4 (1983-1991) • Civic 5 and 6 (1991-2000) • Civic 6 (1995-2000) • Civic 7 (2000-2005) • Civic 8 (2005-2011) • Fit 1 (2001-2008) • CR-V 1 (1995-2001) • CR-V 2 (2002-2006) • HR-V 1 (1998-2006) • Avancier 1 (1999-2003) •
 
This website uses cookies to ensure proper functioning. By clicking "OK," you agree.