
Contents: Intermittent failures ⇊ Breaks and short circuits ⇊ How to use HONDA PGM tester or…⇊ How to reset ECM/PCM ⇊ How to exit troubleshooting mode…⇊ How to remove ECM/PCM for testing ⇊ How to Test ECM/PCM Circuits ⇊ How to change ECM/PCM unit ⇊
Intermittent failures
The term "intermittent failure" refers to a condition in which a failure could have occurred in the system, but at the moment it does not manifest itself. If the malfunction indicator lamp (MIL) does not illuminate on the instrument panel, check for loose electrical connectors and open wires in the connectors of the circuit you are testing.
Breaks and short circuits
"Open circuit" and "short circuit" (SC) are common terms in the field of electrical engineering. A "break" is defined as an interruption in a circuit in a wire or at a connection point. "Short circuit" is an accidental short circuit of a wire to ground or to another wire. At the same time, in conventional electrical engineering, some components do not work at all. However, in complex electronics (for example, in ECM/PCM units) some components may work, but not as expected.
How to use HONDA PGM tester or scanner
If the MIL light comes on
1. Start the engine and check the MIL lamp
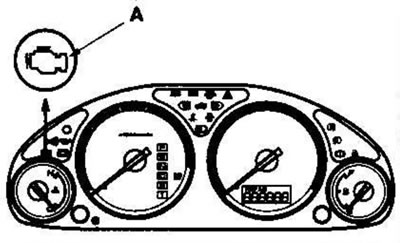
2. If the MIL remains on, connect the Honda PGM Tester (A) or scan tool to the data link connector (DLC) (B) located under the instrument panel on the driver's side.
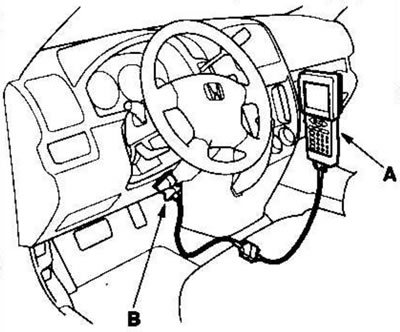
*: The picture shows a left-hand drive model.
3. Turn the ignition key to the ON (II) position.
4. Check the malfunction code (OTC) and write it down. Also check the freeze frame data. Start the appropriate procedure for the list and troubleshooting, using the trouble code (DTC) table.
Note:
- Freeze frame data shows the engine operating mode when a malfunction, misfire or fuel injection undercompensation was first detected.
- The Honda PGM scanner and tester can read DTC codes, freeze frame data, current and other data in the ECM/PCM units.
- For specific operations, see. in the owner's manual that comes with your Honda PGM scanner or tester.
If the MIL lamp does not light
If the MIL does not come on but there is an engine problem, see the trouble code (DTC) table below.
If you cannot reproduce the DTC
When using some of the troubleshooting methods discussed in this section, you must reset the ECM/PCM and attempt to reproduce the DTC. If the fault is intermittent and you are unable to duplicate the code, do not perform this procedure. Otherwise, this will only lead to confusion and possibly an unnecessary replacement of the ECM/PCM unit.
How to reset ECM/PCM
This operation can be performed in two ways:
- Clear the ECM/PCM memory using a scanner or Honda PGM tester.
- For specific instructions, see. in the Honda PGM scanner or tester operating manual.
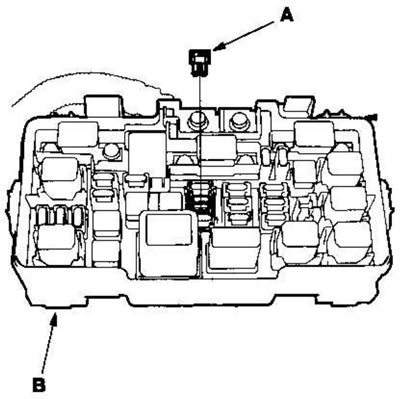
- Turn the ignition switch to the OFF position and remove the ECU (ECM/PCM) fuse (A) No. 6 (15A) from the under-dash fuse/relay box (B) for 10 seconds.
How to exit troubleshooting mode (required after finding and eliminating any malfunction)
1. Reset the ECM/PCM as described above.
2. Turn the ignition key to the OFF position.
3. Disconnect the Honda PGM scanner or tester from the DLC connector.
Note: The ECM/PCM unit is part of the immobilizer system. If the ECM/PCM unit is replaced, it will have a different immobilizer code. Therefore, to start the engine you will have to rewrite the immobilizer code using the Honda PGM tester.
How to remove ECM/PCM for testing
If any DTC requires voltage or resistance measurements at the ECM/PCM connectors, remove the ECM/PCM and perform the following tests:
1. Make sure you have the security code for your car radio. Also write down the frequencies of the radio stations with fixed tuning.
2. Disconnect the cable from the negative battery terminal.
3. Remove the glove box.
4. Disconnect the gray 20-pin ECM/PCM wiring harness connector from the mounting bracket. Remove the ECM/PCM mounting bolt (A) and remove the bracket.
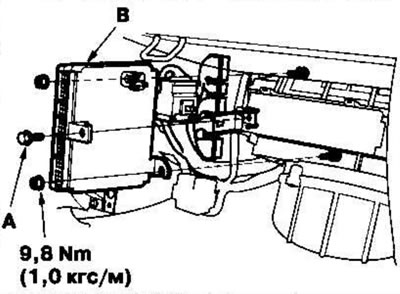
*: Left hand drive model shown.
5. Remove the nuts, then remove the ECM/PCM unit (B).
6. Installation of the ECM/PCM unit is performed in the reverse order of removal.
7. Connect the cable to the negative battery terminal.
8. Enter the car radio security code and preset radio frequencies, then set the time.
How to Test ECM/PCM Circuits
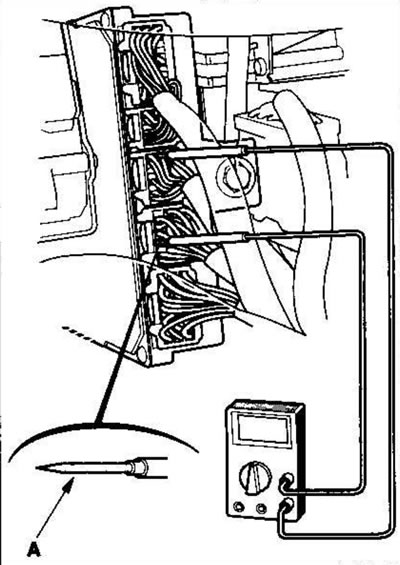
1. Carefully insert the sharp probe (A) of the tester into the connector from the harness side until it touches the contact part of the wire.
2. If you cannot access the connector from the harness side or the connector is sealed (A) from the harness side, disconnect the connector and touch the contacts (B) from the contact side with a tester. Do not force the probe into the connector.
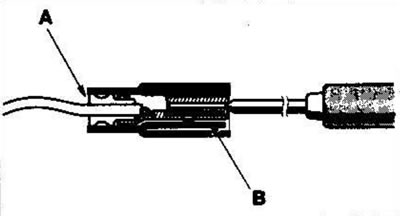
Warning. Do not pierce the wire insulation. Punctures can cause loose or intermittent electrical connections.
How to change ECM/PCM unit
1. Disconnect the cable from the negative battery terminal.
2. Remove the ECM/PCM from the vehicle.
3. Install a known good ECM/PCM into the vehicle.
4. Connect the cable to the negative battery terminal.
5. Rewrite the immobilizer code into the new ECM/PCM using the Honda PGM tester. This will allow you to start the engine.
6. After testing is complete, reinstall the original ECM/PCM and rewrite the immobilizer code into the ECM/PCM again using the Honda PGM Tester.