
Contents: Examination ⇊ Replacement ⇊
The λ-probe located in the engine exhaust tract monitors the oxygen content in the exhaust gas flow. When O2 molecules come into contact with the sensitive element of the probe, the sensor generates an amplitude signal in the range from 0.1 to 0.9 V, depending on the oxygen concentration. Moreover, a value of 0.1 V corresponds to a high O2 content (lean mixture), and a value of 0.9 V - a low O2 content (rich mixture). The PCM continuously monitors the signal coming from the oxygen sensor, if necessary, issuing commands to adjust the composition of the air-fuel mixture by changing the opening duration of the injection injectors. The optimal ratio of the components of the combustible mixture, guaranteeing minimal fuel consumption with the most efficient operation of the catalytic converter, is 14.7 parts air to 1 part fuel - this is what the control module tries to constantly maintain, focusing on the information coming from the λ-probe. The models of cars under consideration use two oxygen sensors; the primary is located in the engine exhaust manifold, and the secondary is below the catalytic converter. By comparing the oxygen content in the sections of the exhaust tract above and below the catalytic converter, the PCM also determines the efficiency of the latter.
It should be noted that the oxygen sensor is capable of generating a signal voltage only when it is warmed up to normal operating temperature (approximately 320°C). While the sensor is cold, the PCM operates in OPEN CIRCUIT mode.
If, with the engine warmed up to normal operating temperature and/or running for at least two minutes, the oxygen sensor produces a stable signal with an amplitude below 0.45 V (at at least 1500 rpm), the self-diagnosis system stores the corresponding fault code (P0131 or P0132) in the PCM memory. The corresponding code is also stored if a fault is detected in the sensor heater circuit (see Section On-Board Diagnostics (OBD) System - Operating Principle and Error Codes).
In the event of a malfunction of the λ-probe or its circuit, the RCM switches to open-loop mode, ignoring the information coming from the sensors and maintaining the composition of the air-fuel mixture at a certain specified level, ensuring sufficient engine efficiency.
The proper functioning of the oxygen sensor depends on the fulfillment of a set of certain conditions:
- a) Electrical parameters: The stability of the low voltage amplitude signal generated by the sensor depends to a large extent on the quality of the contact connections of the λ-probe circuit, which should be checked first in case of problems;
- b) Outside air supply: The design of the λ-probe allows for free circulation of outside air inside the sensor. When installing the probe, always check the air ducts for patency;
- c) Operating temperature: The PCM begins to respond to information coming from the λ-probe only after the sensor has warmed up to normal operating temperature (approximately 320°C). This fact should not be overlooked when checking the correct functioning of the probe;
- d) Fuel quality: Correct functioning of the λ-probe is only possible if UNLEADED fuel is used to refuel the vehicle!
In addition to the conditions listed in the previous paragraph, some special precautions should be observed when servicing the λ probe:
- a) The oxygen sensor is equipped with a section of electrical wiring permanently mounted into it and equipped with a contact plug, attempts to disconnect which may lead to irreversible failure of the sensor;
- b) Avoid allowing dirt and grease to enter the sensor louvers or its electrical connector;
- c) Do not use any solvents to clean the oxygen sensor;
- d) Handle the λ-probe with extreme care, do not drop it and try not to shake it;
- e) The silicone protective cover must be placed on the sensor in a strictly defined manner so as not to melt and impair the proper functioning of the probe.
Examination
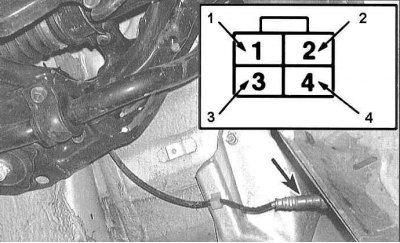
1. Locate the sensor's electrical connector. From the back of the connector, insert an unbent paper clip into the signal wire contact socket (terminal No.1 [+]), insert the second paper clip into the socket of terminal No.2 (ground). Connect the positive probe of the voltmeter to the first paper clip, connect the negative probe to the paper clip inserted into the ground terminal. Set the parking brake, move the AT selector lever to the "P" position, on models with a manual transmission, select neutral gear. Jack up the front of the car and place it on supports.
2. Start the engine and begin monitoring the changes in the oxygen sensor signal voltage.
Caution: Avoid touching hot surfaces of the exhaust system.
The slower fluctuations in the voltage of the secondary λ-probe are a consequence of the action of the catalytic converter, since the bound oxygen atoms in the CO₂ and H2O molecules affect the sensitive element of the probe to a much lesser extent than the atoms in the CO and NOX molecules.
3. At the initial stage, the cold sensor should generate a constant signal with an amplitude of 0.1÷0.2 V (open loop mode). After about two minutes, the engine will reach normal operating temperature and the sensor readings will begin to fluctuate within the range of 0.1 to 0.9 V (closed loop mode). If the system does not switch to closed loop mode, or switches with an unacceptably long delay (lazy sensor), replace the λ-probe.
4. Also check the proper functioning of the oxygen sensor heater. Disconnect the probe wiring connector and connect an ohmmeter between the heater terminals (terminals No.3 and 4). The nominal resistance is 10÷40 Ohm.
5. Check for proper power supply to the heater. Disconnect the electrical connector and measure the voltage on the harness side between terminal #4 and ground. With the ignition on (do not start the engine), the voltmeter should register battery voltage. If there is no power, check the wiring between the main relay, PCM and oxygen sensor.
6. If the above checks are negative, replace the faulty λ-probe.
Replacement
Note: Removing the λ-probe on a cold engine can be extremely difficult due to thermal contraction of the metal of the exhaust manifold/pipe. To avoid the risk of damaging components, warm up the engine for a couple of minutes before removing the sensor - try not to burn yourself on hot surfaces during the procedure.
1. Disconnect the negative cable from the battery.
Warning! If the car stereo system is equipped with a security code, make sure you have the correct combination to activate the audio system before disconnecting the battery!
2. Jack up the car and place it on supports.
3. Carefully disconnect the oxygen sensor wiring connector.
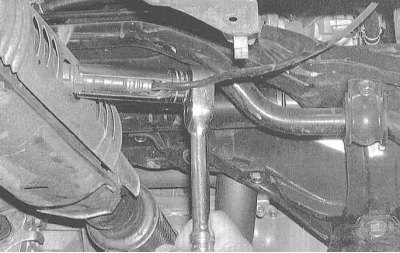
4. Carefully remove the probe from the exhaust manifold (primary sensor) or catalytic converter assembly (secondary sensor).
5. Before screwing the sensor into place, lubricate its threaded part with anti-seize sealant (new sensors are usually already coated with the appropriate compound).
6. Screw the sensor into its original place and tighten it securely.
7. Connect the electrical wiring.
8. Lower the vehicle to the ground and test drive it. Check the control module memory for fault codes.
Original article on the website: HondaBook.ru