
HondaBook.ru
Auto companies Volkswagen Auto companies Ford Auto companies Lada Auto companies Skoda Auto companies BMW Auto companies Mazda Auto companies Peugeot
English Русский
Български
Беларускі
Український
Српски
Hrvatski
Română
Polski
Slovenský
Magyar
Bookmark Contacts Sitemap   


Accord Civic Fit / Jazz CR-V HR-V Others Articles
Accord 3 (1985-1989) Accord 6 (1997-2002)

Removal, inspection and installation of the oil pump (Honda Accord 6)

  • Main
  • Honda Accord
  • 6 (1997-2002)
  • Power unit
  • Six-cylinder engines
  • Removal, inspection and installation of the oil pump
0
Contents: Removal ⇊ Examination ⇊ Installation ⇊

Removal


1. Remove the timing belt, crankshaft sprocket and idler roller (see Section Removal, condition check and installation of the timing belt and timing drive gears).

Caution: Leave the powertrain mount support connected at the timing belt end of the engine.


2. Remove the crankshaft position sensor (CSP).
2. Remove the crankshaft position sensor (CSP).


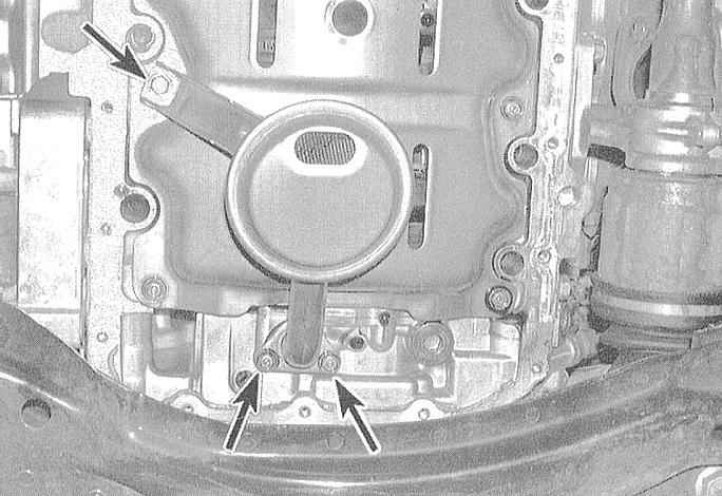
3. Remove the engine oil pan (see Section Removal and installation the engine oil pan) and the oil intake mesh filter. If equipped, remove the engine oil level sensor.

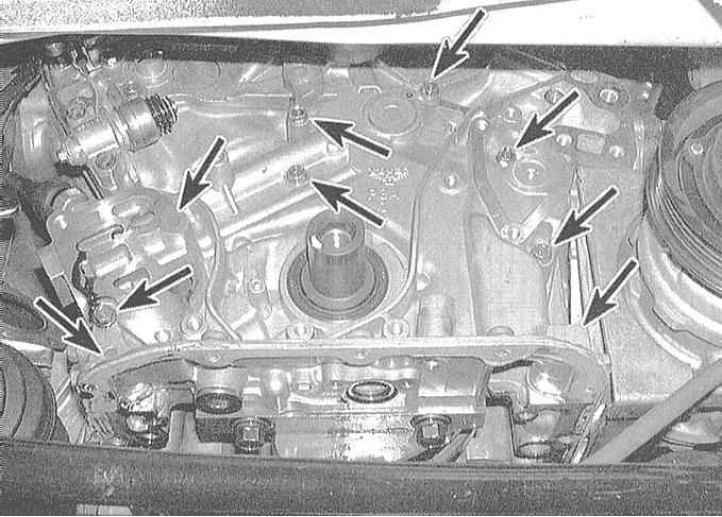
4. Remove the oil filter nozzle assembly with the VTEC lock-up solenoid valve (in front of the oil pump) (see Section VTEC system - general information and component status check).
4. Remove the oil filter nozzle assembly with the…


5. Remove the mounting bolts and separate the oil pump housing from the engine. You may need to pry between the main bearing cap and the pump housing.


Checking the axial clearance of gears is carried out using a blade-type feeler gauge flatness meter.

Examination


Examination


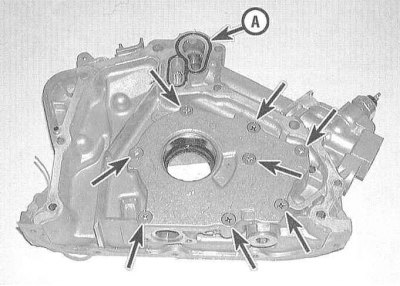
1. Using a large Phillips head screwdriver, remove the screws securing the cover to the rear of the pump housing.
1. Using a large Phillips head screwdriver,…


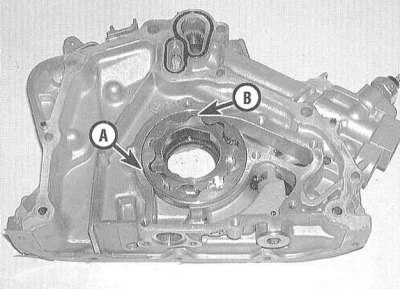
2. Remove the cover and carefully inspect the condition of the pump gears. If signs of wear or mechanical damage are detected, replace the pump. Measure the working clearances of the pump, compare the measurement results with the requirements of the Specifications.

3. Scrape off all traces of old sealant from the mating surfaces of the pump and engine block (be careful not to damage the surfaces of the soft aluminum alloy components).

Installation


1. Replace the crankshaft oil seal (see Section Replacing the front crankshaft oil seal).


Note: Before installing, the lips of the new seal should be lubricated with a multi-purpose grease.


2. Fill the inside of the pump with technical petroleum jelly. Install the cover, lubricate the threads of the fastening screws with sealant, screw them in and tighten them diagonally with the required force.

3. Carefully wipe all gasket surfaces with a rag soaked in acetone, completely removing all traces of oil from below.

4. Lightly lubricate the surface of the pump housing mating with the block, as well as the threaded part of the mounting bolts with anaerobic sealant. Do not overdo it - make sure that the sealant does not block the oil flows and does not get into blind threaded holes. Assembly of the components must be done within five minutes after applying the sealant, otherwise the procedure will have to be repeated. Do not forget to replace the O-rings.

5. After making sure that the flats on the pump drive gear engage with the corresponding flats on the crankshaft journal, install the pump in its regular place.

6. Insert the mounting bolts and tighten them in a diagonal order to the required torque.

7. After replacing the sealing ring, install the oil intake manifold and tighten its fasteners to the required torque.

8. Installation of the remaining components is carried out in the reverse order of their dismantling.

9. Wait about 20 minutes for the sealant to harden, then fill with fresh engine oil, start the engine and check for leaks. Measure the engine oil pressure.

10. Check the engine oil level.
This article is available at: russian, bulgarian, belarusian, ukrainian, serbian, croatian, romanian, polish, slovak, hungarian
This information has been verified: Timofey Goryachev
Share with friends:
◀ Previous
Accord 6: Six-cylinder engines
Next ▶

Removal and installation the engine oil pan
Removal and installation cylinder heads
Replacing oil deflector caps and valve springs with plates
Removal, condition check and installation of camshafts
Removal, condition check and installation of rocker arm assembly
Removal and installation the drive disk
Replacing the rear crankshaft oil seal
Checking the condition and replacing the powertrain suspension supports
Powertrain suspension adjustment system
See also other articles from Honda manuals:
Oil pump — removal, inspection and installation Honda Civic 3 and 4 (1983-1991)
Coolant pump Honda Fit 1 (2001-2008)
Power steering pump Honda CR-V 1 (1995-2001, petrol)
Oil pump — design description Honda HR-V 1 (1998-2006, petrol)
Checking and adjusting the tension of the power steering pump belt Honda Avancier 1 (1999-2003, petrol)
Link in different formats to this article
Comments and feedback from visitors
No comments yet


How much will 16 + 39 ?


Accord 6 (1997-2002) 
  • General information
  • Introduction to the guide
  • User manual
  • Maintenance
  • Power unit
  • Four-cylinder engines
  • Six-cylinder engines
  • Engine overhaul
  • Cooling system
  • Heater and air conditioner
  • Power and exhaust systems
  • Engine electrical equipment
  • Engine management
  • Transmission
  • Mechanical gearbox
  • Automatic gearbox
  • Clutch and drive shafts
  • Chassis and running gear
  • Brake system
  • Car suspension
  • Steering
  • Body and interior
  • Exterior (external elements)
  • Interior (internal elements)
  • Electrical equipment
  • Equipment and devices
  • Electrical circuits
Accord 3 (1985-1989) 
  • General information
  • Maintenance
  • Power unit
  • Engine adjustment
  • Engine repair
  • Engine electrics
  • Emission management
  • Engine management (carburetor)
  • Electronic injection
  • Programmable injection
  • Schematic of emission system
  • Fuel system
  • Feedback management
  • Transmission
  • Manual gearbox
  • Automatic gearbox
  • Clutch
  • Chassis and running gear
  • Front suspension
  • Rear suspension
  • Steering
  • Brake system
  • Electrical equipment
  • Ventilation and heating
  • Air conditioner
  • Cruise control system
  • Equipment and devices
HondaBook.ru © 2018–2026 • Mobile version • Sitemap: EN BG BY UA RS HR RO PL SK HU • Feedback • Driver Information • Search system • Bookmark
Accord 3 (1985-1989) • Accord 6 (1997-2002) • Civic 3 and 4 (1983-1991) • Civic 5 and 6 (1991-2000) • Civic 6 (1995-2000) • Civic 7 (2000-2005) • Civic 8 (2005-2011) • Fit 1 (2001-2008) • CR-V 1 (1995-2001) • CR-V 2 (2002-2006) • HR-V 1 (1998-2006) • Avancier 1 (1999-2003) •
 
This website uses cookies to ensure proper functioning. By clicking "OK," you agree.