
Note: Broken valve springs and worn valve stem seals can be replaced without removing the cylinder heads. All you need is two special tools and a source of compressed air. Before you begin, make sure you have a tool powerful enough to compress the tight valve springs used to assemble the engines of the models in question.
1. Remove the cylinder head cover(s) (see Section Removal and installation cylinder head covers).
2. Remove the spark plugs from the cylinders whose components need to be checked. If the valve stem seals need to be replaced, remove all the spark plugs.
3. Turn the crankshaft and bring the corresponding piston to the TDC position at the end of the compression stroke (see Section Bringing the piston of the first cylinder to the top dead center (TDC) position). When replacing valve stem seals, start with the first cylinder, then move from one to the next in the firing order (see Specifications).
4. Remove the rocker arm assemblies with axles (see Section Removal, condition check and installation of rocker arm assembly).
5. Screw a long adapter into the spark plug hole of the corresponding cylinder and connect a hose from a compressed air source to it.
Note: Special threaded nozzles with quick-connect fittings are available - ask at auto service shops.
6. Supply air to the cylinder.
Caution! Air pressure may cause the piston to move downwards, causing the crankshaft to suddenly turn - do not leave the socket wrench used to bring the piston to TDC on the bolt screwed into the crankshaft journal. The valves will be held in place by air pressure.
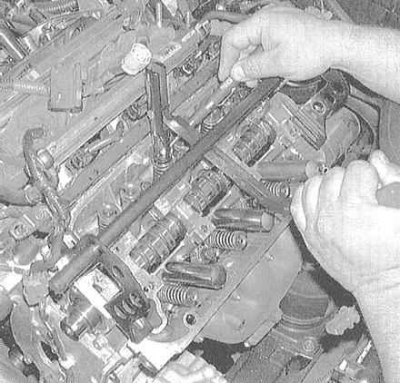
7. To prevent debris and other foreign objects from getting into the engine, plug all the holes in the block around the valves to be serviced with rags. Now, using a special tool, compress the spring of the valve to be serviced. Using tweezers or a magnetized rod, remove the crackers of the split lock from the grooves on the valve stem.
Note. If it is not possible to fix the valve in the closed position with compressed air, then there is a leak in the seal, determined by the presence of mechanical defects in the working chamfer of the valve plate or its seat. In this case, the cylinder head must be removed from the engine in order to perform the appropriate restoration repair.
8. Remove the spring plate, protective screen, and spring from the valve stem, then remove the oil deflector cap from the guide sleeve.
9. Attach a rubber band to the upper end of the valve stem, or wrap it with tape to prevent the valve from falling into the combustion chamber, then shut off the air supply to the cylinder.
10. Check the valve stem for signs of wear or mechanical damage. Rotate the valve inside the guide bushing and estimate the amount of radial clearance of its end, which determines the degree of straightness of the stem (a bent valve must be replaced).
11. Move the valve up and down in the guide bushing, trying to identify jamming points, the presence of which indicates either deformation of the valve stem or damage to the bushing - in either case, the head must be removed in order to perform the necessary repairs.
12. Re-inject air into the cylinder to secure the valve. Remove the rubber band/tape from the rod.
13. Lubricate the valve stem with clean engine oil and install a new valve stem seal.
Note: The inlet valve oil deflector caps are equipped with a white spring, and the outlet valve oil deflector caps are equipped with a black spring.
14. Place the valve spring(s) onto the valve stem (with the end with the shortened pitch of the coils facing the head).
15. Place the plate on the spring, then compress the spring(s) using the special tool and carefully insert the split lock crackers into the seat groove on the valve stem. To temporarily fix the crackers until the tool is released, lubricate them from the inside with thick grease.
16. While observing the correct seating of the crackers in the groove, release the spring compression device.
17. Shut off the air supply to the cylinder and unscrew the adapter from the spark plug hole.
18. Reinstall the rocker arm assembly (see Section Removal, condition check and installation of rocker arm assembly).
19. Install the cylinder head cover (see Section Removal and installation cylinder head covers).
20. Screw the spark plugs back into place and connect the high-voltage wires to them (in the required order).
21. Start the engine and check it for signs of oil leaks and unusual noises from the valve train.
The original can be found on the resource hondabook.ru