
Withdrawal
1. Disconnect the negative cable from the battery.
Attention! If the stereo system installed in the car is equipped with a security code, before disconnecting the battery, make sure that you have the correct combination to activate the audio system!
2. Put the transmission in neutral (RKPP), or in position "R" (AT), apply the parking brake and chock the rear wheels of the vehicle.
3. Remove drive belts (see chapter Settings and ongoing maintenance).
4. Remove the alternator and steering pump (see chapters Engine electrical equipment and Suspension and steering respectively).
5. In order to facilitate turning the crankshaft, turn out the spark plugs (see chapter Settings and ongoing maintenance), then bring the piston of the first cylinder to the TDC position of the end of the compression stroke (see Section Bringing the piston of the first cylinder to the top dead center position (TDC)).
6. Release nuts of fastening of the right forward wheel. Jack up the front of the car and place it on jack stands. Remove the right front wheel.
7. Remove the right front wheel arch splash guard (see chapter Body).
8. Support the engine with a jack, laying a block of wood between its head and the oil pan to distribute the load. Remove the splash screen under the radiator (see chapter Cooling, heating systems).
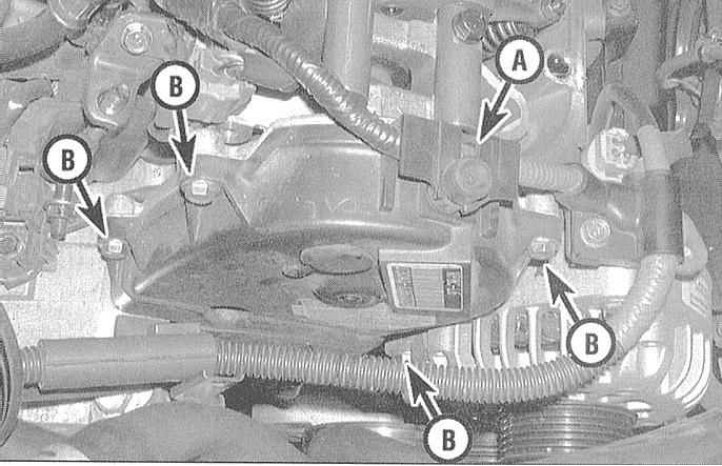
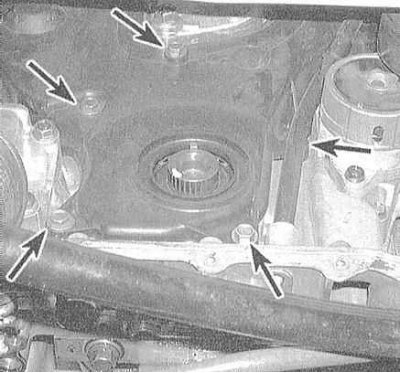
9. Give two bolts of fastening to the block of the engine of the right support of a suspension bracket of the power unit (also remove the wiring harness holder), then unscrew the through bolt and remove the support (see Section Checking the condition and replacing the suspension bearings of the power unit). Remove the support bracket. Remove the engine oil dipstick and remove its guide tube.
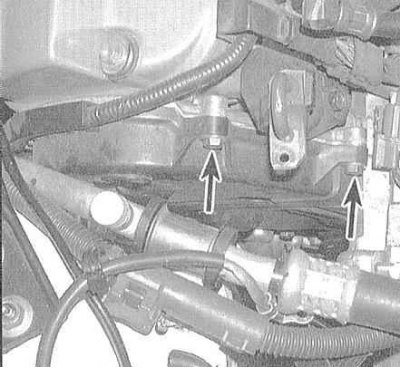
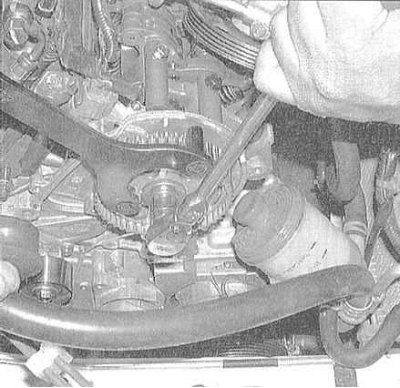
10. Remove the top timing belt covers.
 |  |
11. If the belt will not be replaced, mark the original direction of its rotation - it must be strictly observed during assembly.
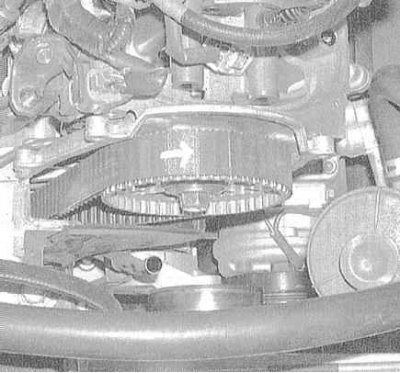
12. Make sure that the alignment marks are correctly aligned.
 |  |
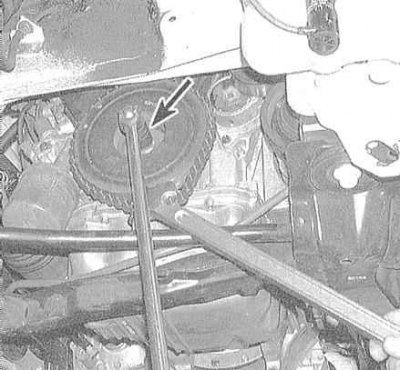
13. After blocking the crankshaft from turning with a chain or strap wrench, loosen the bolt securing its pulley. After unscrewing the bolt, remove the pulley.
Note. In the process of loosening the mounting bolt, the correct alignment of the alignment marks on the pulley and camshaft gears may be violated - check. Temporarily screw the pulley bolt into place, then use a socket wrench to adjust the position of the crankshaft accordingly.
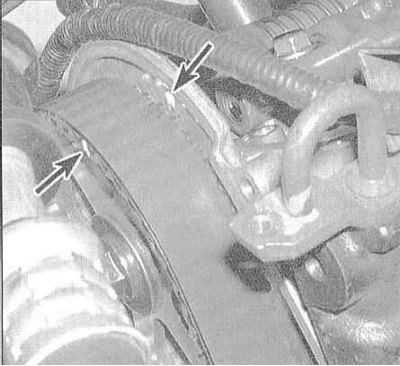
14. Remove the lower timing belt cover.
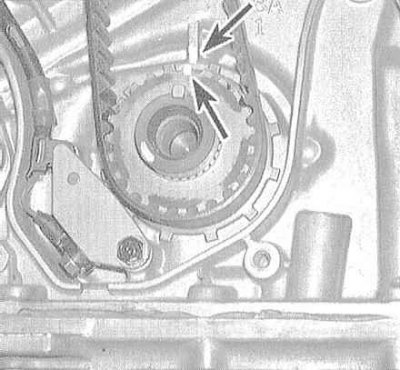
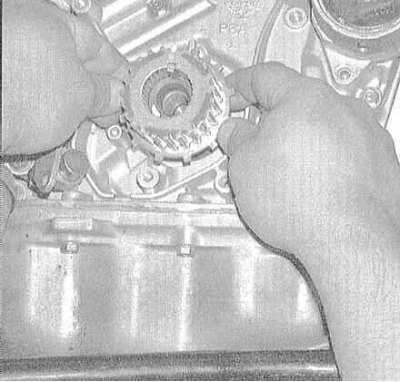
15. Remove the belt guide from the crankshaft gear (try to remember its installation position). Make sure that the alignment marks of the gear wheel are correctly aligned.
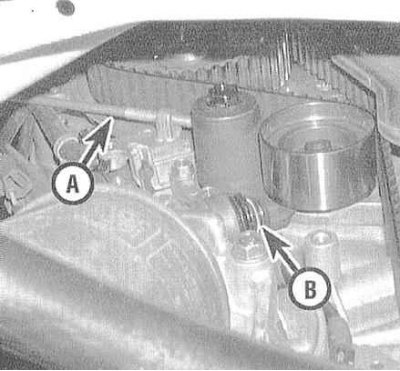
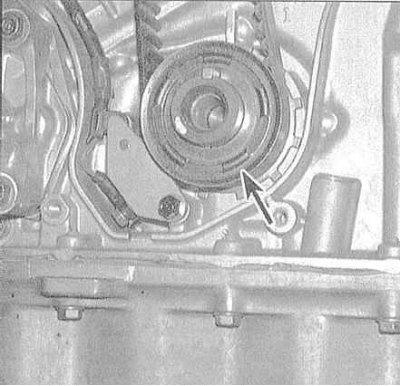
16. Remove one of the long battery clamping bolts and use a file to remove a small chamfer from the end of its threaded part. By manually screwing the bolt into the protrusion on the casting of the block, rest it against the timing belt tensioner. The bolt should secure the regulator.

17. Loosen the intermediate roller mounting bolt for six turns, then remove the timing belt.
18. Now, if necessary, you can begin to remove the defective gears of the camshafts. The need to remove the wheels also arises when replacing the front camshaft oil seals. Remove the keys from the trunnions of the shafts so that they are not lost if they fall out involuntarily.
Attention! Try not to allow the camshafts to rotate!
19. If there is a need to replace the front crankshaft oil seal or its gear, remove the latter from the shaft journal. If the wheel cannot be removed by hand, pry it out with a pair of screwdrivers. Also remove the inner timing belt guide.
Examination
1. Assess the condition of the gears, paying special attention to the degree of wear and signs of mechanical damage to the teeth. Check the toothed timing belt for signs of wear, damage and signs of oiling. Assess the axial play of the camshafts (see Section Removal, condition check and installation of camshafts). Manually check for freedom of rotation of the tensioner pulley, then jerk it from side to side, checking for play in the bearing. Replace defective components.
2. Check the condition of the water pump (see chapter Cooling, heating systems).
Note. It would be wise to replace the pump, regardless of its condition.
Installation
1. Clear the surfaces located in area of a laying of a gas-distributing belt of dirt and oil. Wipe gears with acetone.
2. If removed, reinstall the removed timing gears (do not forget to put keys in your grooves). Tighten the mounting bolts to the required torque.
3. If removed, install the timing belt guide in its regular place on the crankshaft trunnion (chamfer from the belt). Install the crankshaft gear next.
4. Check the alignment of the alignment marks. Reinstall the timing belt - start by putting the belt on the crankshaft sprocket and tensioner pulley, then moving clockwise to the rear camshaft, water pump, front pulley and finally pull the belt over the idler pulley. If an old belt is installed, then the original direction of its rotation must be observed without fail.
Note. If the tensioner piston extends and the belt cannot be pulled onto the idler pulley, remove the tensioner and manually depress the piston.
5. Install the outer timing belt guide on top of the crankshaft gear with the chamfer out.

6. Tighten with the required effort the bolt of fastening of the intermediate roller. Unscrew the retaining tensioner, the long clamping bolt securing the battery.
7. Slowly turn the crankshaft clockwise by the pulley bolt six times to shrink the belt and return the engine to TDC. Make sure that the alignment marks of all shafts are correctly aligned.
Attention! If the slightest resistance occurs, turning the shaft should be suspended, returned to its original position and once again make sure that the marks are aligned correctly. Never try to overcome resistance by force!
8. Install the lower timing belt cover.
9. Reinstall the crankshaft pulley (make sure that the groove in its hub is aligned with the key inserted into the shaft trunnion). Screw in the mounting bolt and tighten it to the required force, blocking the pulley from turning with a chain or strap wrench.
10. Again make sure that all alignment marks are correctly aligned.
Attention! At the slightest violation of the correct alignment of the marks, repeat the procedure for installing the timing belt. Negligent attitude to the implementation of this requirement can lead to the most unfortunate consequences associated with a major engine repair!
11. Install the remaining components in the reverse order of their removal.
Timing Belt Tensioner Adjustment
1. There is usually no need to remove or adjust the tensioner when replacing the timing belt (if there was no extension of its piston). Removing the water pump requires the mandatory dismantling of the belt tensioner. When the tensioner is removed, its piston inevitably extends. The need to perform the procedures described below occurs only when the tensioner is removed.
2. To remove the tensioner, unscrew the long bolt fixing it, then unscrew the tensioner assembly from the cylinder block.
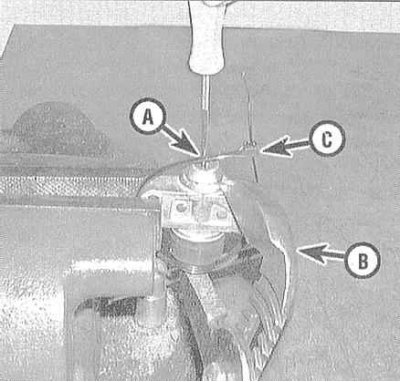
3. Clamp the tensioner by the flange (in no case for the body) in a vise so that it is turned with the service bolt up. Remove the service bolt. Pass a screwdriver with a long sting into the opened service hole, with which you begin to rotate the piston until it returns to its extreme position.
Attention! Try not to tilt the tensioner to prevent oil from leaking out of it. If necessary, add the required amount of fresh oil to the assembly. The total working volume of the tensioner is 6.6 ml.
4. At service stations, the tensioner piston is fixed in the recessed position using a special tool. In the absence of a suitable tool at hand, the piston can be blocked using adjustable pliers. At the same time, the assistant should wrap the body of the assembly with a strong nylon tape.
Attention! The piston fixing tape must be inserted between the jaws of the pliers and the end surface of the piston before the latter is recessed - the procedure is quite delicate and only a very experienced mechanic can perform it on the first try.

5. Replace the service bolt. Install the tensioner in its original place, making sure that the nylon tape fixing the piston does not come off. Screw fixing bolts and tighten them with the required effort. When you have finished installing the timing belt, bite the tape with side cutters and pull it out with tongs.