
HondaBook.ru
Auto companies Volkswagen Auto companies Ford Auto companies Lada Auto companies Skoda Auto companies BMW Auto companies Mazda Auto companies Peugeot
English Русский
Български
Беларускі
Український
Српски
Hrvatski
Română
Polski
Slovenský
Magyar
Bookmark Contacts Sitemap   


Accord Civic Fit / Jazz CR-V HR-V Others Articles
Accord 3 (1985-1989) Accord 6 (1997-2002)

Removal and installation of exhaust manifolds (Honda Accord 6)

  • Main
  • Honda Accord
  • 6 (1997-2002)
  • Power unit
  • Six-cylinder engines
  • Removal and installation of exhaust manifolds
0
Contents: Removal ⇊ Installation ⇊
Attention! Proceed with the procedure only after the power unit has completely cooled down.


Removal


1. Disconnect the negative cable from the battery.

Warning! If the car stereo system is equipped with a security code, make sure you have the correct combination to activate the audio system before disconnecting the battery!


2. Soak the manifold fasteners with a penetrating compound.

3. Chock the rear wheels. Set the parking brake and move the AT selector lever to the "P" position. Jack up the front of the car and place it on supports. Remove the lower splash shield.
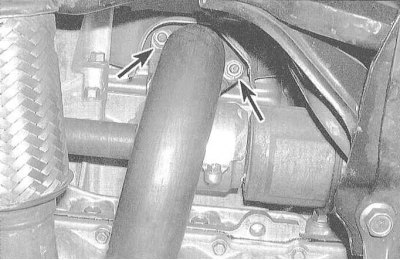
3. Chock the rear wheels. Set the parking brake…


4. Disconnect the exhaust pipes from the exhaust manifolds.

Note: It would also be wise to pre-soak the pipe fasteners with a penetrating compound.
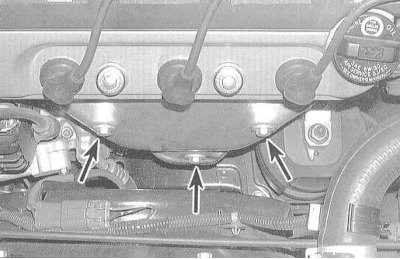

Note: It would also be wise to pre-soak the pipe…


5. Unscrew the mounting bolts and remove the heat shields from the exhaust manifolds (it is also advisable to pre-soak the fasteners with a penetrating compound).
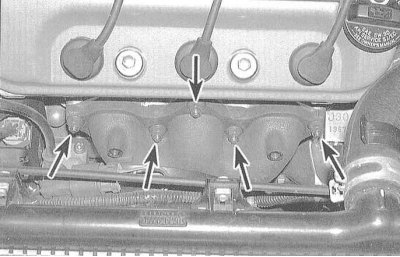


5. Unscrew the mounting bolts and remove the heat…


6. Loosen the self-locking nuts and remove the manifolds from the cylinder heads.

Note: Self-locking nuts must be replaced during assembly.


7. Carefully inspect both manifolds and their fasteners for cracks and other mechanical damage; replace defective parts.

Installation


1. Using a scraper, remove any remaining sealant and traces of old gasket material from the mating surfaces of the exhaust manifolds and cylinder heads. Wipe the surfaces with a rag soaked in acetone. If leaks are suspected, check the flatness of the manifolds and, if necessary, regrind any deformed components.

2. Place new gaskets onto the mounting studs embedded in the cylinder heads.

3. Install the manifolds, lubricate the studs with engine oil and screw on new self-locking mounting nuts. Working from the center of the manifold outward, moving from one fastener to the next in a diagonal order, tighten the nuts to the required torque in three stages.

Note: The manifolds are provided with identification marks in the form of the letters "F" (front) and "R" (rear) to prevent confusion of components.


4. The remaining components are installed in the reverse order of their removal.


5. Start the engine and check it for signs of exhaust gas leaks through the joints of the exhaust manifolds with the cylinder heads and the exhaust system receiving pipes.
This article is available at: russian, bulgarian, belarusian, ukrainian, serbian, croatian, romanian, polish, slovak, hungarian
This information has been verified: Timofey Goryachev
Share with friends:
◀ Previous
Accord 6: Six-cylinder engines
Next ▶

Removal and installation the intake manifold
Removal and installation cylinder head covers
Bringing the piston of the first cylinder to the top dead center (TDC) position
Preparatory actions and a list of repair procedures without removing the engine…
General information about six-cylinder engines
Removal, condition check and installation of the timing belt and timing drive…
Replacing the front crankshaft oil seal
VTEC System — General Information
Removal, condition check and installation of rocker arm assembly
Removal, condition check and installation of camshafts
See also other articles from Honda manuals:
Exhaust system control Honda Civic 3 and 4 (1983-1991)
Catalytic converter and exhaust system Honda Fit 1 (2001-2008)
Exhaust manifold — removal and installation Honda CR-V 1 (1995-2001, petrol)
Replacing the exhaust manifold Honda HR-V 1 (1998-2006, petrol)
Exhaust pipe/muffler replacement Honda Avancier 1 (1999-2003, petrol)
Link in different formats to this article
Comments and feedback from visitors
No comments yet


How much will 20 + 21 ?


Accord 6 (1997-2002) 
  • General information
  • Introduction to the guide
  • User manual
  • Maintenance
  • Power unit
  • Four-cylinder engines
  • Six-cylinder engines
  • Engine overhaul
  • Cooling system
  • Heater and air conditioner
  • Power and exhaust systems
  • Engine electrical equipment
  • Engine management
  • Transmission
  • Mechanical gearbox
  • Automatic gearbox
  • Clutch and drive shafts
  • Chassis and running gear
  • Brake system
  • Car suspension
  • Steering
  • Body and interior
  • Exterior (external elements)
  • Interior (internal elements)
  • Electrical equipment
  • Equipment and devices
  • Electrical circuits
Accord 3 (1985-1989) 
  • General information
  • Maintenance
  • Power unit
  • Engine adjustment
  • Engine repair
  • Engine electrics
  • Emission management
  • Engine management (carburetor)
  • Electronic injection
  • Programmable injection
  • Schematic of emission system
  • Fuel system
  • Feedback management
  • Transmission
  • Manual gearbox
  • Automatic gearbox
  • Clutch
  • Chassis and running gear
  • Front suspension
  • Rear suspension
  • Steering
  • Brake system
  • Electrical equipment
  • Ventilation and heating
  • Air conditioner
  • Cruise control system
  • Equipment and devices
HondaBook.ru © 2018–2026 • Mobile version • Sitemap: EN BG BY UA RS HR RO PL SK HU • Feedback • Driver Information • Search system • Bookmark
Accord 3 (1985-1989) • Accord 6 (1997-2002) • Civic 3 and 4 (1983-1991) • Civic 5 and 6 (1991-2000) • Civic 6 (1995-2000) • Civic 7 (2000-2005) • Civic 8 (2005-2011) • Fit 1 (2001-2008) • CR-V 1 (1995-2001) • CR-V 2 (2002-2006) • HR-V 1 (1998-2006) • Avancier 1 (1999-2003) •
 
This website uses cookies to ensure proper functioning. By clicking "OK," you agree.