
HondaBook.ru
Auto companies Volkswagen Auto companies Ford Auto companies Lada Auto companies Skoda Auto companies BMW Auto companies Mazda Auto companies Peugeot
English Русский
Български
Беларускі
Український
Српски
Hrvatski
Română
Polski
Slovenský
Magyar
Bookmark Contacts Sitemap   


Accord Civic Fit / Jazz CR-V HR-V Others Articles
Accord 3 (1985-1989) Accord 6 (1997-2002)

Throttle Control Cable (1984-88, Carburetor) (Honda Accord 3)

  • Main
  • Honda Accord
  • 3 (1985-1989)
  • Transmission
  • Automatic gearbox
  • Throttle Control Cable (1984-88, Carburetor)
0
1. Start the engine and let it warm up to operating temperature. Wait until the cooling fan turns on at least once.

2. Check that the throttle cable free play and idle speed are normal and that the automatic throttle control operates normally.

3. Check the distance between the throttle control lever and the bracket. Adjust if necessary.

4. Stop the engine and disconnect the cable from the negative terminal of the battery.

5. Disconnect the control cable from the throttle control lever.

6. If the car is equipped with an air damper, then you should disconnect the vacuum hose from it, connect a pump and pump out the air. This will provide the air damper with normal traction, as with a running engine.

7. Place an object weighing approximately 1.5 kg on the accelerator pedal. Lift and then lower the pedal. This will allow the weight of the load to eliminate the pedal's normal free play.

8. Secure the control cable with clamps.

9. Place the end of the throttle cable on the shock buffer.

10. Adjust the distance between the end of the cable and the lock nut closest to the cable housing to 85.5 mm. This applies to all models except the 1988 Prelude, where this distance should be 158 mm.
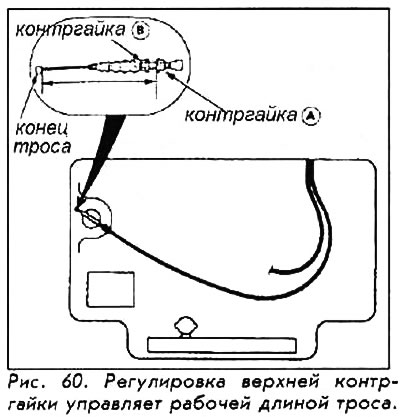
10. Adjust the distance between the end of the…


11. Insert the end of the throttle cable into the groove in the throttle control lever. Insert the cable into the bracket and secure it with the lock nut. The cable must not be kinked or twisted.


12. While pressing the accelerator pedal, check that the cable moves freely.

13. Remove the weight from the accelerator pedal, press the pedal and make sure that the free play of the throttle control lever is at least 2 mm.

14. Connect the wire to the negative battery terminal and the vacuum hose to the air damper.

15. Start the engine and check the synchronization of the carburetor with the throttle control cable. The throttle control lever should begin to move simultaneously with the increase in engine speed.
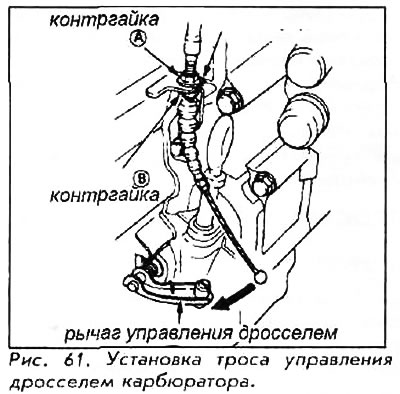
15. Start the engine and check the…


16. If the control lever begins to move before the engine speed starts to increase, then turn the lock nut near the cable housing counterclockwise and tighten the lock nut near the end of the cable again.
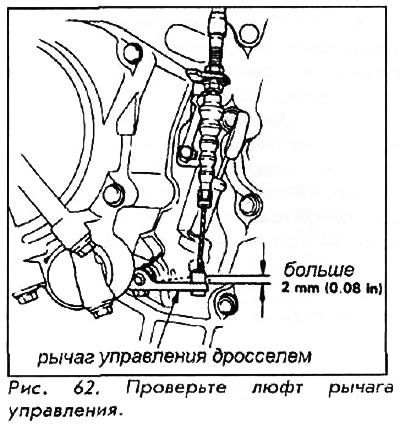
16. If the control lever begins to move before…


17. If the control lever begins to move later than the engine speed begins to increase, then turn the lock nut near the cable housing clockwise and tighten the lock nut near the end of the cable again.
This article is available at: russian, bulgarian, belarusian, ukrainian, serbian, croatian, romanian, polish, slovak, hungarian
This information has been verified: Yaroslav Shiryaev
Share with friends:
◀ Previous
Accord 3: Automatic gearbox
Next ▶

Throttle Control Cable Fastener (Carburetor)
Adjusting the shift cable
Transmission Removal and Installation — Prelude 1988-91
Transmission Removal and Installation — Accord 1990-91
Transmission Removal and Installation — Accord 1984-89, Prelude 1984-87
Throttle Control Cable (1989-91, Carburetor)
Throttle Control Cable (1985-88, Injection)
Throttle Control Cable (1989-91, Injection)
Reverse light switch
Tightening torques for threaded connections
See also other articles from Honda manuals:
Throttle Control — Cable Replacement Honda Civic 3 and 4 (1983-1991)
Gearbox control cable — adjustment Honda Fit 1 (2001-2008)
Adjusting the throttle cable Honda CR-V 2 (2002-2006, petrol)
Throttle cable Honda HR-V 1 (1998-2006, petrol)
Checking the throttle cable Honda Avancier 1 (1999-2003, petrol)
Link in different formats to this article
Comments and feedback from visitors
No comments yet


How much will 10 + 37 ?


Accord 6 (1997-2002) 
  • General information
  • Introduction to the guide
  • User manual
  • Maintenance
  • Power unit
  • Four-cylinder engines
  • Six-cylinder engines
  • Engine overhaul
  • Cooling system
  • Heater and air conditioner
  • Power and exhaust systems
  • Engine electrical equipment
  • Engine management
  • Transmission
  • Mechanical gearbox
  • Automatic gearbox
  • Clutch and drive shafts
  • Chassis and running gear
  • Brake system
  • Car suspension
  • Steering
  • Body and interior
  • Exterior (external elements)
  • Interior (internal elements)
  • Electrical equipment
  • Equipment and devices
  • Electrical circuits
Accord 3 (1985-1989) 
  • General information
  • Maintenance
  • Power unit
  • Engine adjustment
  • Engine repair
  • Engine electrics
  • Emission management
  • Engine management (carburetor)
  • Electronic injection
  • Programmable injection
  • Schematic of emission system
  • Fuel system
  • Feedback management
  • Transmission
  • Manual gearbox
  • Automatic gearbox
  • Clutch
  • Chassis and running gear
  • Front suspension
  • Rear suspension
  • Steering
  • Brake system
  • Electrical equipment
  • Ventilation and heating
  • Air conditioner
  • Cruise control system
  • Equipment and devices
HondaBook.ru © 2018–2026 • Mobile version • Sitemap: EN BG BY UA RS HR RO PL SK HU • Feedback • Driver Information • Search system • Bookmark
Accord 3 (1985-1989) • Accord 6 (1997-2002) • Civic 3 and 4 (1983-1991) • Civic 5 and 6 (1991-2000) • Civic 6 (1995-2000) • Civic 7 (2000-2005) • Civic 8 (2005-2011) • Fit 1 (2001-2008) • CR-V 1 (1995-2001) • CR-V 2 (2002-2006) • HR-V 1 (1998-2006) • Avancier 1 (1999-2003) •
 
This website uses cookies to ensure proper functioning. By clicking "OK," you agree.