
Contents: Removal ⇊ To install: ⇊
Removal
1. Disconnect the negative cable from the battery and transmission.
2. Drain the transmission fluid and replace the drain plug.
3. Disconnect the wiring from the starter, locking solenoids, shift solenoids and pulsator (pulse generator for measuring speed).
4. On fuel injected models, the air intake hose and air cleaner box must be removed.
5. Remove the speed sensor from the gearbox without disconnecting its hoses.
6. Disconnect the throttle control cable from the transmission bracket.
7. Disconnect the transmission cooling hoses from the pipes and plug the pipes.
8. Remove the upper transmission mounting bracket.
9. Unscrew the bolts securing the gearbox to the cylinder block. The bolts should be pulled out from the engine compartment.
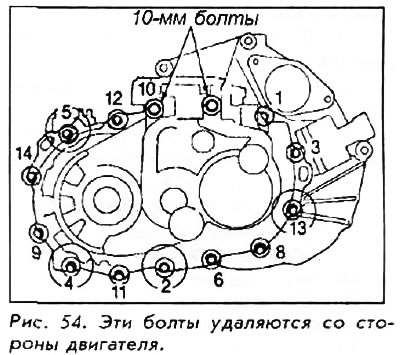
10. Raise and securely support the vehicle with stands. Check the reliability of the installation of the stands.
11. Remove the front wheels.
12. Remove the mudguard and center beam.
13. Remove the right thrust rod completely.
14. Remove the right and left half shafts and the secondary shaft.
15. Remove the engine stiffener and torque converter cover.
16. Remove the shift cable from the gearbox.
17. Unscrew the bolts from the drive disk.
18. Raise the gearbox with a suitable jack.
19. Remove the lower bolt from the rear engine mounting bracket. Loosen, but do not remove, the upper bolt, which will support the weight of the engine.
20. Unscrew the remaining bolts securing the gearbox to the engine.
21. Separate the transmission from the engine block. Remove the transmission from the two 14 mm pins and lower it.
To install:
22. Raise the gearbox to its original position and insert the mounting bolts. Tighten them to 65 Nm.
23. Attach the torque converter to the drive disc with the mounting bolts. Tighten each bolt in a crisscross pattern 2 turns at a time - first to 6 Nm, and finally to 12 Nm. After tightening the last bolt, check for rotation.
24. Bolt the gearbox to the rear engine support bracket. Tighten the bolts to 75 Nm.
25. Attach the shift cable with the control key and new cotter pin.
26. Install the torque converter cover and cable holder.
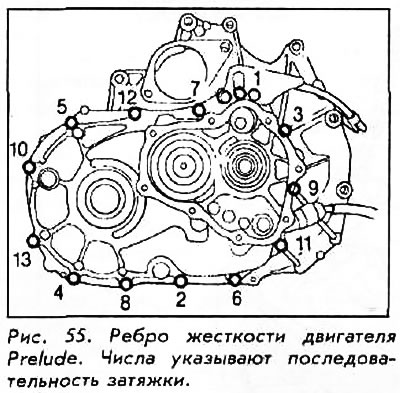
27. Install the engine stiffener. The stiffener mounting bolts should be tightened to 39 Nm in the order specified. First, tighten the uppermost stiffener mounting bolt to the gearbox housing, then the remaining stiffener-to-housing bolt. Then tighten the stiffener-to-cylinder block bolt closest to the gearbox, and then the remaining stiffener-to-cylinder block bolt.
28. Install the secondary shaft and axle shafts.
29. Install the center beam and the right and left front shock absorber forks.
30. Install the reaction rod on the gearbox side.
31. Install the gearbox support bracket and tighten the mounting bolts to 39 Nm.
32. Connect the locking solenoid valve connector, the shift solenoid valve plug and the pulsator connector.
33. Connect the throttle control cable to the throttle control lever.
34. Install the speed sensor assembly and air cleaner box.
35. Connect the oil cooling hoses. Connect the starter and ground wires.
36. Connect the wires to the battery.
37. Start the engine, apply the parking brake and shift the transmission through all gears three times. Pause briefly between each shift. Check that the control cable is adjusted correctly.
38. Allow the engine to warm up to operating temperature in N or P gear. Then stop the engine and check the fluid level.