
Contents: Removal ⇊ To install: ⇊
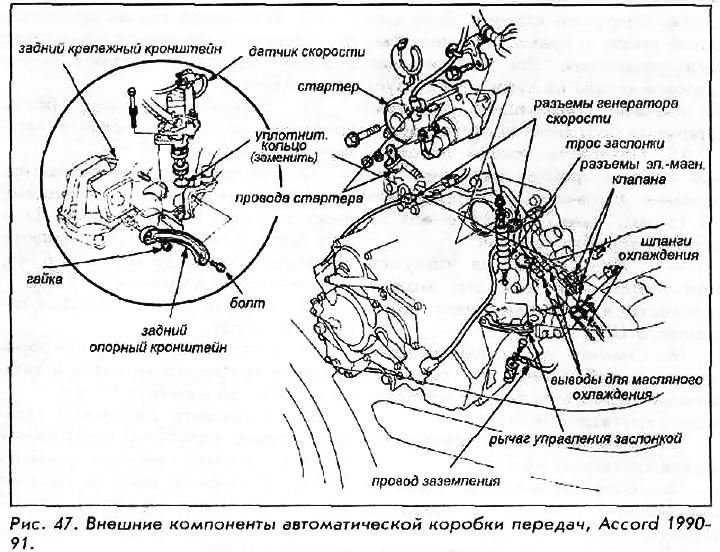
Removal
1. Disconnect the wires from the battery and remove the battery.
2. Raise and securely support the vehicle with stands.
3. Remove the air intake hose, air cleaner box and battery tray.
4. Disconnect the throttle cable from the throttle control lever.
5. Disconnect the transmission ground cable and speed sensor connectors.
6. Disconnect the starter wires and remove the starter.
7. Loosen the rear support bracket nut. Remove the bolt and then remove the rear support bracket.
8. Remove the speed sensor without disconnecting its hoses.
9. Disconnect the connectors of the locking solenoid valve and the control shift solenoid valve.
10. Drain the transmission fluid and reinstall the drain plug with a new washer.
11. Disconnect the transmission cooling hoses from the connecting pipes and plug them.
12. Remove the center beam.
13. Disconnect the oxygen sensor connector.
14. Remove the exhaust pipe and mudguard.
15. Remove the cotter pins and nuts from the lower arm ball joints. Use a suitable puller to separate the ball joints from the lower arms.
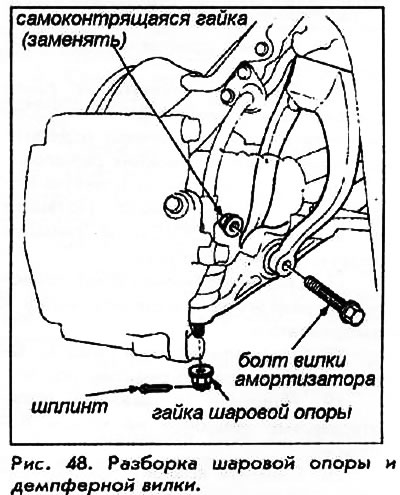
16. Pull the right and left half shafts out of the differential. Pull the inner CV joints and remove the right and left half shafts.
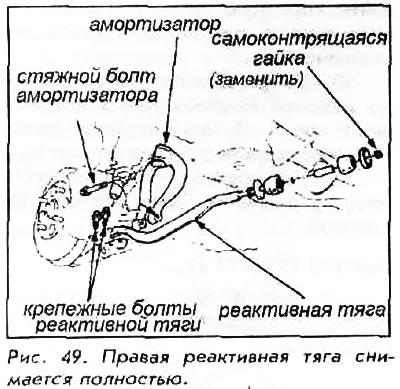
17. Remove the right shock absorber pinch bolt and separate the fork and shock absorber.
18. Unscrew the bolts and nut and then remove the right torque rod.
19. Place and tie plastic bags on the ends of the axle shafts.
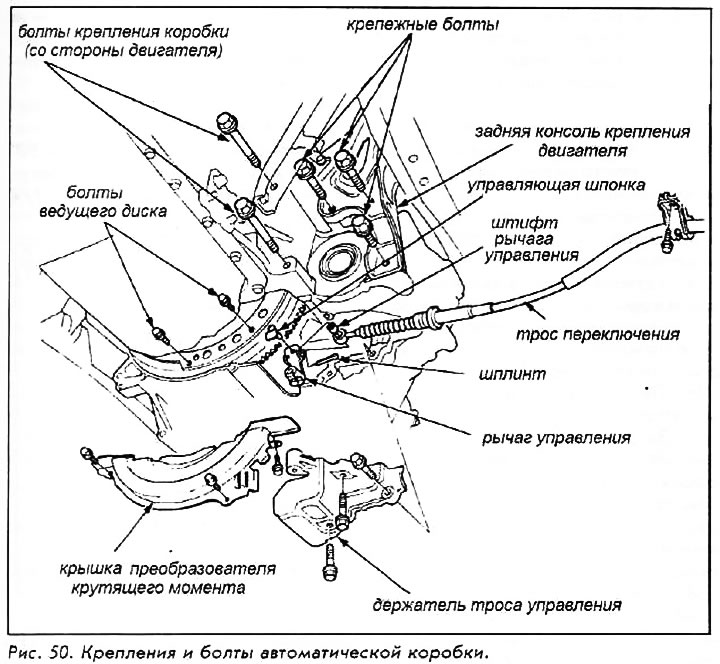
20. Remove the torque converter cover and shift cable holder.
21. Remove the shift cable from the control lever by removing the cotter pin, control key and control lever roller.
22. Remove the plug, unscrew the drive disk bolts one by one, turning the crankshaft pulley.
23. Unscrew the rear gearbox housing mounting bolts located on the engine side.
24. Remove the bolts from the rear engine mounting bracket.
25. Attach lifting equipment to the transmission lifting lugs. Raise the engine slightly to remove weight from the engine mounts.
26. Place a suitable jack under the transmission and lift it slightly to remove the weight from the mounts.
27. Unscrew the 4 gearbox housing mounting bolts and 3 mounting bracket nuts.
28. Move the transmission away from the engine until the 14mm pins are exposed and then lower the transmission onto the jack.
To install:
29. Check that the two 14mm pins are in place in the torque converter cover.
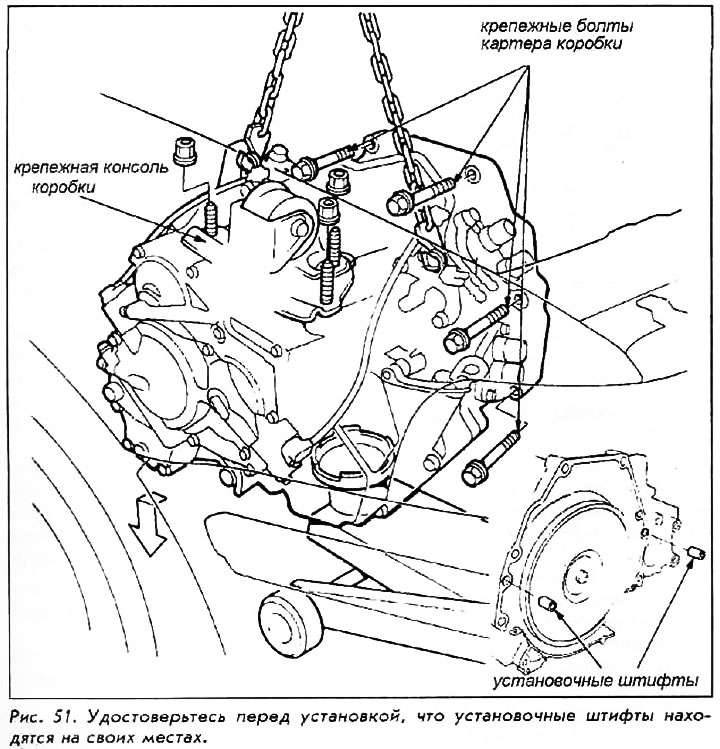
30. Raise the gearbox to its original position and insert the 4 gearbox housing mounting bolts. Tighten the bolts to 65 Nm.
31. Install the gearbox mounting bracket and tighten the nuts to 39 Nm.
32. Remove the transmission jack.
33. Insert the 2 crankcase mounting bolts from the engine side and tighten them to 65 Nm. Insert the rear engine mounting bracket bolts and tighten them to 55 Nm.
34. Attach the torque converter to the drive disc with eight bolts. Tighten them crosswise in two stages - first to 6 Nm, and finally to 12 Nm. After tightening the last bolt, check for rotation.
35. Install the shift cable and its holder. Tighten the cable holder bolts to 18 Nm.
36. Install the torque converter cover and tighten the bolts to 12 Nm.
37. Remove lifting equipment.
38. Install the reaction rod. Tighten the mounting bolts to 105 Nm and the nut to 44 Nm.
39. Install the shock absorber fork. Tighten the shock absorber clamp bolt to 4L Nm.
40. Install a new locating ring onto the end of each axle shaft.
41. Rotate the right steering knuckle fully outward and insert the axle into the differential until the spring clip snaps into the differential side gear. Repeat this procedure on the left side.
42. Insert the shock absorber fork bolts and ball joint nuts into the lower arms. Tighten the nut to 55 Nm, holding the shock absorber fork bolt from turning. Tighten the ball joint nut to 55 Nm and insert a new cotter pin.
43. Install the mudguard, center beam and exhaust pipe. Tighten the center beam bolts to 39 Nm.
44. Connect the oxygen sensor connector.
45. Install the speed sensor and tighten the bolt to 18 Nm.
46. Install the rear support bracket. Tighten the mounting bolt first to 39 Nm, then tighten the nut to 21 Nm.
47. Install the starter. Connect the starter wires.
48. Connect the connectors of the locking solenoid valve and the control solenoid valve for switching.
49. Connect the speed sensor connectors and the gearbox ground wire.
50. Connect the transmission cooling hoses to the pipes.
51. Install the battery tray, air cleaner box and air intake hose. Install the battery.
52. Install the wheels, lower the car and connect the wires to the battery terminals.
53. Fill the gearbox with the required amount of the appropriate fluid.
54. Start the engine, apply the parking brake and shift the transmission through all gears 3 times. Pause briefly before each shift. Check that the control cable is adjusted correctly.
55. Allow the engine to warm up to operating temperature in position N or P, then stop the engine and check the fluid level.
[The original is located on the website: HONDABOOK]