
Withdrawal
1. Disconnect a wire from the negative plug of the storage battery and a transmission.
2. Unlock the steering and shift the transmission to neutral (N).
3. Disconnect a wire from the positive plug of the storage battery and then from a starter. Disconnect the wire from the starter solenoid.
4. Disconnect and muffle transmission cooling hoses.
5. Remove a starter and turn off the top fixing bolt of a transmission.
6. Raise and securely support the vehicle. Additionally, check the reliability of the installation of stands.
7. Remove the front wheels.
8. Drain the fluid from the gearbox and screw back the drain plug with a new washer.
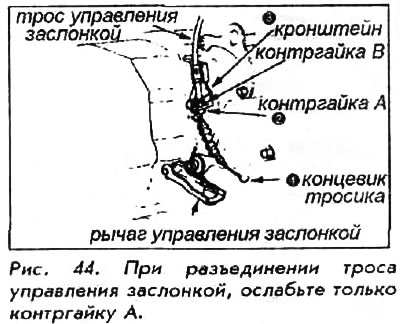
9. Remove the throttle control cable. To do this, remove the end of the cable from the throttle lever, loosen the locknut closest to the end of the cable, and remove the cable from the bracket.
10. Remove the power steering speed sensor along with the speedometer cable and hoses.
11. Turn off two top fixing bolts of a transmission.
12. Place a suitable gearbox jack under the gearbox. Winch the engine and lift it up slightly to take the weight off the engine mounts.
13. Remove the central beam of the subframe and mudguard. 14. Remove the ball joint pinch bolt from the right lower control arm. Use a proper size puller to remove the ball joint from the knuckle. Loosen the shock absorber bolt.
15. Turn the right knuckle to the outermost position. Pull the CV joint about 13 mm, then pull it out of the gearbox housing.
Do not put pressure on the axle shaft or fist, as this may lead to the disconnection of the inner CV joint.
16. Remove the transmission damper bracket located in front of the torque converter cover.
17. Remove the torque converter cover.
18. From the inside, remove the center console and switch indicator from the machine. It should be remembered that the car is on stands.
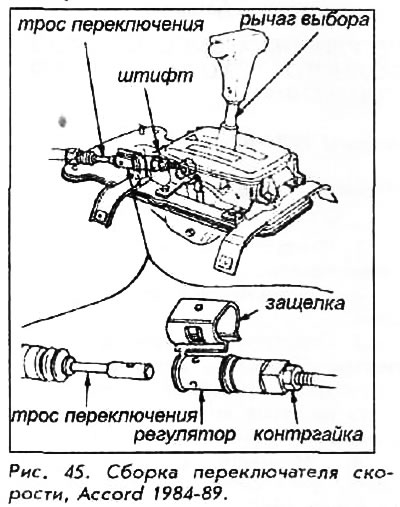
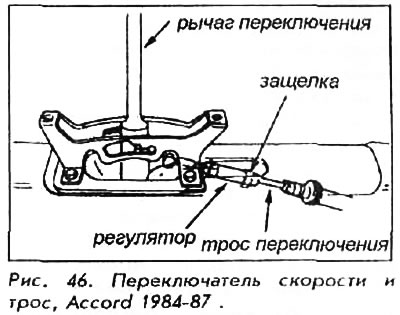
19. Remove the latch from the adjuster and shift cable. Remove both bolts and pull out the shift cable.
20. Remove the eight bolts securing the torque converter assembly to the drive plate.
21. Remove the three rear engine mounting bolts from the gearbox housing. Remove the rear engine mount.
22. Turn off two bolts from a forward support of a transmission.
23. Turn off the bottom bolt of fastening of a transmission.
24. Move the gearbox away from the engine until the two 14mm pins are exposed. Pull out the left side CV joint approximately 13 mm. Pull out the gearbox and lower it.
For installation:
25. Attach shift cable to shift lever with pin and then attach shift cable to crankcase edge with cable retainer and bolt. Tighten the bolt to 12 Nm.
26. Check that the two 14mm pins are in place in the gearbox housing.
27. Install new spring clips on the end of each axle.
28. Install the gearbox in its original position, aligning the pins with the holes in the block and the caps of the torque converter bolts with the holes in the drive plate. Insert the left axle into the differential with the gearbox raised towards the engine.
29. Insert the two lower gearbox mounting bolts, but do not tighten them.
30. Install the rear engine mounting brackets on the gearbox housing and tighten the bolts to 39 Nm.
31. Insert the front gearbox mounting bolts and tighten them to 39 Nm.
32. Attach the torque converter to the drive plate with eight 12mm bolts. Tighten the bolts crosswise in two steps, first to 6 Nm and finally to 12 Nm.
33. Remove the jack from under the gearbox.
34. Install the torque converter cover and tighten the bolts to 12 Nm.
35. Install the rubber anti-roll bar of the central beam and tighten the nuts to a torque of 55 Nm. Fit the anti-roll bar to the gearbox housing and tighten the 3 bolts to 31 Nm.
36. Remove the lifting gear from the engine.
37. Install the starter.
38. Install rear torque rod and brackets. Tighten the bracket mounting bolts to 65 Nm and the rod bolts to 75 Nm.
39. Turn the right steering knuckle fully outward and insert the axle into the differential until the spring clip snaps into place in the differential side gear.
40. Connect the ball joint to the knuckle and tighten the bolt to 55 Nm. Install the shock absorber fork and tighten the bolt to 44 Nm.
41. Install the speedometer cable. Align the key on the end of the cable with the groove in the holder. Install the clip so that the bent leg is on the side of the groove.
After installation, lightly pull on the speedometer cable to make sure it is secure. The cable must remain in place.
42. Install the wheels and lower the car.
43. Insert the remaining gearbox mounting bolts. Tighten all gearbox mounting bolts to 45 Nm.
44. Connect the gearbox cooling hoses and tighten the type bolts "banjo" up to 29 Nm.
45. Connect the positive battery cable to the starter, the solenoid wire to the solenoid, the water temperature sensor wire, and the ignition advance temperature sensor wire.
46. Connect the negative battery cable to the transmission.
47. Unscrew the dipstick from the top of the transmission cover and pour 3 liters of Dexron II ATF into the hole. Reinstall the dipstick.
If the torque converter was removed from the gearbox, then 6 liters of fluid should be poured.
48. Install and connect shift cable. Install the console.
49. Connect the negative cable to the battery, start the engine, apply the parking brake and shift the gearbox in all gears three times. Take a short break before each switch. Check that the shift cable is properly adjusted.
50. Let the engine warm up to operating temperature in the N or P position. Then stop the engine and check the fluid level.
51. Install and adjust the throttle cable.