
HondaBook.ru
Auto companies Volkswagen Auto companies Ford Auto companies Lada Auto companies Skoda Auto companies BMW Auto companies Mazda Auto companies Peugeot
English Русский
Български
Беларускі
Український
Српски
Hrvatski
Română
Polski
Slovenský
Magyar
Bookmark Contacts Sitemap   


Accord Civic Fit / Jazz CR-V HR-V Others Articles
CR-V 1 (1995-2001, petrol) CR-V 2 (2002-2006, petrol)

Replacing the parking brake pads — assembly (Honda CR-V 2)

  • Main
  • Honda CR-V
  • 2 (2002-2006, petrol)
  • Chassis and running gear
  • Brake system
  • Replacing the parking brake pads — assembly
0
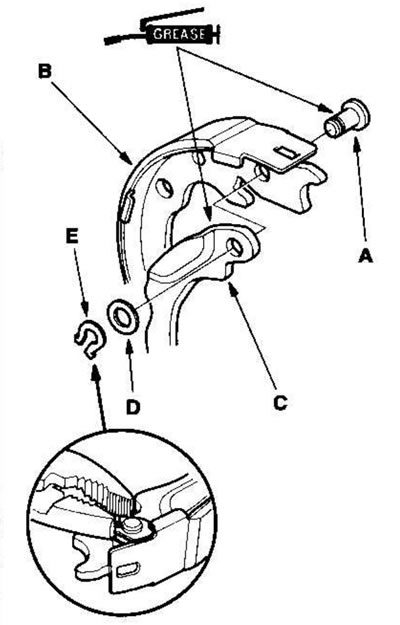
1. Apply Molykote 44 MA grease to the sliding surface of the axle (A) and insert the axle into the driven brake shoe (B).

1. Apply Molykote 44 MA grease to the sliding…


2. Install the parking brake lever (C) and wave washer (D) onto the axle and secure with a U-clamp (E).
  • Place the wave washer with the convex side facing out.
  • To prevent the axle from coming off the brake shoe, tighten the U-clamp securely.

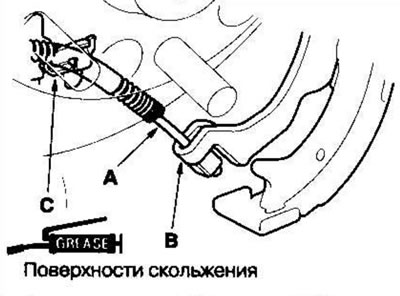
3. Connect the parking brake cable (A) to the parking brake lever (B). Apply silicone grease to the contact surface of the cable (C) on the support plate.
3. Connect the parking brake cable (A) to the…


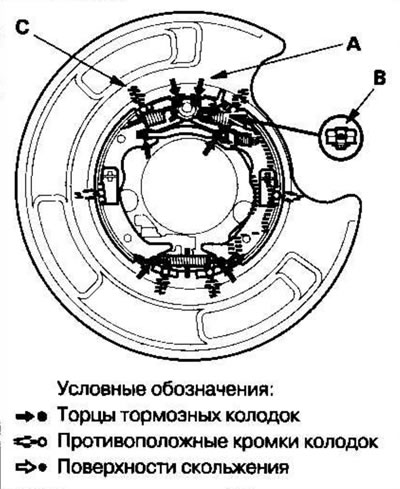
4. Apply Molykote 44 MA grease to the ends of the brake pads (A), sliding surfaces (B) and opposite edges of the pads (C) as shown in the figure. Remove excess. Avoid contact of lubricant with friction surfaces.


4. Apply Molykote 44 MA grease to the ends of the…


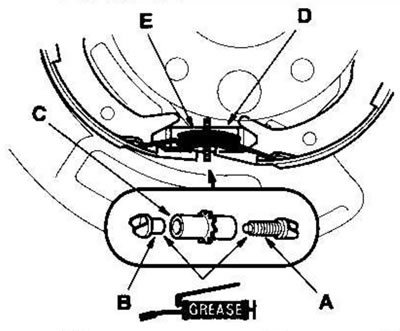
5. Clean the threaded areas of the shackle (A) and apply lubricant to the threads of the shackle. Clean the sliding surface of the shackle (B) and apply grease to the sliding surface of the shackle (B). Mount the shackles (A) and (B) on the adjuster (C) and shorten the shackle (A) by turning the adjuster.
5. Clean the threaded areas of the shackle (A)…


6. Install the brake shoe adjuster assembly (D) and hook the lower return spring (E) to the parking brake shoes.

7. Hook the spring (A) onto the connecting rod (B) first with the end of the spring (C) pointing downwards. Then hook the tie rod spring onto the parking brake shoe and install the tie rod onto the parking brake shoes.
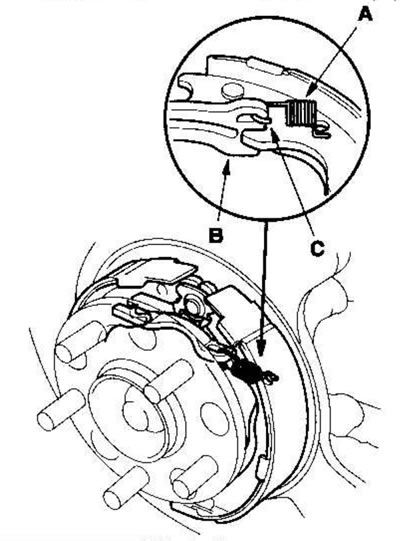
7. Hook the spring (A) onto the connecting rod…


8. Install the tension pins (A) and detent springs (B). Make sure that the tension pins do not contact the parking brake lever.
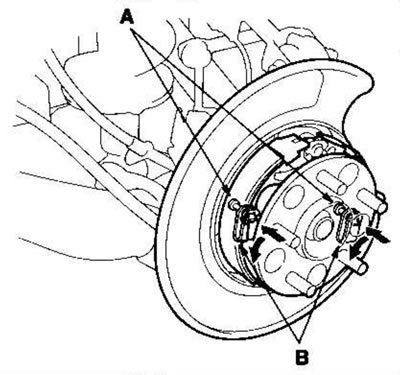


8. Install the tension pins (A) and detent…


9. Attach the upper return springs (A).
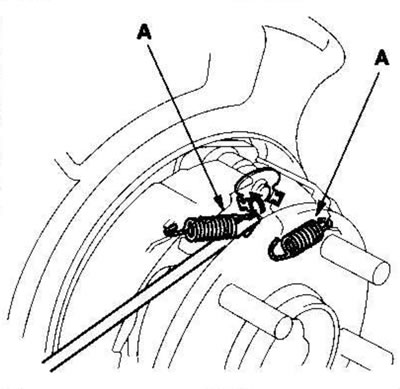
9. Attach the upper return springs (A).


10. Install the rear disc/drum and brake caliper.

11. Perform major adjustment of the parking brake.

(Full version on the source website: hondabook.ru)
This article is available at: russian, bulgarian, belarusian, ukrainian, serbian, croatian, romanian, polish, slovak, hungarian
This information has been verified: Mikhail Kopasov
Share with friends:
◀ Previous
CR-V 2: Brake system
Next ▶

Replacing the parking brake pads — disassembly
Checking the parking brake drum and shoes
Parking brake
Repair of the rear wheel brake caliper
Checking the thickness and parallelism of the rear wheel brake disc
Running-in of friction lining surfaces
Checking brake hoses and pipes
Replacing brake hoses
Replacing the parking brake cable
ABS system components
See also other articles from Honda manuals:
Replacing the parking brake cables Honda Accord 6 (1997-2002)
Replacing the parking brake cable Honda Civic 3 and 4 (1983-1991)
Replacing the front brake pads Honda Fit 1 (2001-2008)
Front Brake Pads — Checking and Replacing Honda HR-V 1 (1998-2006, petrol)
Front Brake Pads — Checking and Replacing Honda Avancier 1 (1999-2003, petrol)
Link in different formats to this article
Comments and feedback from visitors
No comments yet


How much will 22 + 29 ?


CR-V 2 (2002-2006, petrol) 
  • General information
  • User manual
  • Technical data
  • Maintenance
  • Power unit
  • Engine repair
  • Lubrication system
  • Cooling system
  • Exhaust system
  • Fuel system
  • Engine management
  • Engine electrical equipment
  • Transmission
  • Clutch
  • Manual gearbox
  • Automatic gearbox
  • Rear differential
  • Drive shafts
  • Chassis and running gear
  • Steering
  • Front suspension
  • Rear suspension
  • Brake system
  • Body and interior
  • Exterior (external elements)
  • Interior (internal elements)
  • Doors, locks and windows
CR-V 1 (1995-2001, petrol) 
  • General information
  • Maintenance
  • Tips for car owner
  • Power unit
  • Engine repair
  • Engine overhaul
  • Cooling and lubrication system
  • Engine electrical equipment
  • Control system
  • Fuel system
  • Transmission
  • Clutch and drive shafts
  • Car gearbox
  • Chassis and running gear
  • Front suspension
  • Rear suspension
  • Steering
  • Brake system
  • Body and interior
  • Body service
  • Exterior (external elements)
  • Interior (internal elements)
  • Electrical equipment
  • Equipment and devices
  • Electrical circuits
HondaBook.ru © 2018–2026 • Mobile version • Sitemap: EN BG BY UA RS HR RO PL SK HU • Feedback • Driver Information • Search system • Bookmark
Accord 3 (1985-1989) • Accord 6 (1997-2002) • Civic 3 and 4 (1983-1991) • Civic 5 and 6 (1991-2000) • Civic 6 (1995-2000) • Civic 7 (2000-2005) • Civic 8 (2005-2011) • Fit 1 (2001-2008) • CR-V 1 (1995-2001) • CR-V 2 (2002-2006) • HR-V 1 (1998-2006) • Avancier 1 (1999-2003) •
 
This website uses cookies to ensure proper functioning. By clicking "OK," you agree.