HondaBook.ru
Auto companies Volkswagen Auto companies Ford Auto companies Lada Auto companies Skoda Auto companies BMW Auto companies Mazda Auto companies Peugeot
English Русский
Български
Беларускі
Український
Српски
Hrvatski
Română
Polski
Slovenský
Magyar
Bookmark Contacts Sitemap   


Accord Civic Fit / Jazz CR-V HR-V Others Articles
HR-V 1 (1998-2006, petrol)

Checking and adjusting the ignition timing angle (Honda HR-V 1)

  • Main
  • Honda HR-V
  • 1 (1998-2006, petrol)
  • Power unit
  • Engine electrical equipment
  • Checking and adjusting the ignition timing angle
0
1. Check the idle speed and adjust if necessary.

2. Remove the 2-pin diagnostic connector (BROWN and BLACK wires), then insert the shorting jumper (P/N 07PAZ-0010100) into it.

3. Start the engine. Maintain the speed at 3000 rpm (min⁻¹) without load with the selector lever in the N or P position until the radiator fan comes on, then let it idle.

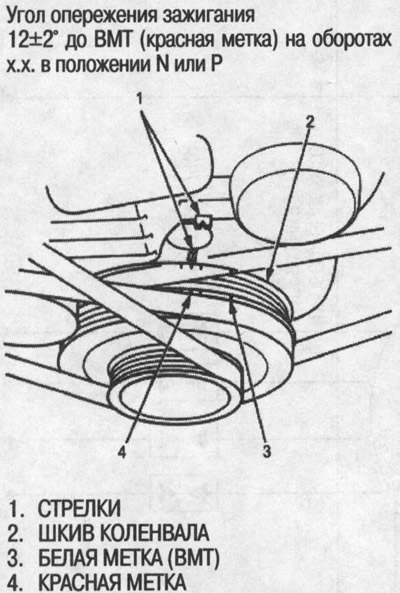
4. Connect the timing light to the high tension wire #1, then aim the timing light at the arrow on the timing belt cover.

5. Check the ignition timing without load, with the headlights, fan, rear window defroster and air conditioner off.

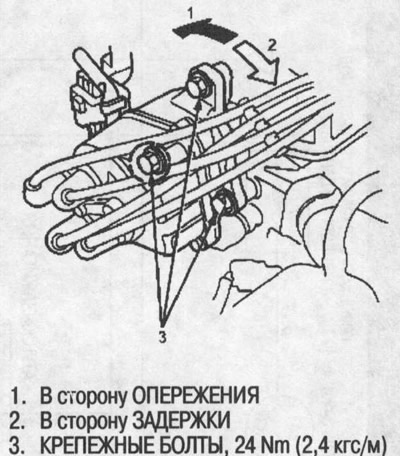
6. If necessary, adjust the ignition timing as follows: Loosen the distributor mounting bolts and turn the distributor housing counterclockwise for advanced ignition or clockwise for retarded ignition.

7. Tighten the distributor mounting bolts and recheck the ignition timing.

8. Remove the jumper from the diagnostic connector.
8. Remove the jumper from the diagnostic…


[Publication reprinted from the website: www.hondabook.ru]
This article is available at: russian, bulgarian, belarusian, ukrainian, serbian, croatian, romanian, polish, slovak, hungarian
This information has been verified: Emil Safonov
Share with friends:
◀ Previous
HR-V 1: Engine electrical equipment
Next ▶

Ignition system — basic information
Checking the starter operation
Assembling the starter
Testing the starter brush holder
Checking and testing the starter rotor
Replacing the ignition distributor
Ignition distributor repair
Testing the ignition coil
Checking and testing high voltage wires
Checking spark plugs
See also other articles from Honda manuals:
Ignition timing — checking and adjustment Honda Accord 3 (1985-1989)
Checking the installation and adjusting the ignition timing angle Honda Civic 6 (1995-2000)
Checking the ignition timing angle Honda Fit 1 (2001-2008)
Setting the ignition timing Honda CR-V 1 (1995-2001, petrol)
Checking the ignition timing angle Honda Avancier 1 (1999-2003, petrol)
Link in different formats to this article
Comments and feedback from visitors
No comments yet


How much will 42 + 11 ?


HR-V 1 (1998-2006, petrol) 
  • General information
  • User manual
  • Maintenance
  • Power unit
  • Engine repair
  • Lubrication system
  • Cooling system
  • Fuel injection and control
  • Power and exhaust system
  • Engine electrical equipment
  • Transmission
  • Clutch
  • Mechanical gearbox
  • Automatic gearbox
  • Rear differential
  • Drive shafts and cardan
  • Chassis and running gear
  • Steering
  • Car suspension
  • Brake system
  • Body and interior
  • Exterior (external elements)
  • Interior (internal elements)
  • Doors, locks and windows
  • Electrical equipment
  • Equipment and devices
  • Lighting system
  • Electrical circuits
HondaBook.ru © 2018–2026 • Mobile version • Sitemap: EN BG BY UA RS HR RO PL SK HU • Feedback • Driver Information • Search system • Bookmark
Accord 3 (1985-1989) • Accord 6 (1997-2002) • Civic 3 and 4 (1983-1991) • Civic 5 and 6 (1991-2000) • Civic 6 (1995-2000) • Civic 7 (2000-2005) • Civic 8 (2005-2011) • Fit 1 (2001-2008) • CR-V 1 (1995-2001) • CR-V 2 (2002-2006) • HR-V 1 (1998-2006) • Avancier 1 (1999-2003) •
 
This website uses cookies to ensure proper functioning. By clicking "OK," you agree.