
HondaBook.ru
Auto companies Volkswagen Auto companies Ford Auto companies Lada Auto companies Skoda Auto companies BMW Auto companies Mazda Auto companies Peugeot
English Русский
Български
Беларускі
Український
Српски
Hrvatski
Română
Polski
Slovenský
Magyar
Bookmark Contacts Sitemap   


Accord Civic Fit / Jazz CR-V HR-V Others Articles
CR-V 1 (1995-2001, petrol) CR-V 2 (2002-2006, petrol)

Checking the timing chain (Honda CR-V 2)

  • Main
  • Honda CR-V
  • 2 (2002-2006, petrol)
  • Power unit
  • Engine repair
  • Checking the timing chain
0
1. Remove the front wheels.

2. Remove the mud deflector.

3. Remove the drive belt.

4. Remove the cover from the cylinder head.

5. Remove the pulley from the crankshaft.

6. Disconnect the connector from the crankshaft position (CKP) sensor and the connector from the electronic variable valve timing (VTC) oil solenoid valve sensor.

7. Remove the VTC oil solenoid valve.

8. Support the engine with a jack, placing a wooden block under the oil pan.

9. Disconnect the ground cable and remove the top bracket.

10. Remove the side engine mount bracket.

11. Remove the chain cover.

12. Measure the length of the tensioner rod.

If the length is different from the standard, replace the timing chain and oil pump drive chain.
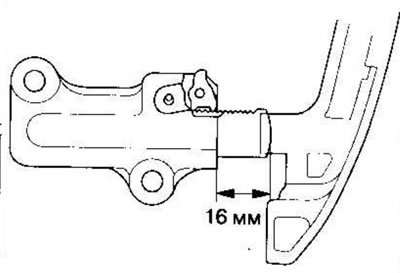
If the length is different from the standard,…


Tensioner rod length: limit - 16 mm

13. Check if the chain cover seal is damaged. If the seal is damaged, replace it.

14. Remove old sealant from the mating surfaces of the chain cover, bolts and bolt holes.

15. Clean and dry the contact surfaces of the chain cover.

16. Apply sealant, P/N 08C70-K0234M, 08C70-K0334M or 08C70-X0331S, evenly to the contact surface of the cylinder block under the chain cover and to the internal threads of the holes.


17. Apply sealant to the contact areas on the top of the cylinder block under the chain cover.

18. Apply sealant, P/N 08C70-K0234M or 08C70-X0331S, evenly to the oil pan contact surface under the chain cover and to the internal threads of the holes.

Note: Do not install components if more than 5 minutes have passed since applying the sealant. Instead, reapply the sealant, removing any traces of the old one.


19. Insert the new O-ring into the chain cover. Place the edge of the chain cover on the edge of the oil pan, then install the chain cover onto the cylinder block.

Note: When installing the chain cover, do not allow its bottom surface to slide on the contact surface of the oil pan.


20. Install the side engine mount bracket.

21. Install the top bracket and connect the ground cable.

22. Install the VTC oil solenoid valve.

23. Connect the connector to the crankshaft position sensor (CKP) and the connector to the VTC oil solenoid valve sensor.

24. Place the pulley on the crankshaft.

25. Install the cover on the cylinder head.

26. Put on the drive belt.

27. Install the mudguard.

28. Install the front wheels.

(Information obtained from this source: HondaBook.ru)
This article is available at: russian, bulgarian, belarusian, ukrainian, serbian, croatian, romanian, polish, slovak, hungarian
This information has been verified: Mikhail Kopasov
Share with friends:
◀ Previous
CR-V 2: Engine repair
Next ▶

Installing the oil seal in the chain cover
Removal/installing automatic tensioner
Installing the timing chain
Removal the timing chain
Removal and installation the crankshaft pulley
Removal the cylinder head cover
Removal the cylinder head
Replacing VTC drive, exhaust camshaft sprocket
Checking the cylinder head for warpage
Removal the valve rocker arms as an assembly
See also other articles from Honda manuals:
Ignition timing — checking and adjustment Honda Accord 3 (1985-1989)
Installing the timing chain housing oil seal Honda Civic 8 (2005-2011)
Checking the ignition timing angle Honda Fit 1 (2001-2008)
Checking and adjusting the ignition timing angle Honda HR-V 1 (1998-2006, petrol)
Checking the timing belt Honda Avancier 1 (1999-2003, petrol)
Link in different formats to this article
Comments and feedback from visitors
No comments yet


How much will 23 + 14 ?


CR-V 2 (2002-2006, petrol) 
  • General information
  • User manual
  • Technical data
  • Maintenance
  • Power unit
  • Engine repair
  • Lubrication system
  • Cooling system
  • Exhaust system
  • Fuel system
  • Engine management
  • Engine electrical equipment
  • Transmission
  • Clutch
  • Manual gearbox
  • Automatic gearbox
  • Rear differential
  • Drive shafts
  • Chassis and running gear
  • Steering
  • Front suspension
  • Rear suspension
  • Brake system
  • Body and interior
  • Exterior (external elements)
  • Interior (internal elements)
  • Doors, locks and windows
CR-V 1 (1995-2001, petrol) 
  • General information
  • Maintenance
  • Tips for car owner
  • Power unit
  • Engine repair
  • Engine overhaul
  • Cooling and lubrication system
  • Engine electrical equipment
  • Control system
  • Fuel system
  • Transmission
  • Clutch and drive shafts
  • Car gearbox
  • Chassis and running gear
  • Front suspension
  • Rear suspension
  • Steering
  • Brake system
  • Body and interior
  • Body service
  • Exterior (external elements)
  • Interior (internal elements)
  • Electrical equipment
  • Equipment and devices
  • Electrical circuits
HondaBook.ru © 2018–2026 • Mobile version • Sitemap: EN BG BY UA RS HR RO PL SK HU • Feedback • Driver Information • Search system • Bookmark
Accord 3 (1985-1989) • Accord 6 (1997-2002) • Civic 3 and 4 (1983-1991) • Civic 5 and 6 (1991-2000) • Civic 6 (1995-2000) • Civic 7 (2000-2005) • Civic 8 (2005-2011) • Fit 1 (2001-2008) • CR-V 1 (1995-2001) • CR-V 2 (2002-2006) • HR-V 1 (1998-2006) • Avancier 1 (1999-2003) •
 
This website uses cookies to ensure proper functioning. By clicking "OK," you agree.