
Ideally, the air-fuel mixture ignites and begins to expand rapidly as soon as the piston passes top dead center (TDC or TDC). If this is the case, then the piston will begin its movement just at the moment when the compressed and ignited air-fuel mixture begins to expand. The expanding gas will press on the piston and drive the crankshaft.
It takes a fraction of a second for the spark to completely ignite the mixture in the cylinder. Because of this, you need to apply a spark a little before the piston reaches TDC, so that the mixture is completely ignited by the time the piston passes TDC. This measurement is given in degrees of crankshaft rotation before the piston reaches TDC (before TDC or BTDC). If the ignition is set to 6°before TDC, this means that the spark plug should spark when the piston of that cylinder is 6°from the end of the compression movement. But this is true only for idle mode. When accelerating relative to idle, the engine speed increases. The increase in RPM means the pistons are now moving up and down even faster. Because of this, the spark plugs must spark even earlier in order for the mixture to be fully ignited by the time the piston passes TDC. To meet this requirement, the system has means to advance the ignition timing appropriately as speed increases.
The mechanical distributor has two mechanisms for advancing the ignition. The first is the centrifuge advance mechanism, which is driven by weights in the distributor. The other is a vacuum advance mechanism and is housed in a large round housing on the side of the distributor. Fully electronic systems use an electronic engine control unit (ECU), to control the trigger signal to the coil. A computer can provide much more precise ignition control than mechanical units.
In addition, some Honda distributors have a vacuum ignition advance mechanism that is housed in the same housing on the side of the distributor as the vacuum ignition advance mechanism. Models with two hoses going to the distributor vacuum boot have both vacuum mechanisms: both ignition advance and ignition retard. The function of this mechanism is to regulate the ignition timing at certain (one or the other) engine operating conditions. This allows a more complete combustion of the fuel-air mixture in the cylinder and therefore reduces exhaust.
If the ignition timing is set too far, ignition and combustion of the air-fuel mixture in the cylinder will prevent the piston from moving upwards. It causes "knocking" sound in the engine, a sound like a coffee grinder. If the torque is too delayed, the piston will already start to move down when the air-fuel mixture is ignited. This will cause the piston to move down with much less power. This will result in poor engine performance and poor fuel consumption.
Check and adjustment
On 1984-91 vehicles, check and adjust ignition timing (if it is needed) after every 100,000 km of run.
1984-89 Accord, 1984-87 Prelude, 1988 Prelude (carburetor)
Timing marks are located on the flywheel (mechanical box) or on the plate of the torque converter (automatic transmission), with a pointer on the back of the cylinder block. All of them are visible from the front right side of the engine compartment after removing the special rubber cover from the timing marks window. In all cases, the timing is checked with the engine warmed up to operating temperature and idling.
1. Stop the engine and install the tachometer on the engine. The positive wire is connected. with the output of the ignition coil that goes to the distributor, and "minus" - good grounding (or mass), like some kind of bolt on the engine.
2. Following the manufacturer's instructions, install the stroboscope on the engine. Connect the positive and negative wires to the appropriate battery terminals and the spark plug wire to the number 1 spark plug wire.
3. Make sure no wires touch the cooling fan or hot exhaust pipes.
4. Set the handbrake and block the front wheels. Start the engine. Check that the idle speed is set to the specifications for the neutral position (manual transmission) or Drive (Automatic transmission).
5. If the distributor is equipped with a vacuum ignition advance mechanism, it is necessary to mark and disconnect the vacuum line (s), clog it (their) and re-install on the vacuum ignition timing mechanism.
At any engine speed different from the specified one, the ignition timing advance and retard mechanisms will be activated, which will lead to an erroneous adjustment of the ignition timing.
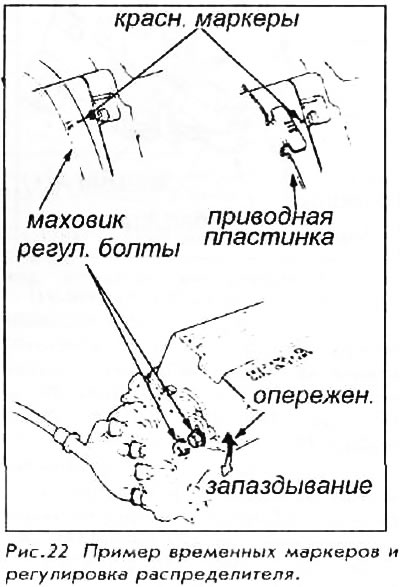
6. Aim the strobe at the timing marks. A flywheel or control plate may have more than one mark. If there is more than one mark, then the red mark must be used to adjust the lead time. A white line or label indicates TDC or 0°. When the engine is idling, the red mark should line up with the pointer. Some timing markers are indicated by three lines; then the central one should coincide with the pointer.
7. If you need to adjust the timing, then you need to loosen the bolt (s) retaining distributor and/or nut (And) and slowly rotate the distributor in the required direction while observing the marks.
CAUTION: Do not grasp the top cover of the distributor while the engine is running as you may receive a dangerous electric shock. Instead, grasp the distributor mount to rotate it.
Some models are equipped with two bolts, others with a bolt and nut that can be loosened to adjust ignition timing. If there is a smaller bolt on the underside of the distributor's rotating mounting plate, this bolt does not need to be loosened unless you are unable to achieve a satisfactory adjustment with the top bolt. This (less) the bolt is intended to provide an additional adjustment range, for example, in cases where the distributor has been removed and then installed with a one tooth offset.
8. To complete the adjustment procedure, tighten the retaining (fixing) bolts, take care not to knock off the setting. If there is a vacuum ignition advance mechanism, then remove (previously established) plug and install the vacuum line (s).
9. Turn off the engine. Replace the rubber cover on the timing window and disconnect the test equipment.
1988 Prelude Si, 1989-91 Prelude, 1990-91 Accord
Timing on these cars is computer controlled. There is no need to regularly adjust the timing during normal maintenance.
1. Remove the rubber cover from the timing window on the back of the engine.
2. Start the engine and let it warm up. The engine is fully warmed up if the cooling fan has turned on at least once. Turn off the engine.
3. Remove the cap from the test port. On Prelude vehicles, the cover is yellow and the connector is located just behind the ignition coil. The Accord has a blue connector. The connector on the Accord is located behind the dash panel on the right side, under the dashboard. Use a shorting wire to connect the two pins of the service connector.
4. Following the manufacturers instructions, install the stroboscope on the engine. Connect the positive and negative wires to the appropriate battery terminals and the spark plug wire to the number 1 spark plug wire.
5. Make sure no wires touch the cooling fan or hot exhaust pipes.
6. Set the handbrake and block the front wheels. Start the engine. Check that the idle speed is set to the specifications for the neutral position (Manual Transmission) or Drive (Automatic transmission).
7. Aim the strobe at the timing marks. A flywheel or plate may have more than one mark. If there is more than one mark, then the red mark must be used to adjust the lead time. A white line or label indicates TDC or 0°. When the engine is idling, the red mark should line up with the pointer. Some timing marks are indicated by three lines; then the central one should coincide with the pointer.
8. If you need to adjust the timing, then you need to loosen the bolt (s) retaining distributor and/or nut (And) and slowly rotate the distributor in the required direction while observing the marks.
9. To complete the adjustment procedure, tighten the retaining (fixing) bolts, take care not to knock off the setting. If there is a vacuum ignition advance mechanism, then remove (previously established) plug and install the vacuum line (s).
10. Turn off the engine. Replace the rubber cover on the timing window and disconnect the test equipment.