HondaBook.ru
Auto companies Volkswagen Auto companies Ford Auto companies Lada Auto companies Skoda Auto companies BMW Auto companies Mazda Auto companies Peugeot
English Русский
Български
Беларускі
Український
Српски
Hrvatski
Română
Polski
Slovenský
Magyar
Bookmark Contacts Sitemap   


Accord Civic Fit / Jazz CR-V HR-V Others Articles
CR-V 1 (1995-2001, petrol) CR-V 2 (2002-2006, petrol)

Engine Processor Unit — Removal and Installation (Honda CR-V 1)

  • Main
  • Honda CR-V
  • 1 (1995-2001, petrol)
  • Power unit
  • Control system
  • Engine Processor Unit — Removal and Installation
0
Contents: Removal and installation ⇊ CR-V and 4-cylinder Odyssey models ⇊ Odyssey V6 ⇊
Engine Processor Unit (eCM on vehicles with manual transmission or PCM on vehicles with automatic transmission) provides automatic regulation of operation of all engine systems (including power supply, ignition, etc.). The 1995 Odyssey featured a separate transmission control module (TCM) that provided communication between the ECM and the automatic transmission.

The Odyssey since 1996 and the CR-V since 1997 have been equipped with an automatic transmission and these units have been combined into a single PCM unit that controls the powertrain (engine and transmission).

RSM block mounted:
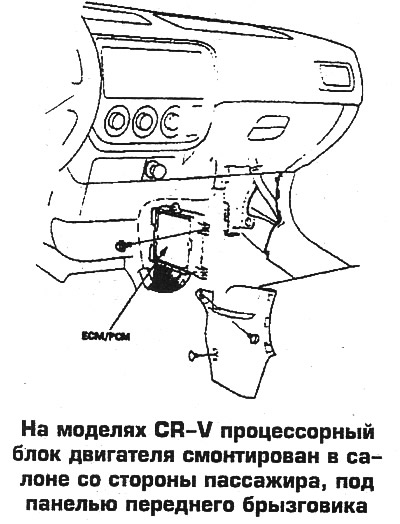
  • on CR-V models - in the passenger compartment on the passenger side, under the front mudguard panel,
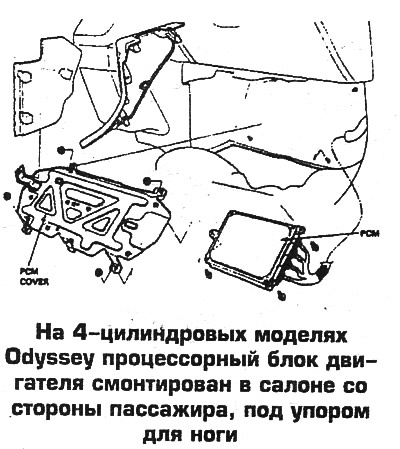
  • on 1995-98 Odyssey models - in the passenger compartment on the passenger side, under the footrest,
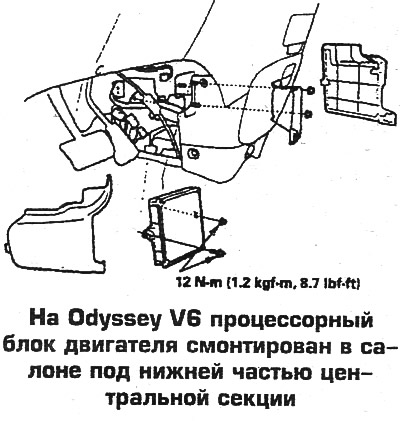
  • on 1999-00 Odyssey models - in the passenger compartment under the lower portion of the center floor section.


Removal and installation


The processor unit can be checked by replacing it with a known good one. In this case, the installed unit must exactly match the one being tested, otherwise the new unit will fail. It is not allowed to operate a car with a discharged battery or a faulty voltage regulator, since the charging system of the cars in question is connected to the processor unit.

Caution! On 1998 Odyssey 2.3L and 1999-00 V6 models after replacement (or installation of the removed) the PCM block should be rewritten with the immobilizer codes using the Honda PGM Tester. Otherwise, the engine will not start. To avoid damage to the processor unit, do not disconnect the battery from the ground when the ignition is on.


CR-V and 4-cylinder Odyssey models


CR-V and 4-cylinder Odyssey models

1. Make sure the ignition is off and disconnect the battery from ground.

2. On CR-V models, remove the passenger side front wheel well splash guard trim panel from inside the passenger compartment.

3. On 4-cylinder Odysseys, remove the front passenger door sill trim, fold back the carpet, and remove the processor unit cover.

4. Unscrew the screws (or disconnect the latches), disconnect the connector and remove the unit.

5. The block is installed in reverse order. On 4-cylinder Odysseys, rewrite the immobilizer codes.

Odyssey V6


Odyssey V6


1. Make sure the ignition is off and disconnect the battery from ground.


2. Fold back the front floor mats.

3. Remove the covers from the bottom of the center section on both sides.

4. Remove the PCM cover by removing the fasteners and pull it out through the opening in the center section.

5. Unscrew the screws (or disconnect the latches), disconnect the connector and remove the PCM.

6. The block is installed in reverse order. Rewrite the immobilizer codes.

7. If on Odyssey V6 models the PCM is tested by substituting with a known good one, do the following:.
  • a. Remove the blocks from both vehicles, attach tags to the blocks indicating the serial number of the vehicle from which the block is being removed.
  • b. Install the unit on the vehicle being tested.
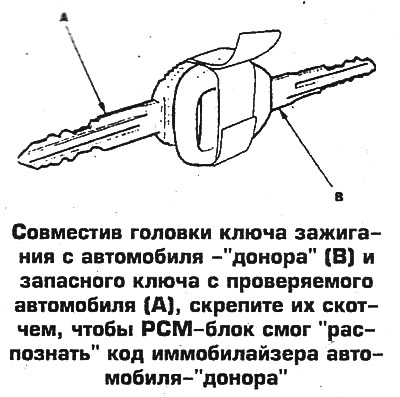
  • c. Align the heads of the ignition key from the donor vehicle and the spare key from the vehicle being tested (photo), and tape them together so that the PCM can "recognize" the immobilizer code of the donor vehicle. Otherwise, the engine will not start.
  • d. After completing the check, install the blocks in their original places and disconnect the keys.
d. After completing the check, install the blocks…


[Based on materials from the website hondabook]
This article is available at: russian, bulgarian, belarusian, ukrainian, serbian, croatian, romanian, polish, slovak, hungarian
This information has been verified: Emil Safonov
Share with friends:
◀ Previous
CR-V 1: Control system
Next ▶

Recirculation valve — checking, removal and installation
Recirculation system — general information
Gasoline vapor recovery system
Crankcase ventilation system
Exhaust Gas Oxygen Sensor
Oxygen sensor — removal and installation
Idle Air Control Valve (IAC valve)
Coolant Temperature Sensor (ECT Sensor)
Intake Air Temperature Sensor (IAT Sensor)
See also other articles from Honda manuals:
Engine Oil Recommendations Honda Accord 3 (1985-1989)
Engine control unit Honda Civic 5 and 6 (1991-2000)
Engine number and identification plates Honda Fit 1 (2001-2008)
Engine Starting Procedure Honda HR-V 1 (1998-2006, petrol)
Engine Control Unit PGM-FI Honda Avancier 1 (1999-2003, petrol)
Link in different formats to this article
Comments and feedback from visitors
No comments yet


How much will 21 + 40 ?


CR-V 2 (2002-2006, petrol) 
  • General information
  • User manual
  • Technical data
  • Maintenance
  • Power unit
  • Engine repair
  • Lubrication system
  • Cooling system
  • Exhaust system
  • Fuel system
  • Engine management
  • Engine electrical equipment
  • Transmission
  • Clutch
  • Manual gearbox
  • Automatic gearbox
  • Rear differential
  • Drive shafts
  • Chassis and running gear
  • Steering
  • Front suspension
  • Rear suspension
  • Brake system
  • Body and interior
  • Exterior (external elements)
  • Interior (internal elements)
  • Doors, locks and windows
CR-V 1 (1995-2001, petrol) 
  • General information
  • Maintenance
  • Tips for car owner
  • Power unit
  • Engine repair
  • Engine overhaul
  • Cooling and lubrication system
  • Engine electrical equipment
  • Control system
  • Fuel system
  • Transmission
  • Clutch and drive shafts
  • Car gearbox
  • Chassis and running gear
  • Front suspension
  • Rear suspension
  • Steering
  • Brake system
  • Body and interior
  • Body service
  • Exterior (external elements)
  • Interior (internal elements)
  • Electrical equipment
  • Equipment and devices
  • Electrical circuits
HondaBook.ru © 2018–2026 • Mobile version • Sitemap: EN BG BY UA RS HR RO PL SK HU • Feedback • Driver Information • Search system • Bookmark
Accord 3 (1985-1989) • Accord 6 (1997-2002) • Civic 3 and 4 (1983-1991) • Civic 5 and 6 (1991-2000) • Civic 6 (1995-2000) • Civic 7 (2000-2005) • Civic 8 (2005-2011) • Fit 1 (2001-2008) • CR-V 1 (1995-2001) • CR-V 2 (2002-2006) • HR-V 1 (1998-2006) • Avancier 1 (1999-2003) •
 
This website uses cookies to ensure proper functioning. By clicking "OK," you agree.