
HondaBook.ru
Auto companies Volkswagen Auto companies Ford Auto companies Lada Auto companies Skoda Auto companies BMW Auto companies Mazda Auto companies Peugeot
English Русский
Български
Беларускі
Український
Српски
Hrvatski
Română
Polski
Slovenský
Magyar
Bookmark Contacts Sitemap   


Accord Civic Fit / Jazz CR-V HR-V Others Articles
CR-V 1 (1995-2001, petrol) CR-V 2 (2002-2006, petrol)

Gasoline vapor recovery system (Honda CR-V 1)

  • Main
  • Honda CR-V
  • 1 (1995-2001, petrol)
  • Power unit
  • Control system
  • Gasoline vapor recovery system
0
Contents: Examination ⇊ Removal and installation ⇊
Provides absorption of gasoline vapors in a special tank with an absorber and prevents them from entering the atmosphere. The vehicles in question are equipped with an electromagnetic purge valve for ventilation of the fuel tank, controlled by the engine processor unit. The valve is activated when the engine temperature reaches a certain level.
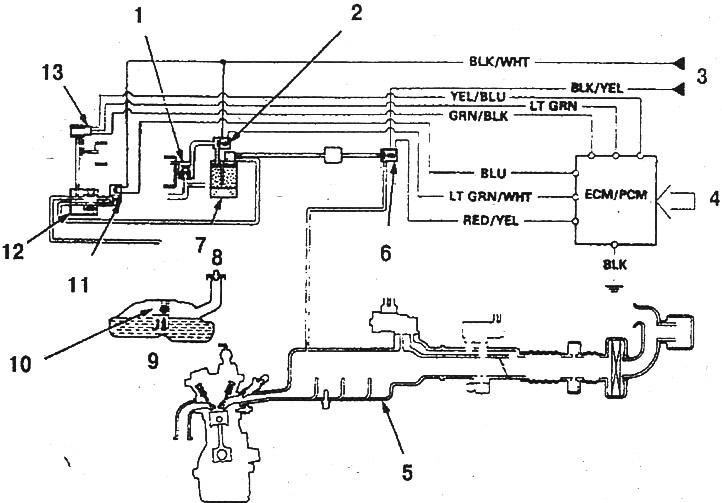
Gasoline vapor recovery system (CR-V 1998-99): 1.…

Gasoline vapor recovery system (CR-V 1998-99): 1. Three-way valve; 2. Ventilation valve; 3. From fuse N15 of the generator speed sensor (in the block under the dashboard); 4. Sensors; 5. Collector; 6. Purge solenoid valve; 7. Tank; 8. Tank filler cap; 9. Tank; 10. Ventilation valve; 11. Bypass solenoid valve; 12. Two-way valve; 13. Tank vapor pressure sensor


Examination


Tank


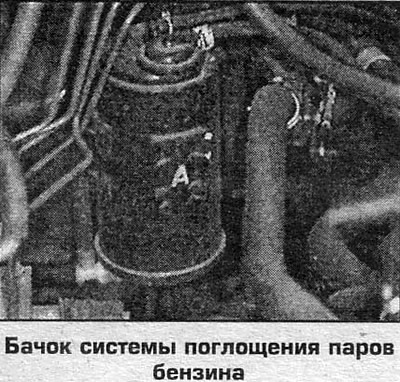
The condition of the tank is checked by external inspection.
The condition of the tank is checked by external…


Purge solenoid valve


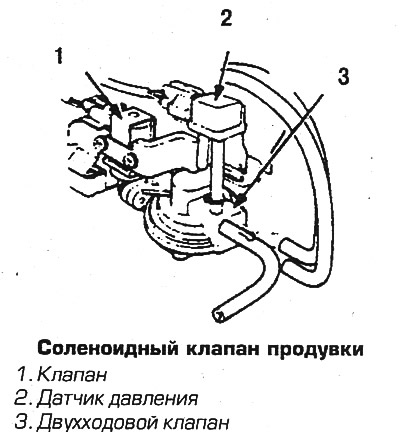
A malfunction of this valve causes the diagnostic system indicator lamp on the instrument panel to light up. Remove the valve, create a vacuum in it and turn on the ignition. When the ignition is on, air leakage through the valve is not allowed. Otherwise, turn off the ignition, disconnect the connector and check the circuit between the yellow/red wire and ground. If there is a chain, then replace the valve. Otherwise, you should check the wire to the processor unit.


A malfunction of this valve causes the diagnostic…


Removal and installation


Tank


1. Raise the vehicle.

2. Loosen the bolts, mark and disconnect the hoses and remove the tank together with the bracket.

3. Installation is carried out in reverse order.

Tank solenoid valve


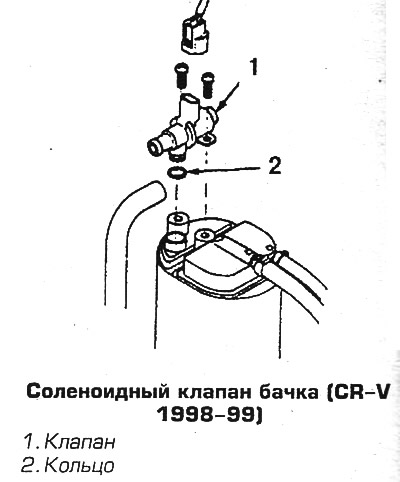
1. Disconnect from the valve (mounted on the tank) vacuum hose.

2. Loosen the screws (bolts) and remove the valve from the tank.

3. Installation is carried out in reverse order.
3. Installation is carried out in reverse order.


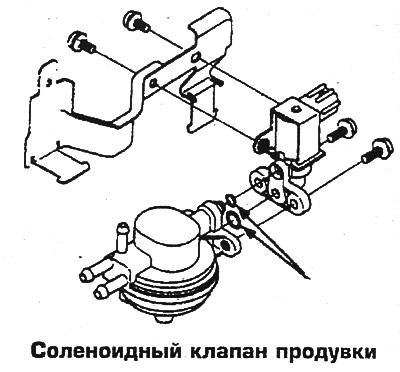
Purge solenoid valve


1. Raise the vehicle.

2. Disconnect the connector from the valve, disconnect the hoses and remove the valve.

3. Installation is carried out in reverse order.
3. Installation is carried out in reverse order.


Full text available on the portal hondabook
This article is available at: russian, bulgarian, belarusian, ukrainian, serbian, croatian, romanian, polish, slovak, hungarian
This information has been verified: Emil Safonov
Share with friends:
◀ Previous
CR-V 1: Control system
Next ▶

Crankcase ventilation system
Recirculation system — general information
Recirculation valve — checking, removal and installation
Engine Processor Unit — Removal and Installation
Exhaust Gas Oxygen Sensor
Oxygen sensor — removal and installation
See also other articles from Honda manuals:
Gasoline vapor recovery system Honda Accord 3 (1985-1989)
Fuel vapor recovery system control Honda Civic 3 and 4 (1983-1991)
Fuel vapor recovery system Honda Fit 1 (2001-2008)
Anti-lock braking system (ABS) Honda HR-V 1 (1998-2006, petrol)
Checking the fuel vapor recovery system Honda Avancier 1 (1999-2003, petrol)
Link in different formats to this article
Comments and feedback from visitors
No comments yet


How much will 15 + 35 ?


CR-V 2 (2002-2006, petrol) 
  • General information
  • User manual
  • Technical data
  • Maintenance
  • Power unit
  • Engine repair
  • Lubrication system
  • Cooling system
  • Exhaust system
  • Fuel system
  • Engine management
  • Engine electrical equipment
  • Transmission
  • Clutch
  • Manual gearbox
  • Automatic gearbox
  • Rear differential
  • Drive shafts
  • Chassis and running gear
  • Steering
  • Front suspension
  • Rear suspension
  • Brake system
  • Body and interior
  • Exterior (external elements)
  • Interior (internal elements)
  • Doors, locks and windows
CR-V 1 (1995-2001, petrol) 
  • General information
  • Maintenance
  • Tips for car owner
  • Power unit
  • Engine repair
  • Engine overhaul
  • Cooling and lubrication system
  • Engine electrical equipment
  • Control system
  • Fuel system
  • Transmission
  • Clutch and drive shafts
  • Car gearbox
  • Chassis and running gear
  • Front suspension
  • Rear suspension
  • Steering
  • Brake system
  • Body and interior
  • Body service
  • Exterior (external elements)
  • Interior (internal elements)
  • Electrical equipment
  • Equipment and devices
  • Electrical circuits
HondaBook.ru © 2018–2026 • Mobile version • Sitemap: EN BG BY UA RS HR RO PL SK HU • Feedback • Driver Information • Search system • Bookmark
Accord 3 (1985-1989) • Accord 6 (1997-2002) • Civic 3 and 4 (1983-1991) • Civic 5 and 6 (1991-2000) • Civic 6 (1995-2000) • Civic 7 (2000-2005) • Civic 8 (2005-2011) • Fit 1 (2001-2008) • CR-V 1 (1995-2001) • CR-V 2 (2002-2006) • HR-V 1 (1998-2006) • Avancier 1 (1999-2003) •
 
This website uses cookies to ensure proper functioning. By clicking "OK," you agree.