
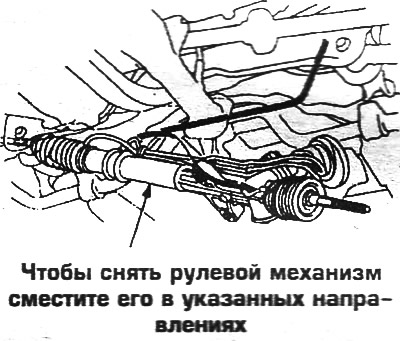
Withdrawal
1. Drain the fluid from the hydraulic booster circuit:
- a. Raise the power steering reservoir and disconnect the intake hose.
- b. Attach a tube to the inlet hose, lower the other end into the vessel.
- c. Start the engine, turn the wheels in both directions until they stop. Stop the engine as soon as fluid stops flowing from the tube.
2. Set the wheels in the straight ahead direction. Lock the steering column by inserting the ignition key. Connect the inlet hose to the tank.
3. Disconnect the battery from the ground. Work must begin in at least three minutes.
4. Raise the car.
5. On the driver's side, remove the steering shaft clutch cover and unscrew the clutch mounting bolts.
6. Remove the sleeve by sliding it up along the column.
7. Remove the front wheels.
8. Vypressuyte tips of steering drafts from rotary fists. In order not to damage the threads, screw a nut onto the tie rod pin.
9. Remove the converter by unscrewing the self-locking nuts. If necessary, disconnect the wiring from the oxygen sensor.
10. On CR-Vs and 4-cylinder Odysseys:
- a. Disconnect the return hose bracket on the rear subframe beam.
- b. Disconnect the pipes from the valve body on the steering gear and muffle. Take the tubes to the rear of the steering gear.
- c. Push the left inner rod to the right of failure, holding the rod tip.
- d. Remove the steering stiffener, then remove the right mounting bolts.
- e. Remove the steering gear from the steering gear shaft by pushing it down.
- f. Lower the rack so that the steering shaft comes out of the hole in the frame.
- g. Move the steering rack to the right so that the left tie rod moves away from the subframe. Then feed the rail down and get it from the left side of the car.
11. On Odyssey V6 vehicles, do the following:
- a. Remove the front lower mudguard.
- b. Disconnect the tube brackets from the front subframe.
- c. Loosen the union nut on the steering gear housing and disconnect the tube.
- d. Remove the return hose clamp and remove the hose.
- e. Hang the engine on hoists.
- f. Remove the bolts securing the rear engine mount to the subframe.
- g. Remove the rear engine mount through bolt.
- h. Lift the engine mount bushing together with the bracket and insert the through bolt so that the bushing rests on the bolt and there is clearance between the subframe and the bushing bracket.
- i. Support the subframe by installing a jack and laying wooden blocks. Select the slack of the hoists.
- j. Turn out 4 bolts of fastening of a subframe on 30 mm from a surface of a subframe.
- k. Loosen the bolts and remove the front and rear stiffener plates of the subframe.
- l. Lower the subframe all the way into the loosened bolts.
- m. Remove the clamp and right tube bracket.
- n. Turn away bolts and nuts from the left side of the steering mechanism.
- O. Give the steering mechanism to the left and remove through the opening between the subframe and the body.
Installation
Attention! When installing the converter, replace the gaskets and self-locking nuts.
The power steering can only be filled with Genuine Honda Type-V steering fluid. The use of a different type of fluid leads to the failure of the power steering pump.
12. Before installation of the steering mechanism, give drafts to the right against the stop. Establish a cover of a shaft of the steering mechanism. Align the notch and protrusion of the boot with the valve body.
13. Install the steering mechanism in place, put on the shaft cover and insert the cover into the opening of the engine compartment wall.
14. On CR-V and 4-cylinder Odyssey models, do the following.
- a. Tighten the mounting bolts with a torque of 39 Nm. Tighten the reinforcement plate bolts to 43 Nm.
- b. Attach the hydraulic tubes to the valve. Tighten the inlet and outlet hose fittings to 37 Nm. and 28 Nm., respectively.
- c. Install the neutralizer. Tighten the self-locking nuts to 22 Nm. Connect the oxygen sensor.
- d. Install the tie rod ends with the inner tie rods in the straight ahead position. Install wheels.
- e. Make sure the tie rods and wheels are in the straight ahead position.
15. Center the coil of the air bag module following the procedure above (see the order of removal - installation of the steering wheel).
16. On Odyssey V6 vehicles, do the following.
- a. Screw bolts and nuts of fastening from the left side of the steering mechanism.
- b. Install the hydraulic pressure tube bracket and clamp.
- c. Raise the subframe with a jack, install the subframe stiffeners and tighten the mounting bolts to a torque of 74 Nm.
- d. Tighten the 4 subframe mounting bolts to 103 Nm, remove the jack.
- e. Install the rear engine mount and tighten the bolts to the subframe to 39 Nm. Tighten the support bushing through bolt to 83 Nm. Remove the hoists on which the engine is hung.
17. Further assembly is carried out in the reverse order, taking into account the following.
- a. Replace gaskets and nuts securing the converter.
- b. When installing the coupling connecting the steering gear shaft and the steering shaft, set the hole in the coupling for the locking bolt opposite the flat of the steering gear shaft. When tightening, the bolt must enter the groove of the steering gear shaft. Make sure the splines of the coupling fit into the splines of both shafts. Tighten the clutch bolts to 30 Nm. If, after installing the clutch, the centered position of the helix and steering wheel is violated, then reinstall the lower part of the clutch in the splines of the steering shaft.
- With. On CR-V and 4-cylinder Odyssey models, tighten the tie rod end castle nuts to 40-48 Nm. If necessary, tighten them to install cotter pins.
- d. Bleed air from the hydraulic booster circuit.
- e. Check for fluid leaks from the power steering circuit.
- f. Make sure the steering wheel spokes match the position of the wheels. Adjust if necessary by turning the left and right tie rod ends equally.