
HondaBook.ru
Auto companies Volkswagen Auto companies Ford Auto companies Lada Auto companies Skoda Auto companies BMW Auto companies Mazda Auto companies Peugeot
English Русский
Български
Беларускі
Український
Српски
Hrvatski
Română
Polski
Slovenský
Magyar
Bookmark Contacts Sitemap   


Accord Civic Fit / Jazz CR-V HR-V Others Articles
CR-V 1 (1995-2001, petrol) CR-V 2 (2002-2006, petrol)

Inner steering rods (Honda CR-V 1)

  • Main
  • Honda CR-V
  • 1 (1995-2001, petrol)
  • Chassis and running gear
  • Steering
  • Inner steering rods
0
Contents: Removal ⇊ Installation ⇊

Removal


1. Raise the vehicle and remove the wheel.

2. Clean the outer tie rod down to the tie rod end lock nut.
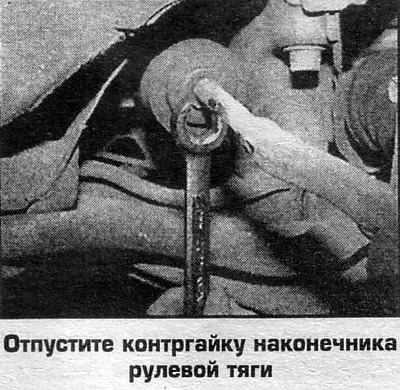
2. Clean the outer tie rod down to the tie rod…


3. Loosen the outer tie rod end lock nut by 1/8 turn.
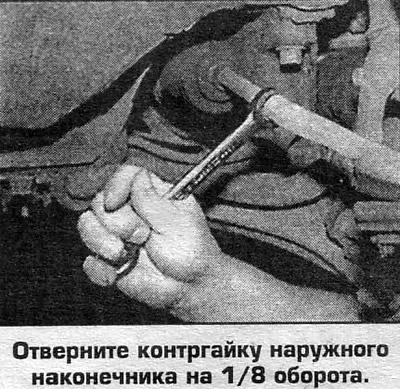
3. Loosen the outer tie rod end lock nut by 1/8…


4. Loosen the clamps of the dust cover, remove the small clamp.

5. To access the inner tie rod nut, unscrew the dust cover.

6. Unlock and loosen the steering rod nut by 1 turn (turn the wheels if necessary).

7. Mark the relative positions of the steering rod end.

8. Remove the cotter pin and unscrew the castle nut of the outer tie rod end pin and press the tie rod end out of the steering knuckle.

9. While holding the inner rod with a wrench, unscrew the steering rod end. Count the number of complete turns required to unscrew the tip.


10. Unscrew the tie rod end lock nut.

11. Remove the inner dust cover.

12. Unscrew the nut of the ball joint of the inner rod and remove the rod.

Installation


13. Check the condition of the steering rod end and rubber parts, replace damaged parts.

14. Clean the rod and lubricate with Genuine Honda Power Steering Oil.

15. Lubricate the threaded parts of the ball joint and lock nut with an elastic locking compound; put on a new lock washer (on Odyssey models, also replace the lock washer) and screw the inner tie rod end into the steering rack.

16. Tighten the inner tie rod end fastening g to torque (Nm):
  • CR-V 54
  • 4-cylinder Odyssey 78
  • Odyssey V6 83

17. Bend the edges of the lock washer onto the nut (or on the rail's chamfer).

18. Lubricate the edges of the tie rod end ball joint and the adjacent groove with silicone grease.

19. Lubricate the inside of the dust cover neck with silicone grease. Place the dust cover on the inner rod, install it in place and secure it with clamps (on some vehicles, install air hose fittings on the cover).

20. Apply a thin layer of anti-seize compound to the threads of the tie rod end and screw on the lock nut.

21. Screw in the steering rod end by the number of turns counted during disassembly.

22. Install the tie rod end.

23. Further installation is carried out in reverse order. Check and adjust the rear wheel alignment.
This article is available at: russian, bulgarian, belarusian, ukrainian, serbian, croatian, romanian, polish, slovak, hungarian
This information has been verified: Emil Safonov
Share with friends:
◀ Previous
CR-V 1: Steering
Next ▶

Ignition switch — removal and installation
Contact part of the ignition switch — removal and installation
Combination switch — removal and installation
Steering wheel — removal and installation
Outer tie rod ends
Power steering gear — removal and installation
Power steering pump — removal and installation
Removal air from the hydraulic drive circuit
Tightening torques for threaded connections
See also other articles from Honda manuals:
Power steering pump Honda Accord 3 (1985-1989)
Checking the fluid level in the power steering Honda Civic 3 and 4 (1983-1991)
Adjusting the position of the steering wheel Honda Fit 1 (2001-2008)
Connecting rods — selection Honda HR-V 1 (1998-2006, petrol)
Adjusting the steering column and mirrors Honda Avancier 1 (1999-2003, petrol)
Link in different formats to this article
Comments and feedback from visitors
No comments yet


How much will 46 + 18 ?


CR-V 2 (2002-2006, petrol) 
  • General information
  • User manual
  • Technical data
  • Maintenance
  • Power unit
  • Engine repair
  • Lubrication system
  • Cooling system
  • Exhaust system
  • Fuel system
  • Engine management
  • Engine electrical equipment
  • Transmission
  • Clutch
  • Manual gearbox
  • Automatic gearbox
  • Rear differential
  • Drive shafts
  • Chassis and running gear
  • Steering
  • Front suspension
  • Rear suspension
  • Brake system
  • Body and interior
  • Exterior (external elements)
  • Interior (internal elements)
  • Doors, locks and windows
CR-V 1 (1995-2001, petrol) 
  • General information
  • Maintenance
  • Tips for car owner
  • Power unit
  • Engine repair
  • Engine overhaul
  • Cooling and lubrication system
  • Engine electrical equipment
  • Control system
  • Fuel system
  • Transmission
  • Clutch and drive shafts
  • Car gearbox
  • Chassis and running gear
  • Front suspension
  • Rear suspension
  • Steering
  • Brake system
  • Body and interior
  • Body service
  • Exterior (external elements)
  • Interior (internal elements)
  • Electrical equipment
  • Equipment and devices
  • Electrical circuits
HondaBook.ru © 2018–2026 • Mobile version • Sitemap: EN BG BY UA RS HR RO PL SK HU • Feedback • Driver Information • Search system • Bookmark
Accord 3 (1985-1989) • Accord 6 (1997-2002) • Civic 3 and 4 (1983-1991) • Civic 5 and 6 (1991-2000) • Civic 6 (1995-2000) • Civic 7 (2000-2005) • Civic 8 (2005-2011) • Fit 1 (2001-2008) • CR-V 1 (1995-2001) • CR-V 2 (2002-2006) • HR-V 1 (1998-2006) • Avancier 1 (1999-2003) •
 
This website uses cookies to ensure proper functioning. By clicking "OK," you agree.