
2. Prepare fresh transmission fluid of the correct grade.
3. Other tools and materials needed include: props to secure vehicle in raised position, 3/8" ratchet (with extension) to the socket wrench, a drainage container with a volume of at least 5 liters and a supply of rags and / or old newspapers.
4. Fluid must be drained after being preheated to normal operating temperature during a short trip. Hot ATF has a higher fluidity and better flushes out sludge and other deposits.
Attention! ATF operating temperature can reach 180°C! Be careful, wear rubber gloves.
5. After driving for a short time and warming up the ATF to normal operating temperature, park the vehicle on a level, hard paved area, jack it up and support it on jack stands so that the transmission case drain plug is easily accessible.
6. Place a drain container and all necessary equipment under the transmission housing. Try not to touch the heated components of the power unit and the exhaust system located under the bottom of the car.
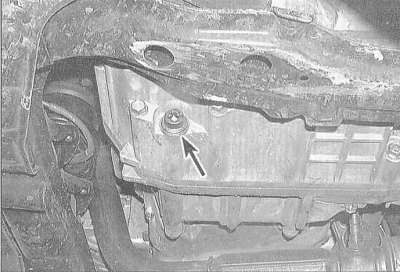
7. After placing the receiving container properly, remove the drain plug (on 4-cylinder engines, it is located on the lower right on the AT crankcase, on V6 engines - on the lower left). The plug is turned out using a ratchet drive and an extension cord. Do not forget that at the first moment ATF will begin to flow out with a relative pressure, which, as the liquid level decreases, will gradually decrease - be prepared to correct the position of the drain tank accordingly in time. When the flow of fluid has completely stopped, wipe the drain plug, screw it into place and tighten it firmly.
8. Lower the vehicle to the ground.
9. Without starting the engine, remove the measuring probe from the transmission housing (4-cylinder engines) or unscrew the filler bolt marked ATF, - on V6 engines). Pour the required amount of fresh liquid of the required grade through the vacated hole (see specs). Use a funnel to minimize ATF loss. Pour liquid in small portions, periodically checking its level on the dipstick (see Section Checking the level of ATF AT). Pause, allowing the poured liquid to drain to the bottom of the pan.
10. Reinstall the dipstick/filler bolt.
11. Start the engine, then move the selector lever slowly through all positions, ending at "R", then apply the parking brake.
12. Stop the engine and check the ATF level. Make appropriate adjustments if necessary (the liquid level should be approximately in the middle of the notched area of the dipstick blade).