
Warning! Do not allow antifreeze to come into contact with exposed skin or painted surfaces of the vehicle. Wash away accidental splashes immediately with plenty of water. Remember that antifreeze is a highly toxic liquid and its ingestion, even in small quantities, can have the most serious consequences (even fatal). Never leave antifreeze stored in a loosely closed container and immediately collect any coolant spilled on the floor. Remember that the sweet smell of antifreeze can attract the attention of children and animals. Consult with your local authorities about how to dispose of used coolant. Many regions of the world have special collection points for various types of waste. Never pour old coolant down the drain or onto the ground!
Recently, non-toxic types of antifreeze have been developed, but they also require careful handling. Regularly, in accordance with the car's routine maintenance schedule, the cooling system should be drained, flushed and filled with a fresh mixture of antifreeze and water. This type of maintenance helps prevent the development of corrosion inside the cooling tract and significantly increases the efficiency of the system.
During maintenance, it is also mandatory to check the condition of all system hoses and the radiator filler cap (see Section Checking the condition of the cooling system components). Defective components are subject to replacement.
Be aware of the precautions that must be taken when servicing the cooling system (see warning at the beginning of the Section).
Emptying
1. Set the parking brake and support the wheels with wheel chocks. The actual maintenance procedures should be performed only after the engine has completely cooled down, i.e. at least several hours after the end of the trip.
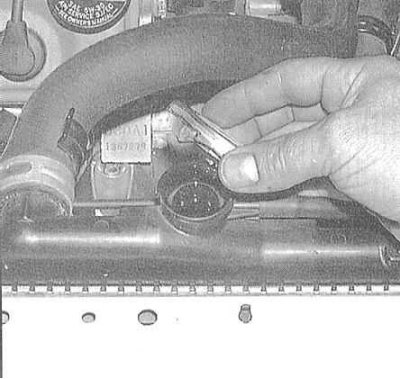
2. After the engine has completely cooled down, remove the caps from the radiator neck and expansion tank.
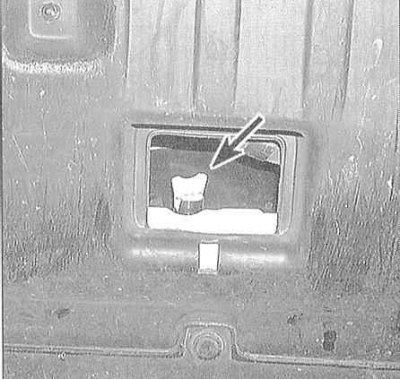
3. To drain the coolant from the radiator, remove the drain plug at the bottom of it. If the plug is stuck or not provided at all, disconnect the lower hose from the radiator and drain the liquid through it.
Note: The coolant should be drained into a drain container of appropriate volume, which should be prepared in advance. Try to avoid getting antifreeze in your eyes and on exposed areas of skin. 4. After the coolant has finished draining from the radiator, remove the lower hose of the latter and drain the remaining liquid from the upper part of the engine block.
5. While the fluid is draining from the block, disconnect the hose from the expansion tank and remove the latter (see Chapter Cooling and heating systems). Rinse the tank with clean water (with soap if necessary). Clean the level marks on the walls of the tank.
6. Check the condition of the radiator hoses and heating system hoses, as well as the clamps securing them to the fittings and pipes (if necessary, see Section Checking the condition of the cooling system components).
7. Replace damaged components (if necessary, see Chapter Cooling and heating systems).
Flushing
1. Once the system has been drained, remove the thermostat from the engine, take it out of the housing and install the latter back in its original place (empty). The system is now ready for flushing.
2. Reinstall the lower radiator hose and tighten the drain plug. Set the interior heating control knob to maximum heat to also flush the heater core.
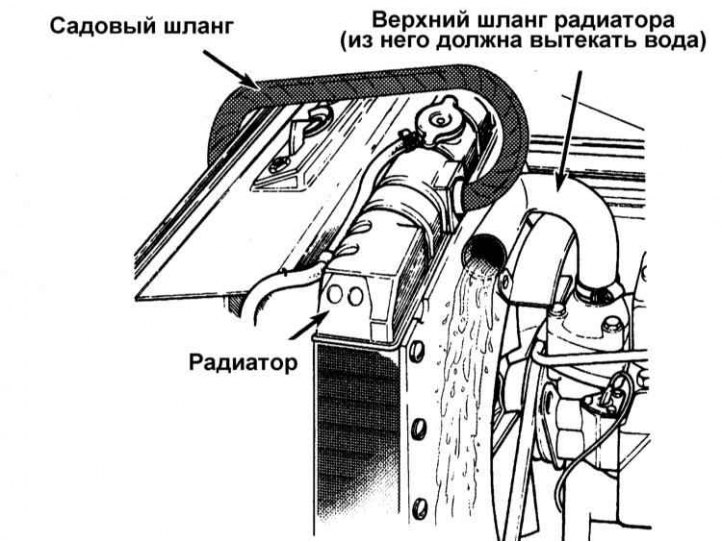
3. Disconnect the upper hose from the radiator and insert a garden hose into the latter's outlet. Turn on the water supply and continue flushing until a clean, transparent stream begins to flow out of the upper hose. 4. In cases of particularly heavy contamination or obstruction of the radiator, remove the latter (see Chapter Cooling and heating systems) and deliver it to a car service workshop for repair and maintenance.
5. Corrosion products and dense deposits are removed from the cooling system tract by chemical treatment - follow the instructions of the manufacturer of the cleaning agent you purchased.
Note: If the system is flushed and coolant is replaced regularly, there should be no need to chemically treat the system.
Refueling
1. Install the thermostat and expansion tank, connect all hoses to the radiator.
2. Move the interior heating control handle to maximum heating.
3. Slowly pour fresh antifreeze and water mixture into the radiator in the required proportions (see Specifications). Continue pouring until the liquid level rises to the lower edge of the filler neck. Add coolant to the expansion tank, bringing its level to the FULL COLD mark. Wait five minutes and check the coolant level in the radiator again, adjusting if necessary.
4. Without installing the radiator cap, start the engine and warm it up until the thermostat valve opens (the liquid should start to circulate through the radiator, and the upper hose of the latter will warm up).
5. Turn off the engine and let it cool down. Add some more liquid to the radiator, bringing its level to the lower edge of the filler neck.
6. Squeeze the upper radiator hose to release any air, and add a little more coolant if necessary. Replace the radiator cap.
7. Set the supply air temperature and fan speed selector knobs to maximum performance.
8. Start the engine, warm it up to normal operating temperature and check the system for signs of leaks.