
WARNING: This procedure REQUIRES the use of a propane enrichment kit. Do not start the procedure if the kit is not available. Check if the propane tank is full enough before starting work.
The mixture can also be determined with an exhaust gas analyzer or emission tester, but this equipment is rarely available to the car enthusiast. If this method is used, you must still have access to the mixture adjusting screws in order to make the adjustment.
Vehicles with fuel injection do not allow manual adjustment of the fuel/air mixture. The engine control module or ECU is responsible for this; it also controls the operation of the fuel injector according to the electrical signals sent to the injector (injector) controller of all sensors and monitors. If a fuel injected engine is experiencing emission related problems, then the sensors and computer controlled output components should be checked (be tested) and be repaired.
Carburetor Keihin 2
1984-85 Accord, 1886-89 Accord with manual
1. Put the car in neutral and parking brake, block the wheels. Start the engine and warm up to normal temperature (the fan should turn on at least once).
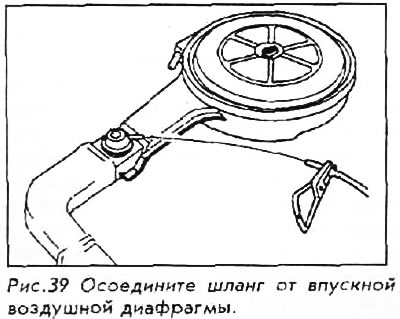
2. Disconnect the vacuum hose from the air inlet control diaphragm and pinch the end of the hose.
3. Connect a suitable tachometer to the engine and follow the manufacturer's instructions.
4. Check the speed of x.x. with all equipment turned off. If necessary, adjust the x.x. throttle stop screw.
5. Disconnect the air cleaner inlet pipe from the air duct on the radiator bulkhead.
6. Insert the hose from the propane kit about 10 cm into the inlet tube.
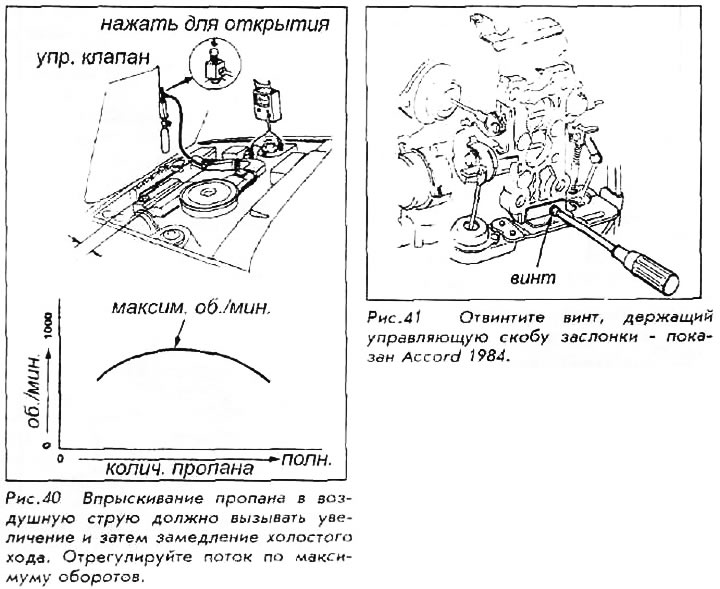
7. With the engine on x.x. depress the button on top of the propane unit, then slowly open the control valve to obtain maximum engine speed. As propane comes in, the speed should increase.
If propane is applied suddenly, the engine may stall.
8. Speed x.x. should increase like this:
- 1984-85 Accord with manual - 100±25 rpm.
- 1984-85 Accord with automatic - 50±20 rpm.
- 1986 Accord with manual - 35±20 rpm.
- 1987-89 Accord with manual - 50±20 rpm.
9. If speed increase is within specification - disconnect propane kit and repair any disconnected hoses. Otherwise, proceed to the next point. Switch off the ignition.
10. Disconnect the vacuum hose from the quick release valve. Pull the throttle cable out of the bracket.
11. Remove the carburetor nuts, washers and bolts securing the metal vacuum manifold. Lift the carburetor off the rack, then tilt it back to access the throttle controller bracket screws.
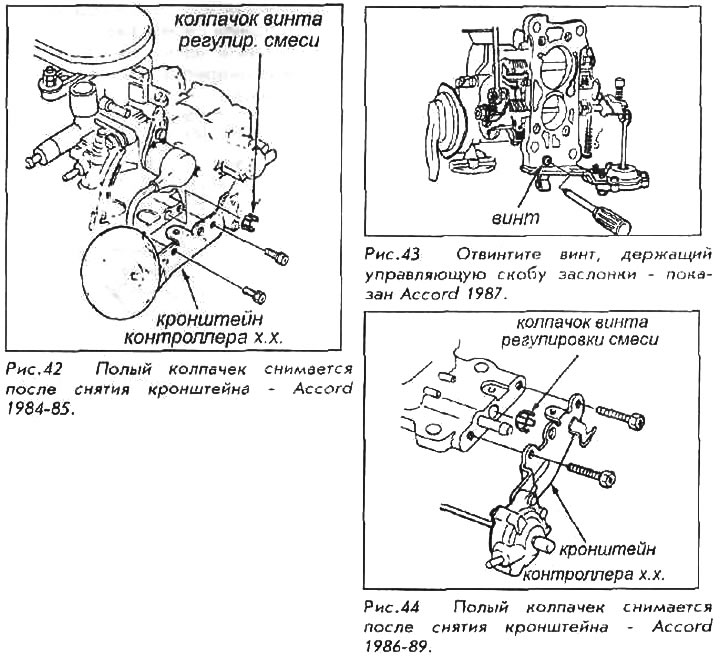
12. Disconnect the throttle controller bracket. Remove the hollow cap of the mixture adjustment screw from the throttle controller bracket and then reinstall the bracket. With the plug removed, the adjusting screw can be reached from the outside of the carburetor body with the carburetor in place.
13. Install the carburetor, connect the vacuum hoses to the fast idle relief valve. Connect the air cleaner.
14. Start the engine and warm it up again to normal temperature.
15. Disconnect the vacuum hose from the air inlet control diaphragm and pinch the end of the hose, Install the propane kit and recheck the engine's top speed when enriched with propane.
16. If after the introduction of propane the speed is too low, then the mixture is enriched. Turn the mixture adjusting screw 1/2 turn clockwise and retest.
17. If after the introduction of propane the speed is too high, then the mixture is lean. Turn the mixture adjusting screw % turn counterclockwise and retest.
18. Close the propane valve and repeat the speed test. Let the engine run at 2500 rpm for 10 seconds to stabilize cold conditions.
19. If the engine speed is within specification, disconnect the propane kit, all test equipment and restore the vacuum hoses and air cleaner inlet tube to their original position.
20. If engine speed is not within specification, recheck speed and adjust as necessary by turning throttle stop screw, then repeat procedures 14-19.
21. Adjust the idle speed by tightening the idle control screw if necessary.
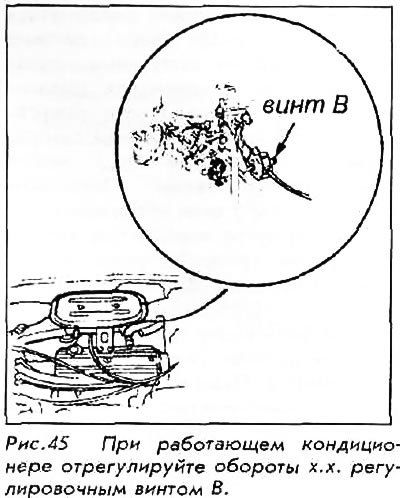
22. If the car is equipped with air conditioning, recheck with the air conditioner on. Adjust the speed by tightening the adjusting screw on the amplification diaphragm if necessary.
Carburetor Keihin 2
1886-89 Accord with automatic
1. Put the car in neutral and parking brake, block the wheels. Start the engine and warm up to normal temperature (the fan should turn on at least once).
2. Disconnect the vacuum hose from the air inlet control diaphragm and pinch the end of the hose.
3. Connect a suitable tachometer to the engine and follow the manufacturer's instructions.
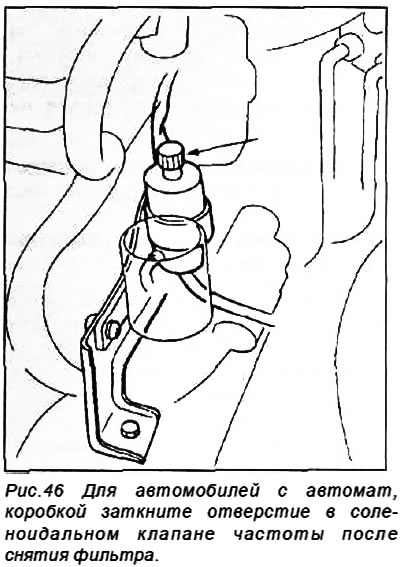
4. Disconnect the air filter from the frequency solenoid valve C and plug the hole in the valve.
5. With the engine unloaded, reduce idle speed. as far as possible by turning the throttle stop screw.
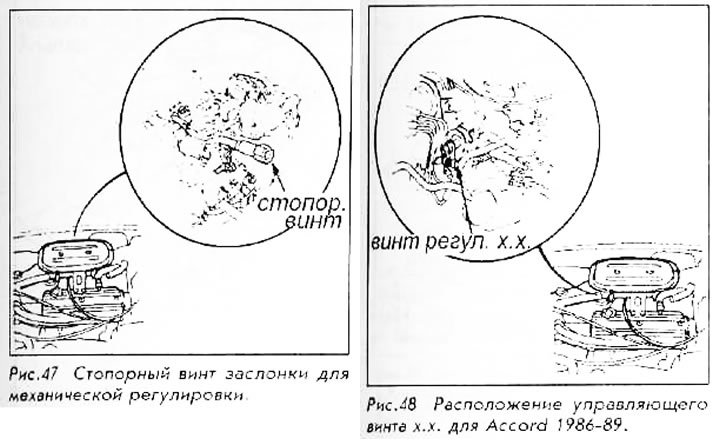
6. Adjust the speed of x.x. by turning the control screw x.x. up to 600±50 rpm (630±50 rpm on 1987-89 models).
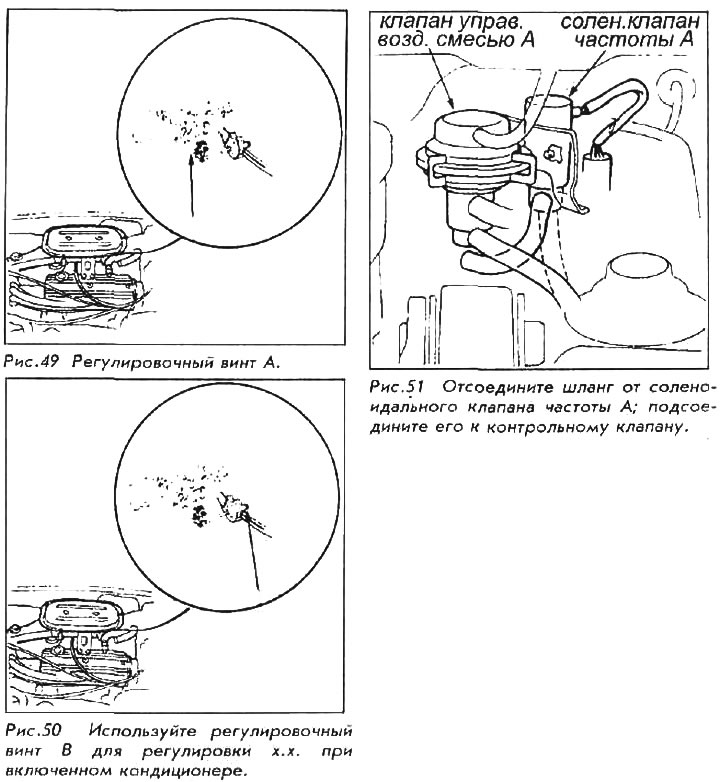
7. With headlights on, rear defroster and heater blower at maximum, adjust idle speed. by turning the adjusting screw A to 600±50 rpm on models 1986 and 700 + 50 on models 1987-89.
8. If the car is equipped with air conditioning, adjust the idle speed. by turning the adjusting screw B to 700±50 rpm with the air conditioner on.
9. With the engine unloaded, remove the internal vacuum hose from the throttle gain controller x.x. and plug the hose.
10. Adjust the speed of x.x. by turning the throttle stop screw up to 700+50 rpm (650+50 rpm on high mountain models).
11. Disconnect hose from frequency solenoid valve A and connect to air control valve A.
12. Disconnect the air cleaner inlet pipe from the air duct on the radiator bulkhead.
13. Insert the hose from the propane kit about 10 cm into the inlet tube.
14. With an engine on x.x. depress the button on top of the propane unit, then slowly open the control valve to obtain maximum engine speed. As propane comes in, the speed should increase.
If propane is applied suddenly, the engine may stall.
15. Kh.kh. engine should increase to 135±35 rpm.
16. If the engine speed increases to specification, disconnect the propane kit, all test equipment and restore the vacuum hoses to their original position. If the engine speed does not increase to specification, continue with the next step. Switch off the ignition.
17. Disconnect the vacuum hose from the quick release valve. Pull the throttle cable out of the bracket.
18. Remove the carburetor nuts, washers and bolts securing the metal vacuum manifold. Lift the carburetor off the rack, then tilt it back to access the throttle controller bracket screws.
19. Disconnect the throttle controller bracket. Remove the hollow cap of the mixture adjustment screw from the throttle controller bracket and then reinstall the bracket. With the plug removed, the adjusting screw can be reached from the outside of the carburetor body with the carburetor in place.
20. Install the carburetor, connect the vacuum hoses to the fast idle relief valve. Connect the air cleaner.
21. Start the engine and warm it up again to normal temperature.
22. Disconnect the vacuum hose from the air inlet control diaphragm and pinch the end of the hose. Install the propane kit and recheck the maximum engine speed when enriching with propane.
23. If after the introduction of propane the speed is too low, then the mixture is enriched. Turn the mixture adjusting screw 1/2 turn clockwise and retest.
24. If the speed is too high after propane injection, then the mixture is lean. Turn the mixture adjusting screw % turn counterclockwise and retest.
25. Close the propane valve and repeat the speed test. Let the engine run at 2500 rpm for 10 seconds to stabilize cold conditions.
26. If the engine speed is within specification, disconnect the propane kit, all test equipment and restore the vacuum hoses and air cleaner inlet tube to their original position.
27. If the engine speed is out of specification, recheck the speed and adjust as necessary by turning the throttle stop screw, then repeat the adjustment procedures.
28. Stop the engine. Close the propane valve, remove all plugs and reconnect all hoses.
29. Start the engine and repeat the speed x test. X.
2 or 3 times in 10 minutes, increase the engine speed to 2500 rpm, then check the idle speed. x speed. X. should be 700±50 rpm on 1986 models and /30±50 on 1987-89 models.
30. Check the speed of x.x. with headlights, heater blower and rear window defroster on. Speed x.x. should be 700+50 rpm.
31. Recheck the speed x.x. with automatic transmission switch in gear. Speed x.x. should be 700±50 rpm.
32. Recheck the speed x.x. with A/C on and speed selector in PARK or Neutral. Speed x.x. should be 750±50 rpm.
33. Recheck the speed x.x. with A/C on and shifter in gear. Speed x.x. should be 750±50 rpm.
34. If the speed x.x. does not reach specification for items 30 to 33 - check the idle control system.
Keihin twin carburetors
1984-90 Prelude
Check that the carburetors are correctly timed before checking the cold. and composition of the mixture. You will also need to pull the ECU fuse for at least 10 seconds to reset the electronic control unit after the procedure is completed.
1. Start the engine and warm up to normal temperature (the fan should turn on at least once).
2. Disconnect the vacuum hose from the air inlet control diaphragm and plug the end of the hose.
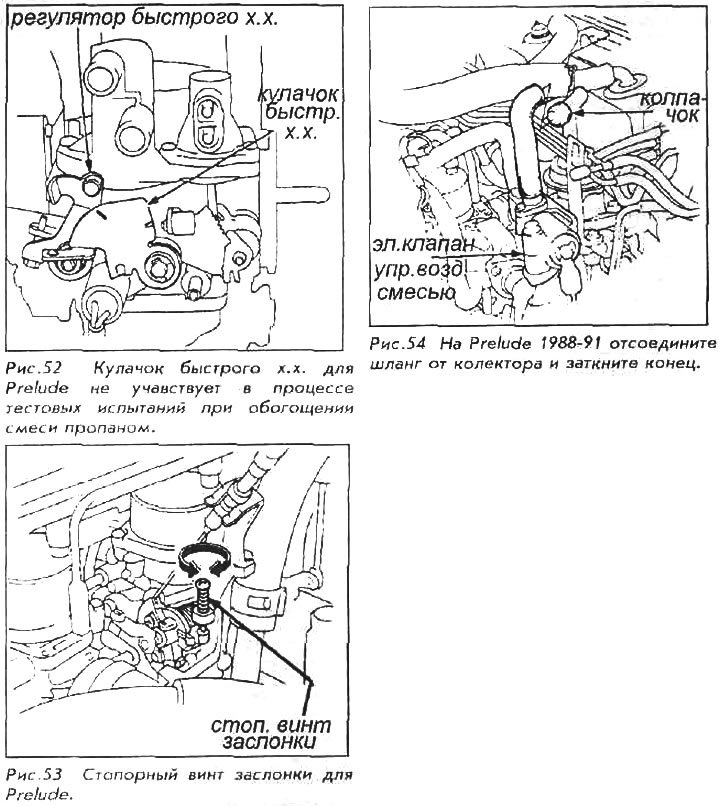
3. Connect a tachometer. Check that the quick release lever is not opposite the fast idle cam, otherwise you will need to move the left carburetor.
4. Check the speed of x.x. with all equipment turned off. Speed should be 800±50 rpm (750±50 rpm with automatic transmission in gear). If necessary, adjust the idle speed. by turning the throttle lock screw.
With excessive speed x. X. check throttle control.
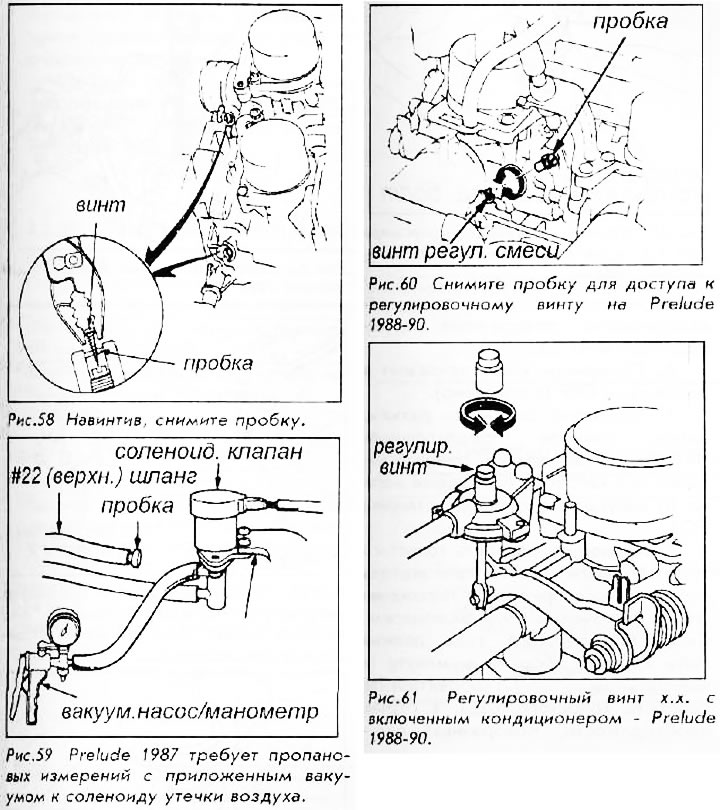
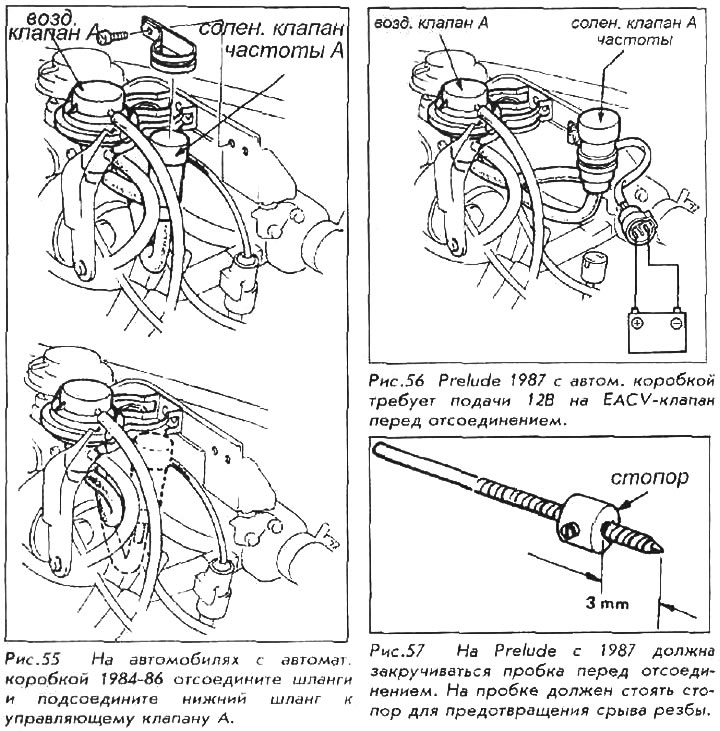
5. Only on cars with automatic transmission 1987. disconnect the connector from the frequency solenoid valve A and use a short to connect the valve to 12V. On all other vehicles, disconnect the two connectors from the EACV valve, disconnect the hose from the vacuum hose manifold, and plug the end of the hose.
6. Disconnect the vacuum tubes and connect the lower hose to the air control valve A. Disconnect the vacuum hose from the throttle gain controller x.x. air conditioning. Disconnect the air cleaner intake tube from the intake duct.
7. Insert the hose from the propane kit about 10 cm into the inlet tube.
8. With the engine on x.x. depress the button on top of the propane unit, then slowly open the control valve to obtain maximum engine speed. As propane comes in, the speed should increase.
If propane is applied suddenly, the engine may stall.
9. Speed x.x. should increase like this:
- 1984-86 with manual - 45±25 rpm.
- 1984-86 with automatic transmission - 1 10±25 rpm.
- 1987 with manual -65±20 rpm.
- 1987 with automatic transmission - 130±25 rpm (in D3 or D4).
- 1988-90 with manual - 170±20 rpm.
- 1988-90 with automatic - 50±10 rpm.
10. If the speed changes properly - testing is complete, disconnect the test equipment and restore all lines and hoses. Otherwise - on Prelude since 1987, remove the carburettors and use steps 11-13 below; on later models, the plugs can be removed without removing the carburetors; start from point 15.
11. Drill the safety plugs of the mixture adjustment screws.
When drilling, do not exceed 3mm depth to avoid damaging the adjusting screws.
12. Screw a 5mm screw into the plug hole.
13. Clamping it with pliers, pull out the plug.
14. Reinstall the carburetors.
15. Start the engine and warm up to normal temperature (the fan should turn on at least once).
16. Recheck the maximum RPM for propane enrichment. If the mixture is rich, turn the adjusting screws 1/4 turn counterclockwise.
17. Close the propane control valve.
18. Run engine at 2500 rpm for 10 seconds to stabilize mixture conditions, then check idle speed. Adjust idle speed, if necessary.
19. On 1984-86 models, remove the propane enrichment kit, and reconnect the control diaphragm inlet hose. Install new plugs in the idle mixture screw holes.
20. On 1987-89 models, disconnect the #5 vacuum hose from the air intake valve and plug it.
21. On a 1987 Prelude, disconnect the #22 top vacuum hose from the air leak solenoid valve and plug the end. Connect a vacuum gauge to the solenoid valve.
22. With the engine idling, depress the button on the top of the propane unit, then slowly open the control valve and check the vacuum. There must be a vacuum.
23. If there is no vacuum, inspect the air leak solenoid valve.
24. Inspect thermal valve C.
25. Remove the propane enrichment kit and reconnect the connector.
26. On cars manufactured in 1988-90, equipped with air conditioning, the idle speed should be checked at the end of the procedure with the air conditioner still on. If adjustment is necessary, remove the small cap from the adjustment screw and make an external adjustment.