
HondaBook.ru
Auto companies Volkswagen Auto companies Ford Auto companies Lada Auto companies Skoda Auto companies BMW Auto companies Mazda Auto companies Peugeot
English Русский
Български
Беларускі
Український
Српски
Hrvatski
Română
Polski
Slovenský
Magyar
Bookmark Contacts Sitemap   


Accord Civic Fit / Jazz CR-V HR-V Others Articles
Accord 3 (1985-1989) Accord 6 (1997-2002)

Ignition Coil Test (Honda Accord 3)

  • Main
  • Honda Accord
  • 3 (1985-1989)
  • Power unit
  • Engine adjustment
  • Ignition Coil Test
0
All resistance values are given for a coil temperature of 21°C. Resistance will vary with temperature. Use common sense when interpreting the data.
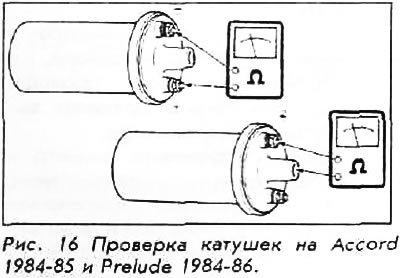

All resistance values are given for a coil…


ACCORD 1984-85 and PRELUDE 1984-86


1. Number the wires and disconnect them from the coil. The small outer terminals of the primary winding are marked on the coil with (+) and (-) symbols. The large terminals of the coil (from which the wires go to the distributor) are the terminals of the secondary winding.

2 With the ignition off, measure the resistance at the terminals of the primary winding. The resistance should be 1.06-1.24 Ohms.

3. Measure the resistance between the secondary winding terminal and the positive terminal of the primary winding; resistance should be 7400-11000 ohms.

4. If the resistance is not within specification, the coil must be replaced.

ACCORD 1986-89 and PRELUDE 198791


1. These vehicles use a 4-pin primary configuration. With the ignition off, disconnect the wires (label them) from the primary and secondary windings of the coil.
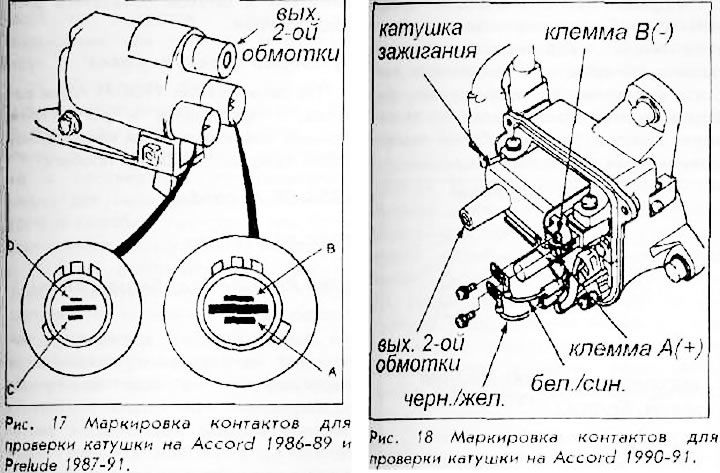
1. These vehicles use a 4-pin primary…


2. Measure the resistance between terminals A and D; resistance on the primary winding should be: on ACCORD 1886-89 and Prelude 1987-89: 1.2-1.5 Ohms; Prelude 1990-91: 0.3-0.4 Ohm.


3. Measure the resistance between terminal A and the terminal of the secondary winding. The resistance should be: on the ACCORD 1986-89 and on the Prelude 1987: 11074-11526 Ohms; Prelude 1988-91: 9040-13560 Ohms.

4. Check the resistance between terminals B and D; it should be around 2100-2300 Ohm for all the cars described.

5. Measure the resistance between terminals A and C. There should be continuity.

6. All specified conditions must be met; if any condition is not met, the coil must be replaced.

ACCORD 1990-91


1. The ignition coil is located inside the distributor. With the ignition off, remove the distributor cap.

2. Remove the screws holding the black/yellow and white/blue wires to the terminals. The black/yellow wire is connected to the (+) terminal of the primary winding, and the white/blue wire is connected to the (-).

3. Measure the resistance between the terminals. The resistance should be 0.6-0.8 Ohm.

4. Measure the resistance between the (+) primary winding and the secondary winding terminal. The resistance should be 12800-19200 Ohm.

5. All conditions must be met; if any condition is not met, the coil must be replaced.

(You will find the original on the portal: HondaBook.ru)
This article is available at: russian, bulgarian, belarusian, ukrainian, serbian, croatian, romanian, polish, slovak, hungarian
This information has been verified: Yaroslav Shiryaev
Share with friends:
◀ Previous
Accord 3: Engine adjustment
Next ▶

Checking the spark
Checking the breaker module input
Checking the breaker module
Checking and adjusting the magnetic resistance gap
Electronic ignition — description and diagnostics
Replacement of ignition system parts
Ignition timing — checking and adjustment
Valve clearance — adjustment
Adjusting the air-fuel mixture
Idle speed control
See also other articles from Honda manuals:
Ignition coil — inspection and replacement Honda Civic 3 and 4 (1983-1991)
Checking the ignition timing angle Honda Fit 1 (2001-2008)
Ignition Coil — Checking and Replacing Honda CR-V 1 (1995-2001, petrol)
Testing the ignition coil Honda HR-V 1 (1998-2006, petrol)
Ignition switch Honda Avancier 1 (1999-2003, petrol)
Link in different formats to this article
Comments and feedback from visitors
No comments yet


How much will 46 + 17 ?


Accord 6 (1997-2002) 
  • General information
  • Introduction to the guide
  • User manual
  • Maintenance
  • Power unit
  • Four-cylinder engines
  • Six-cylinder engines
  • Engine overhaul
  • Cooling system
  • Heater and air conditioner
  • Power and exhaust systems
  • Engine electrical equipment
  • Engine management
  • Transmission
  • Mechanical gearbox
  • Automatic gearbox
  • Clutch and drive shafts
  • Chassis and running gear
  • Brake system
  • Car suspension
  • Steering
  • Body and interior
  • Exterior (external elements)
  • Interior (internal elements)
  • Electrical equipment
  • Equipment and devices
  • Electrical circuits
Accord 3 (1985-1989) 
  • General information
  • Maintenance
  • Power unit
  • Engine adjustment
  • Engine repair
  • Engine electrics
  • Emission management
  • Engine management (carburetor)
  • Electronic injection
  • Programmable injection
  • Schematic of emission system
  • Fuel system
  • Feedback management
  • Transmission
  • Manual gearbox
  • Automatic gearbox
  • Clutch
  • Chassis and running gear
  • Front suspension
  • Rear suspension
  • Steering
  • Brake system
  • Electrical equipment
  • Ventilation and heating
  • Air conditioner
  • Cruise control system
  • Equipment and devices
HondaBook.ru © 2018–2026 • Mobile version • Sitemap: EN BG BY UA RS HR RO PL SK HU • Feedback • Driver Information • Search system • Bookmark
Accord 3 (1985-1989) • Accord 6 (1997-2002) • Civic 3 and 4 (1983-1991) • Civic 5 and 6 (1991-2000) • Civic 6 (1995-2000) • Civic 7 (2000-2005) • Civic 8 (2005-2011) • Fit 1 (2001-2008) • CR-V 1 (1995-2001) • CR-V 2 (2002-2006) • HR-V 1 (1998-2006) • Avancier 1 (1999-2003) •
 
This website uses cookies to ensure proper functioning. By clicking "OK," you agree.