
2. Remove the wheel.
3. If required, disconnect the brake hose clamp from the shock absorber or knuckle by unscrewing the mounting bolts.
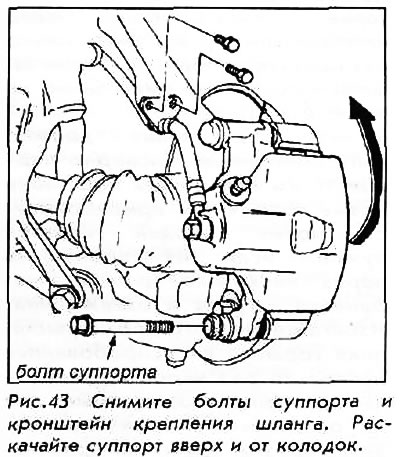
4. Turn off the bottom fixing bolt of a support and turn away a support up from pads.
5. Remove pad gasket and fastener. Remove the pads from the caliper.
For installation:
6. Completely clean the caliper; remove any rust from the disc or rotor lugs. Check the brake rotor for gouges or cracks. If there is any deep scratch, then the rotor must be replaced.
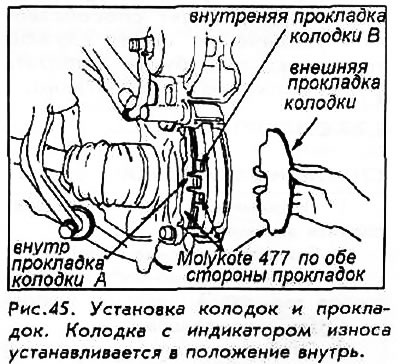
7. Establish fastening of blocks. Lubricate both surfaces of the gasket and the back of the brake pad. DO NOT apply lubricant to the brake pad surface.
8. Install pads and gaskets. The block with the wear indicator is placed inside.
9. Insert the caliper piston so that the caliper is over the pads. This is most easily done with the large C-clamp. As the piston is pushed back into the caliper, fluid will tend to flow into the master cylinder reservoir. Some liquid may need to be drained to prevent overflow.
10. Return the caliper to its place and tighten the mounting bolt to 45 Nm.
11. Attach the brake hose back if it has moved. Install the wheel and lower the car to the ground.
12. Check the master cylinder and add fluid as needed, then replace the master cylinder cap cylinder.
13. Depress the brake pedal several times and check that the movement feels normal. The first press of the brake pedal can have a very "long" pedals due to pistons that pull back. Always apply the brakes several times before driving off. After replacing the pads, bleeding is usually not necessary.
Braking should be moderate for about the first 10 km or until the new pads are worn in. New pads will shrink better if they are run through a few cycles of moderate heating and cooling. Avoid sudden braking until the brakes have been tried several times at intervals necessary for them to cool down. The time spent in this way on the correct landing will help to increase the service life of the brakes; they will work more calmly and efficiently.