HondaBook.ru
Auto companies Volkswagen Auto companies Ford Auto companies Lada Auto companies Skoda Auto companies BMW Auto companies Mazda Auto companies Peugeot
English Русский
Български
Беларускі
Український
Српски
Hrvatski
Română
Polski
Slovenský
Magyar
Bookmark Contacts Sitemap   


Accord Civic Fit / Jazz CR-V HR-V Others Articles
CR-V 1 (1995-2001, petrol) CR-V 2 (2002-2006, petrol)

Checking the balancing shafts (Honda CR-V 2)

  • Main
  • Honda CR-V
  • 2 (2002-2006, petrol)
  • Power unit
  • Lubrication system
  • Checking the balancing shafts
0
1. Place the balance shaft in place by sliding it away from the oil pump sprocket.

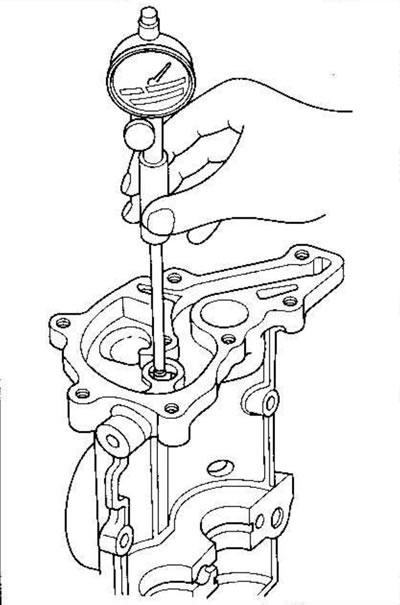
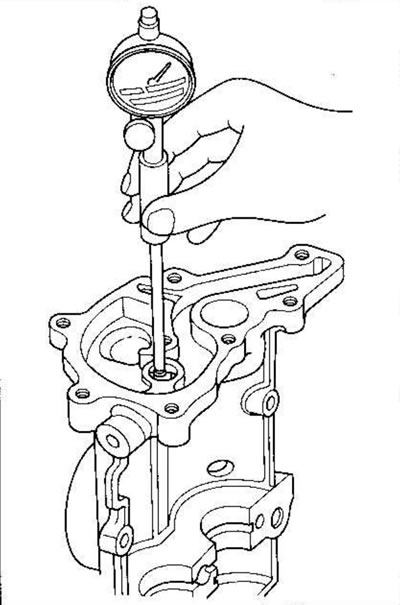
2. Set the indicator to zero by resting it against the end of the balance shaft, then move the balance shaft in the forward and reverse directions and measure the axial play.
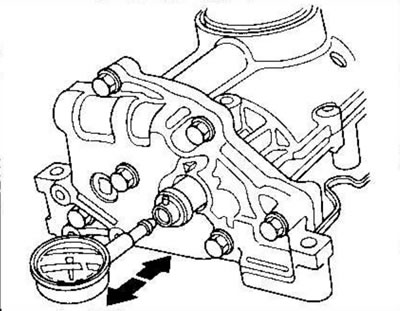
2. Set the indicator to zero by resting it…


Axial clearance of front and rear balance shafts:

Standard (new)0.070-0.135 mm
Redistribution0.15 mm

3. Remove the mud deflector (A) and balance shaft upper bracket (B), then remove the front (C) and rear (D) balance shafts.
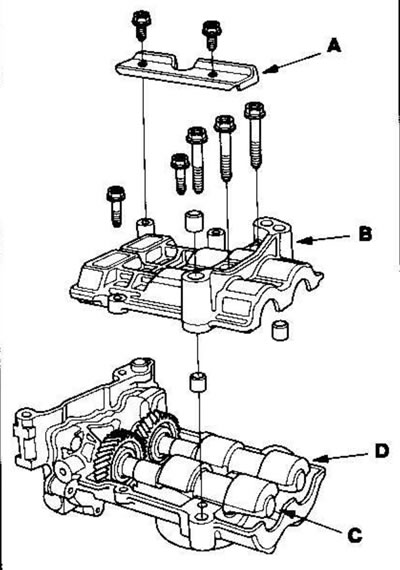
3. Remove the mud deflector (A) and balance shaft…


4. Measure the inner diameter of bearing No. 1 for the holes of the front and rear balance shafts.

Bearing inner diameter:

FrontStandard (new)20,000-20,020 mm
Redistribution20.03 mm
RearStandard (new)24,000-24,020 mm
Redistribution24.03 mm


Front:

Front:


Rear:

Rear:


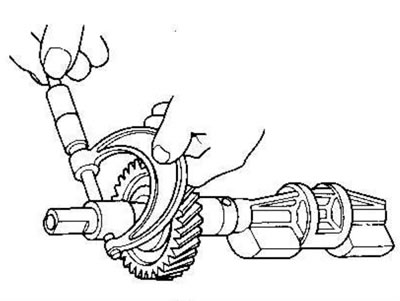
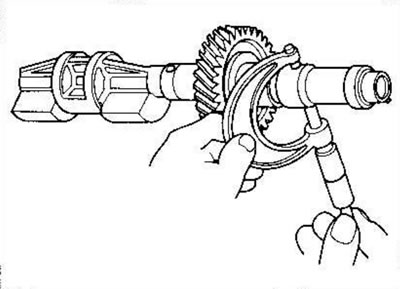
5. Measure the diameters of journals No. 1 on the front and rear balance shafts.

Neck diameter:

FrontStandard (new)19,938-19,950 mm
Redistribution19.92 mm
RearStandard (new)23,938-23,950 mm
Redistribution23.92 mm

Front:

Front:


Rear:

Rear:


6. Wipe journals No. 2 and bearing shells of balance shafts with a clean cloth.


7. Place a length of calibrated Plastigage wire across each neck.

8. Reinstall the bearings and upper balance shaft bracket, then tighten the bolts.

Note: Do not rotate the balance shaft during inspection.


9. Remove the upper balance shaft bracket and bearings again and measure the widest part of the flattened wire.
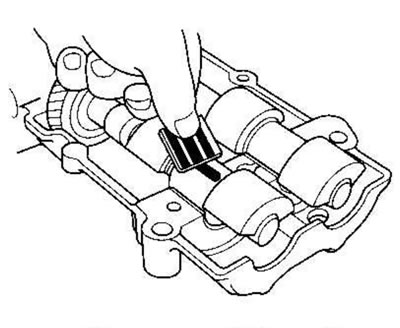
9. Remove the upper balance shaft bracket and…


If the oil clearance of journal No. 2 of the balance shafts exceeds the limit, install new bearings and recheck. If the clearance still exceeds the limit, replace the balance shafts.


Oil clearance of journal No. 2:

Standard (new)0.060-0.120 mm
Redistribution0.15 mm

10. Align the stamped mark on the rear balance shaft centered between the two stamped marks on the front balance shaft, then install the balance shafts into the lower balance shaft bracket.
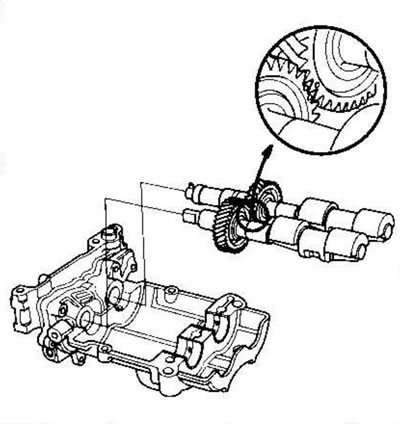
10. Align the stamped mark on the rear balance…


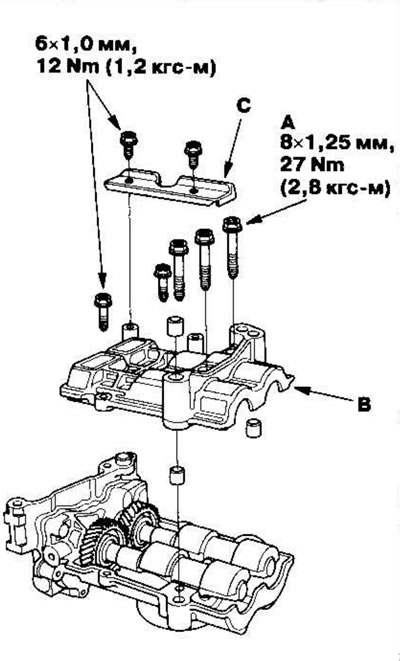
11. Apply engine oil to the threads of the 8mm bolts (A).


11. Apply engine oil to the threads of the 8mm…


12. Install the upper balance shaft bracket (B) and mud deflector (C).

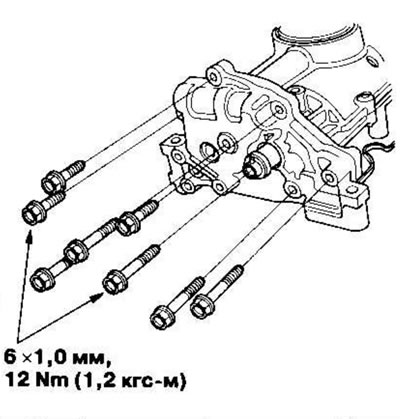
13. Install the oil pump housing.
13. Install the oil pump housing.


[Full version on the source website «www.HondaBook.ru»]
This article is available at: russian, bulgarian, belarusian, ukrainian, serbian, croatian, romanian, polish, slovak, hungarian
This information has been verified: Mikhail Kopasov
Share with friends:
◀ Previous
CR-V 2: Lubrication system
Next ▶

Checking the oil pump
Removal the oil pump
Oil pump
Replacing the oil filter holder
Replacing the oil filter (French oil filter (3/4 turn))
Installing an oil pump
Replacing the oil pressure sensor
See also other articles from Honda manuals:
Removal and checking the condition of the balance shafts (4-cylinder… Honda Accord 6 (1997-2002)
Checking the fluid level in the power steering Honda Civic 3 and 4 (1983-1991)
Checking tire pressure and condition Honda Fit 1 (2001-2008)
Checking drive shafts Honda HR-V 1 (1998-2006, petrol)
Checking and replacing fuses Honda Avancier 1 (1999-2003, petrol)
Link in different formats to this article
Comments and feedback from visitors
No comments yet


How much will 44 + 37 ?


CR-V 2 (2002-2006, petrol) 
  • General information
  • User manual
  • Technical data
  • Maintenance
  • Power unit
  • Engine repair
  • Lubrication system
  • Cooling system
  • Exhaust system
  • Fuel system
  • Engine management
  • Engine electrical equipment
  • Transmission
  • Clutch
  • Manual gearbox
  • Automatic gearbox
  • Rear differential
  • Drive shafts
  • Chassis and running gear
  • Steering
  • Front suspension
  • Rear suspension
  • Brake system
  • Body and interior
  • Exterior (external elements)
  • Interior (internal elements)
  • Doors, locks and windows
CR-V 1 (1995-2001, petrol) 
  • General information
  • Maintenance
  • Tips for car owner
  • Power unit
  • Engine repair
  • Engine overhaul
  • Cooling and lubrication system
  • Engine electrical equipment
  • Control system
  • Fuel system
  • Transmission
  • Clutch and drive shafts
  • Car gearbox
  • Chassis and running gear
  • Front suspension
  • Rear suspension
  • Steering
  • Brake system
  • Body and interior
  • Body service
  • Exterior (external elements)
  • Interior (internal elements)
  • Electrical equipment
  • Equipment and devices
  • Electrical circuits
HondaBook.ru © 2018–2026 • Mobile version • Sitemap: EN BG BY UA RS HR RO PL SK HU • Feedback • Driver Information • Search system • Bookmark
Accord 3 (1985-1989) • Accord 6 (1997-2002) • Civic 3 and 4 (1983-1991) • Civic 5 and 6 (1991-2000) • Civic 6 (1995-2000) • Civic 7 (2000-2005) • Civic 8 (2005-2011) • Fit 1 (2001-2008) • CR-V 1 (1995-2001) • CR-V 2 (2002-2006) • HR-V 1 (1998-2006) • Avancier 1 (1999-2003) •
 
This website uses cookies to ensure proper functioning. By clicking "OK," you agree.