
HondaBook.ru
Auto companies Volkswagen Auto companies Ford Auto companies Lada Auto companies Skoda Auto companies BMW Auto companies Mazda Auto companies Peugeot
English Русский
Български
Беларускі
Український
Српски
Hrvatski
Română
Polski
Slovenský
Magyar
Bookmark Contacts Sitemap   


Accord Civic Fit / Jazz CR-V HR-V Others Articles
Accord 3 (1985-1989) Accord 6 (1997-2002)

Removal and checking the condition of the balance shafts (4-cylinder engines) (Honda Accord 6)

  • Main
  • Honda Accord
  • 6 (1997-2002)
  • Power unit
  • Engine overhaul
  • Removal and checking the condition of the balance shafts (4-cylinder engines)
0
Contents: Removal ⇊ Examination ⇊

Removal
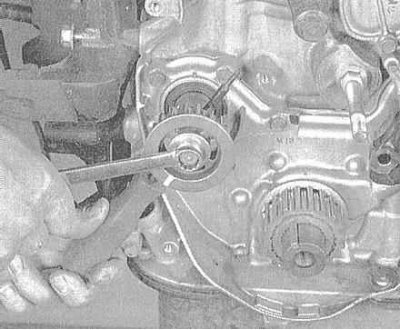


Removal


1. Insert a long 6x100 mm bolt (or a long screwdriver of a suitable diameter) into a special hole in the journal of the front balance shaft and, holding the shaft from turning with it, loosen the gear mounting bolt.

2. Remove the rear balance shaft gear housing.

3. To lock the rear balance shaft, insert a bolt or screwdriver into the access hole (remove the plug first) in the rear wall of the cylinder block. Unbolt the rear shaft gear casing. Now unbolt and remove the shaft drive gear from the shaft.

Note: Make a mark on the bolt at a distance of 74 mm from the end cut. The bolt should not be inserted into the block deeper than this mark.


4. Remove the oil pump housing.
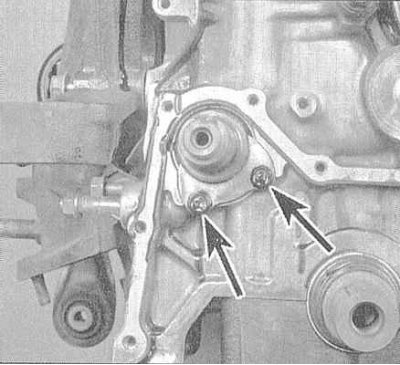
4. Remove the oil pump housing.


5. Remove the two mounting bolts and the front balance shaft thrust plate. Carefully remove the shafts from the block, being careful not to damage the bearing surfaces.


Examination


1. Carefully wipe the shafts and carefully inspect their journals for scoring, scratches, signs of excessive wear and traces of overheating. Usually, wear of the journals is manifested by the appearance of areas polished to a mirror shine.

2. Using a micrometer, measure the diameters of the front and rear edges of each journal. The difference between the measurement results corresponds to the amount of taper present. If the taper exceeds the permissible value according to the specifications, the shaft must be replaced.

3. Place each shaft in turn in V-shaped blocks and fix a dial gauge (DTI) in a plane perpendicular to the shaft axis so that its plunger touches the surface of the middle journal. Rotate the shaft in the blocks to determine its runout. Compare the results of the measurements with the requirements of the Specifications; excessively bent shafts are subject to replacement.

4. Measure the diameters of the shaft journals and the inside diameters of the corresponding bearings. By subtracting the results of the first measurements from the results of the second, determine the value of the clearance of the shaft fit in the bearings. Compare the measurement results with the requirements of the Specifications. If the measurement results are outside the permissible range, and the shafts themselves are in satisfactory condition, deliver the unit to a service workshop for the purpose of replacing the bearings.

[The text can be found on the website www.hondabook.ru]
This article is available at: russian, bulgarian, belarusian, ukrainian, serbian, croatian, romanian, polish, slovak, hungarian
This information has been verified: Timofey Goryachev
Share with friends:
◀ Previous
Accord 6: Engine overhaul
Next ▶

Cylinder head assembly
Valve maintenance
Cleaning and checking the condition of the cylinder head
Disassembling the cylinder head
The procedure for disassembling the engine in preparation for major repairs
Removal connecting rod and piston assemblies
Removal the crankshaft
Cleaning the engine block
Checking the condition of the engine block
Honing of cylinder mirrors
See also other articles from Honda manuals:
Cleaning and checking the condition of the cylinder head Honda Civic 6 (1995-2000)
Checking tire pressure and condition Honda Fit 1 (2001-2008)
Checking the general condition of the cylinder head Honda CR-V 1 (1995-2001, petrol)
Checking drive shafts Honda HR-V 1 (1998-2006, petrol)
Checking the balance shaft belt Honda Avancier 1 (1999-2003, petrol)
Link in different formats to this article
Comments and feedback from visitors
No comments yet


How much will 25 + 44 ?


Accord 6 (1997-2002) 
  • General information
  • Introduction to the guide
  • User manual
  • Maintenance
  • Power unit
  • Four-cylinder engines
  • Six-cylinder engines
  • Engine overhaul
  • Cooling system
  • Heater and air conditioner
  • Power and exhaust systems
  • Engine electrical equipment
  • Engine management
  • Transmission
  • Mechanical gearbox
  • Automatic gearbox
  • Clutch and drive shafts
  • Chassis and running gear
  • Brake system
  • Car suspension
  • Steering
  • Body and interior
  • Exterior (external elements)
  • Interior (internal elements)
  • Electrical equipment
  • Equipment and devices
  • Electrical circuits
Accord 3 (1985-1989) 
  • General information
  • Maintenance
  • Power unit
  • Engine adjustment
  • Engine repair
  • Engine electrics
  • Emission management
  • Engine management (carburetor)
  • Electronic injection
  • Programmable injection
  • Schematic of emission system
  • Fuel system
  • Feedback management
  • Transmission
  • Manual gearbox
  • Automatic gearbox
  • Clutch
  • Chassis and running gear
  • Front suspension
  • Rear suspension
  • Steering
  • Brake system
  • Electrical equipment
  • Ventilation and heating
  • Air conditioner
  • Cruise control system
  • Equipment and devices
HondaBook.ru © 2018–2026 • Mobile version • Sitemap: EN BG BY UA RS HR RO PL SK HU • Feedback • Driver Information • Search system • Bookmark
Accord 3 (1985-1989) • Accord 6 (1997-2002) • Civic 3 and 4 (1983-1991) • Civic 5 and 6 (1991-2000) • Civic 6 (1995-2000) • Civic 7 (2000-2005) • Civic 8 (2005-2011) • Fit 1 (2001-2008) • CR-V 1 (1995-2001) • CR-V 2 (2002-2006) • HR-V 1 (1998-2006) • Avancier 1 (1999-2003) •
 
This website uses cookies to ensure proper functioning. By clicking "OK," you agree.