HondaBook.ru
Auto companies Volkswagen Auto companies Ford Auto companies Lada Auto companies Skoda Auto companies BMW Auto companies Mazda Auto companies Peugeot
English Русский
Български
Беларускі
Український
Српски
Hrvatski
Română
Polski
Slovenský
Magyar
Bookmark Contacts Sitemap   


Accord Civic Fit / Jazz CR-V HR-V Others Articles
CR-V 1 (1995-2001, petrol) CR-V 2 (2002-2006, petrol)

Disassembling the CV joint (Honda CR-V 1)

  • Main
  • Honda CR-V
  • 1 (1995-2001, petrol)
  • Transmission
  • Clutch and drive shafts
  • Disassembling the CV joint
0
Disassembling the CV joint, cleaning and replacing the grease is required when replacing the joint boot due to damage. During disassembly and assembly, all cover clamps are also changed. If the outer joint fails on vehicles manufactured before 1998, the axle shaft assembly with the joint should be replaced. When purchasing axle shaft parts, please keep in mind that axle shaft parts for vehicles with ABS and without ABS are different.

Half shaft (Odyssey V6): 1. Left; 2. Right; 3.…

Half shaft (Odyssey V6): 1. Left; 2. Right; 3. Double turn clamp (replace); 4. Spring ring (replace); 5. Outer CV joint; 6, 10. Apply grease; 7. Outer cover; 8. Clamp with tongue and clamps (replace); 9. Half-axle shaft; 11. Inner cover; 12. Crosspiece; 13. Spring ring; 14. Right axle shaft; 15. Inner CV joint; 16. Snap ring (replace)
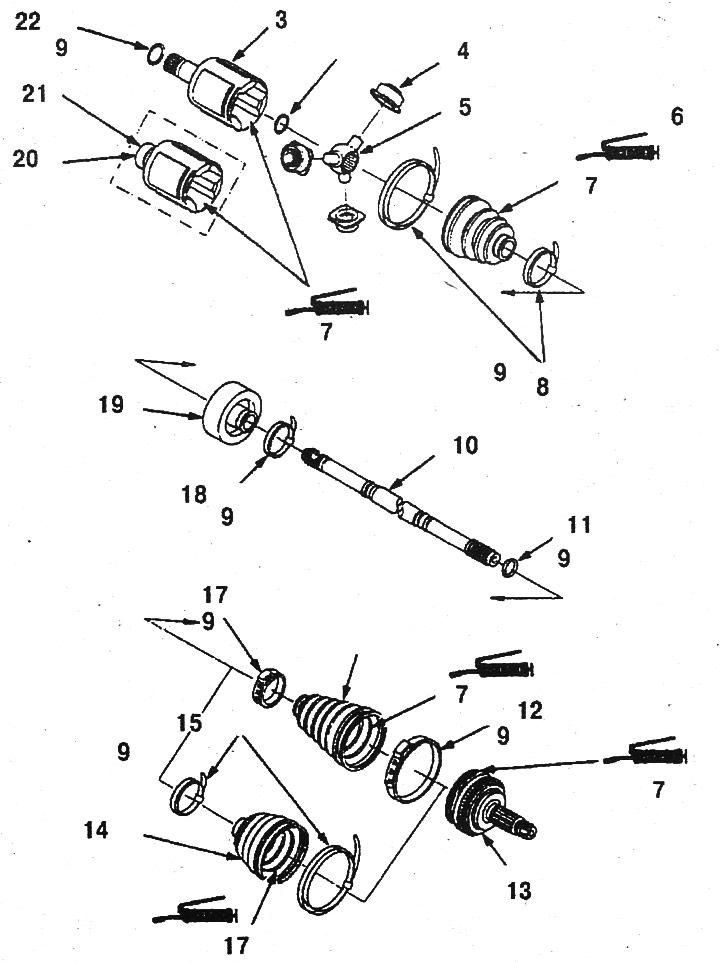

Half shaft (CR-V): 1. Amount of lubricant. Inner…

Half shaft (CR-V): 1. Amount of lubricant. Inner hinge: all models 130 g, inner hinge spline grease 0.5-1.0 g.; 2. Outer joint: 1997 models - 130-140 g, all 1999 models - 140-150 g; 3. Inner CV joint; 4. Roller; 5. Crosspiece; 6. Inner cover; 7. Apply grease; 8, 15. Double-turn clamp; 9. Replace; 10. Half-axle shaft; 11. Spring ring; 12, 17. Clamp with tongue and clamps (replace); 13. Outer CV joint; 14, 16. Outer cover; 18. Intermediate support clamp; 19. Intermediate support; 20. Splines (A); 21. Left inner hinge; 22. Retaining ring (replace)


1. Remove the axle shaft.

2. Mark the relative positions of the intermediate support and the hinge covers on the axle shaft.

3. Mark the position of the inner joint roller grooves.

4. Remove the boot clamps, then remove the boot and inner hinge housing (if the clamps are welded, then cut them off).

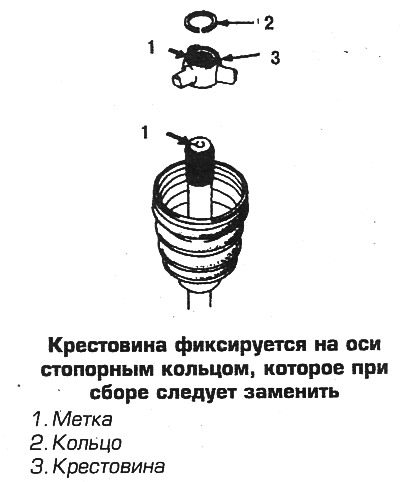
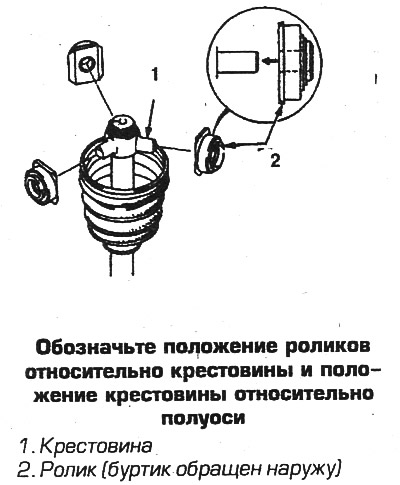
5. Mark the position of the rollers relative to the crosspiece and the position of the crosspiece relative to the axle shaft.

6. Remove the rollers, remove the spring rings, crosspiece and retaining ring (it is recommended to remove the crosspiece with a puller).

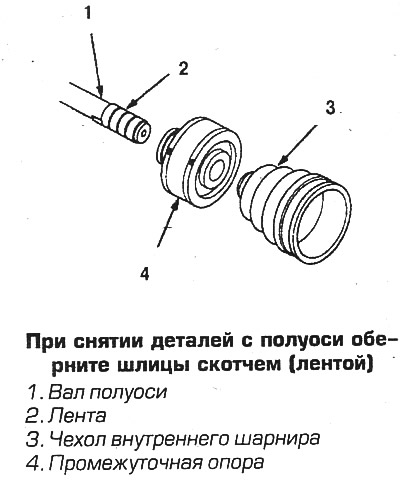
7. On vehicles before 1998, the outer joint cannot be removed from the shaft. Wrap the splines with tape and remove the inner hinge boot, intermediate support and outer boot.

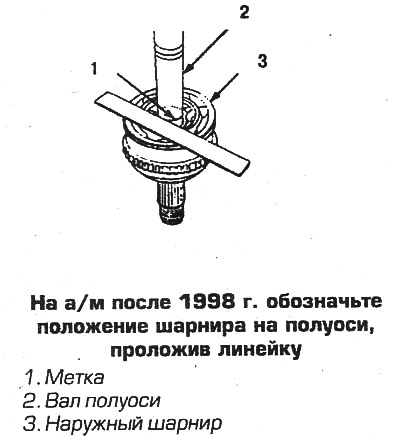
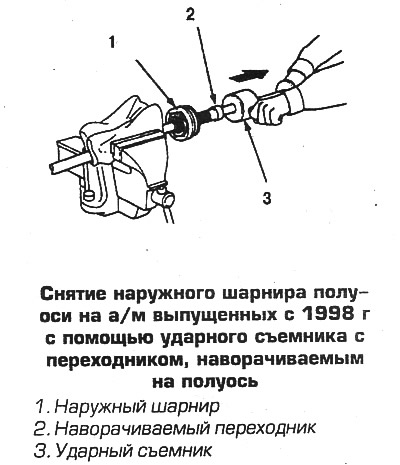
8. On vehicles after 1998, remove the outer joint using an impact puller as follows.
  • A. Mark the position of the hinge relative to the axle shaft.
  • B. Clamp the axle shaft in a vice, wrapping it in a rag.
  • B. Screw the impact puller adapter onto the threaded part of the joint and knock the joint out of the axle shaft.
  • G. Remove the retaining ring
  • D. Wrap the splines with tape and remove the cover.
D. Wrap the splines with tape and remove the…

D. Wrap the splines with tape and remove the…

D. Wrap the splines with tape and remove the…


[Material obtained from the website «HondaBook»]
This article is available at: russian, bulgarian, belarusian, ukrainian, serbian, croatian, romanian, polish, slovak, hungarian
This information has been verified: Emil Safonov
Share with friends:
◀ Previous
CR-V 1: Clutch and drive shafts
Next ▶

CV joints — removal and installation
Half shafts — inspection, removal and installation
CV joint assembly
Clutch — removal and installation
Free play of the clutch pedal
Clutch Master Cylinder — Removal and Installation
Slave cylinder — removal and installation
See also other articles from Honda manuals:
Constant velocity joint (CV joint) Honda Accord 3 (1985-1989)
Cardan shaft and cardan joint — description and control Honda Civic 3 and 4 (1983-1991)
Disassembling the rocker shaft assembly with the rocker arms Honda Fit 1 (2001-2008)
Disassembling the rear differential Honda HR-V 1 (1998-2006, petrol)
Disassembling the throttle body Honda Avancier 1 (1999-2003, petrol)
Link in different formats to this article
Comments and feedback from visitors
No comments yet


How much will 13 + 22 ?


CR-V 2 (2002-2006, petrol) 
  • General information
  • User manual
  • Technical data
  • Maintenance
  • Power unit
  • Engine repair
  • Lubrication system
  • Cooling system
  • Exhaust system
  • Fuel system
  • Engine management
  • Engine electrical equipment
  • Transmission
  • Clutch
  • Manual gearbox
  • Automatic gearbox
  • Rear differential
  • Drive shafts
  • Chassis and running gear
  • Steering
  • Front suspension
  • Rear suspension
  • Brake system
  • Body and interior
  • Exterior (external elements)
  • Interior (internal elements)
  • Doors, locks and windows
CR-V 1 (1995-2001, petrol) 
  • General information
  • Maintenance
  • Tips for car owner
  • Power unit
  • Engine repair
  • Engine overhaul
  • Cooling and lubrication system
  • Engine electrical equipment
  • Control system
  • Fuel system
  • Transmission
  • Clutch and drive shafts
  • Car gearbox
  • Chassis and running gear
  • Front suspension
  • Rear suspension
  • Steering
  • Brake system
  • Body and interior
  • Body service
  • Exterior (external elements)
  • Interior (internal elements)
  • Electrical equipment
  • Equipment and devices
  • Electrical circuits
HondaBook.ru © 2018–2026 • Mobile version • Sitemap: EN BG BY UA RS HR RO PL SK HU • Feedback • Driver Information • Search system • Bookmark
Accord 3 (1985-1989) • Accord 6 (1997-2002) • Civic 3 and 4 (1983-1991) • Civic 5 and 6 (1991-2000) • Civic 6 (1995-2000) • Civic 7 (2000-2005) • Civic 8 (2005-2011) • Fit 1 (2001-2008) • CR-V 1 (1995-2001) • CR-V 2 (2002-2006) • HR-V 1 (1998-2006) • Avancier 1 (1999-2003) •
 
This website uses cookies to ensure proper functioning. By clicking "OK," you agree.