
HondaBook.ru
Auto companies Volkswagen Auto companies Ford Auto companies Lada Auto companies Skoda Auto companies BMW Auto companies Mazda Auto companies Peugeot
English Русский
Български
Беларускі
Український
Српски
Hrvatski
Română
Polski
Slovenský
Magyar
Bookmark Contacts Sitemap   


Accord Civic Fit / Jazz CR-V HR-V Others Articles
CR-V 1 (1995-2001, petrol) CR-V 2 (2002-2006, petrol)

Lower ball joint — removal and installation (Honda CR-V 1)

  • Main
  • Honda CR-V
  • 1 (1995-2001, petrol)
  • Chassis and running gear
  • Front suspension
  • Lower ball joint — removal and installation
0
Caution: On Odyssey V6 vehicles, the lower ball joint and control arm are a one-piece assembly. If the ball joint fails, replace the lower arm assembly.


CR-V and 4-cylinder Odyssey


Removal


1. Remove the brake caliper and disc (see Ch. 9).

2. Remove the steering knuckle (see below).

3. Remove the ball joint boot by removing the spring ring. Replace the damaged cover.

4. Press the ball joint out of the knuckle using the 07HAF-SF101110 puller (is secured to the support with a crown nut for securing the support) with the 07HAF-SF10130 ejector, clamping the fist in a vice (photo). An equivalent device can also be used.
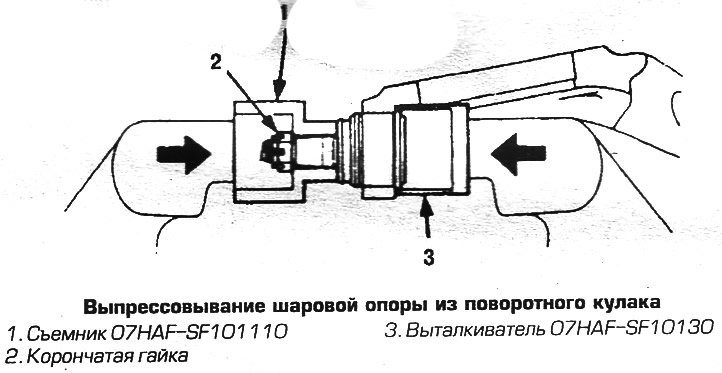
4. Press the ball joint out of the knuckle using…


Installation


5. Install the new ball joint into the steering knuckle hole.

6. Press in the ball joint using puller 07HAF-SF101110 with stop 07HAF-SF10120 (photo), squeezing the marks.
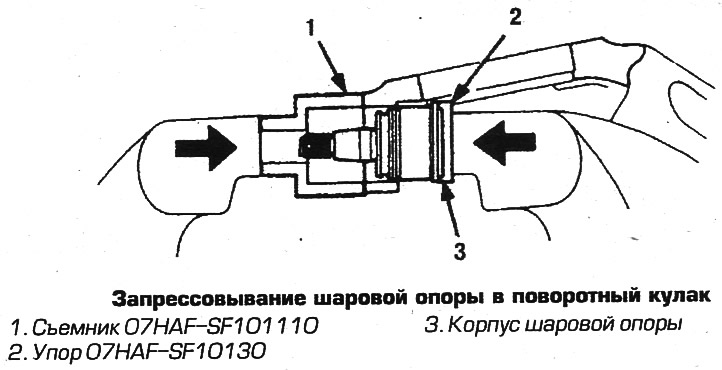
6. Press in the ball joint using puller…


7. Fill the ball joint boot with grease.


8. Place the boot ring on the conical mandrel 07974-SA50700 or 07GAG-SD40700. Rotate the bolt to position the mandrel so that its lower edge is directly above the ring groove. Secure the cover with a spring ring by placing it on the cone and inserting it into the groove of the cover.
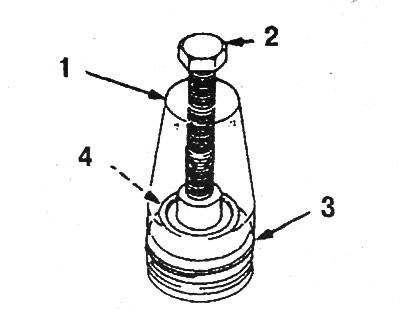
Installing the ball joint boot spring ring: 1.…

Installing the ball joint boot spring ring: 1. Fixture 07GAG-SD40700; 2. Bolt (by rotating the bolt, adjust the device); 3. Ring; 4. Cover


9. Further assembly is carried out in reverse order. Adjust the front wheel alignment angles.

(Full text available on the portal: HondaBook.ru)
This article is available at: russian, bulgarian, belarusian, ukrainian, serbian, croatian, romanian, polish, slovak, hungarian
This information has been verified: Emil Safonov
Share with friends:
◀ Previous
CR-V 1: Front suspension
Next ▶

Lower ball joint — check
Upper Ball Joint — Inspection (CR-V and 4-cyl Odyssey)
Rack — removal and installation
Springs — removal and installation
Front suspension parts
Anti-roll bar — removal and installation
Suspension Rod (4-Cylinder Odyssey) — Removal and Installation
Upper Control Arm (4-Cylinder Odyssey and CR-V) — Removal and Installation
Lower control arm — removal and installation
Lower arm bushings — replacement
See also other articles from Honda manuals:
Lower ball joint inspection Honda Accord 3 (1985-1989)
Removal the front ball joint Honda Civic 8 (2005-2011)
Lower control arm of the front suspension Honda Fit 1 (2001-2008)
Replacing ball joint covers Honda HR-V 1 (1998-2006, petrol)
Steering gear — replacing the ball joint boot Honda Avancier 1 (1999-2003, petrol)
Link in different formats to this article
Comments and feedback from visitors
No comments yet


How much will 38 + 46 ?


CR-V 2 (2002-2006, petrol) 
  • General information
  • User manual
  • Technical data
  • Maintenance
  • Power unit
  • Engine repair
  • Lubrication system
  • Cooling system
  • Exhaust system
  • Fuel system
  • Engine management
  • Engine electrical equipment
  • Transmission
  • Clutch
  • Manual gearbox
  • Automatic gearbox
  • Rear differential
  • Drive shafts
  • Chassis and running gear
  • Steering
  • Front suspension
  • Rear suspension
  • Brake system
  • Body and interior
  • Exterior (external elements)
  • Interior (internal elements)
  • Doors, locks and windows
CR-V 1 (1995-2001, petrol) 
  • General information
  • Maintenance
  • Tips for car owner
  • Power unit
  • Engine repair
  • Engine overhaul
  • Cooling and lubrication system
  • Engine electrical equipment
  • Control system
  • Fuel system
  • Transmission
  • Clutch and drive shafts
  • Car gearbox
  • Chassis and running gear
  • Front suspension
  • Rear suspension
  • Steering
  • Brake system
  • Body and interior
  • Body service
  • Exterior (external elements)
  • Interior (internal elements)
  • Electrical equipment
  • Equipment and devices
  • Electrical circuits
HondaBook.ru © 2018–2026 • Mobile version • Sitemap: EN BG BY UA RS HR RO PL SK HU • Feedback • Driver Information • Search system • Bookmark
Accord 3 (1985-1989) • Accord 6 (1997-2002) • Civic 3 and 4 (1983-1991) • Civic 5 and 6 (1991-2000) • Civic 6 (1995-2000) • Civic 7 (2000-2005) • Civic 8 (2005-2011) • Fit 1 (2001-2008) • CR-V 1 (1995-2001) • CR-V 2 (2002-2006) • HR-V 1 (1998-2006) • Avancier 1 (1999-2003) •
 
This website uses cookies to ensure proper functioning. By clicking "OK," you agree.