
Removal and installation
1. Jack up the front of the vehicle and place it on stands.
2. Turn away nuts of fastening of a wheel and remove a wheel.
3. Remove the front mudguard.
4. Remove the cotter pin and unscrew the nut.
Note: When assembling, screw in a new nut and install a new cotter pin.
- Tightening torque - 49 - 59 Nm
5. Disconnect the ball joint from the steering knuckle using the special tool.
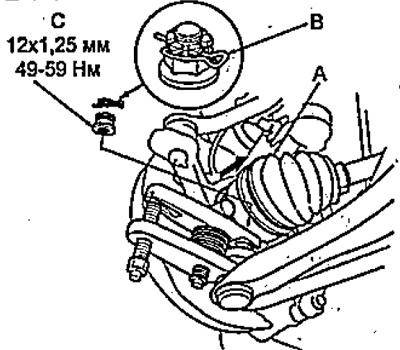
A - drive shaft,
B - cotter pin,
C - nut.
Note: when removing the ball joint, do not press the drive shaft outward, because. the driveshaft inner joint may break.
6. Turn out bolts of fastening of the bottom lever and remove the lever (A) from the stretcher.
Note: Use new bolts when installing.

7. Installation is made in an order, the return to removal.
Note:
- Check ball joints and boots for damage.
- Pre-tighten the bolts and nuts, release the vehicle, stabilize the suspension and finally tighten the bolts and nuts to the specified torque.
- Tighten the ball joint fastening nut with a minimum torque and tighten it, aligning the cotter pin grooves. Do not align the grooves by loosening the nut.
- Before installing the wheels, clean the contact surfaces of the colors and brake discs.
- After installation, check the alignment of the front wheels.