HondaBook.ru
Auto companies Volkswagen Auto companies Ford Auto companies Lada Auto companies Skoda Auto companies BMW Auto companies Mazda Auto companies Peugeot
English Русский
Български
Беларускі
Український
Српски
Hrvatski
Română
Polski
Slovenský
Magyar
Bookmark Contacts Sitemap   


Accord Civic Fit / Jazz CR-V HR-V Others Articles
Accord 3 (1985-1989) Accord 6 (1997-2002)

Removal, inspection and installation of the oil pump (Honda Accord 6)

  • Main
  • Honda Accord
  • 6 (1997-2002)
  • Power unit
  • Four-cylinder engines
  • Removal, inspection and installation of the oil pump
0
Contents: Removal ⇊ Examination ⇊ Installation ⇊

Removal


1. Remove the timing belt and balance shaft drive belt (see Sections Removal, condition check and installation of gear wheels and balance shaft drive belt and Removal, condition check and installation of the timing belt and timing drive gears). Remove the front balance shaft gear and the rear balance shaft gear housing assembly. Disconnect the SKR/TDC sensor wiring from the main braid. Unscrew the four mounting bolts and remove the sensor from the oil pump housing.

2. Remove the engine oil pan (see Section Removal and installation the engine oil pan).
2. Remove the engine oil pan (see Section Removal…


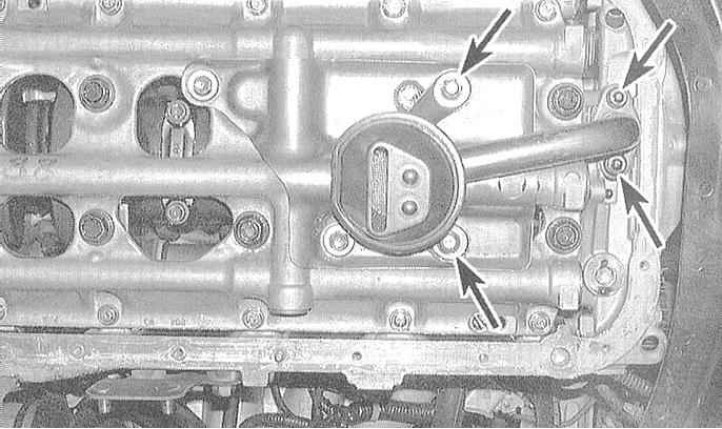
3. Disconnect the oil pickup assembly with the mesh filter and tube from the main bearing cap bridge and the pump housing.

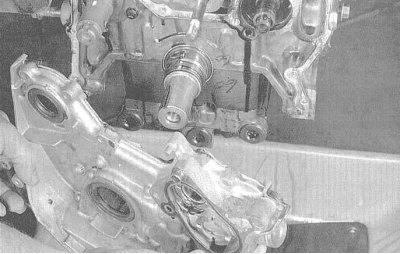
4. Unscrew the mounting bolts and remove the oil pump from the engine.
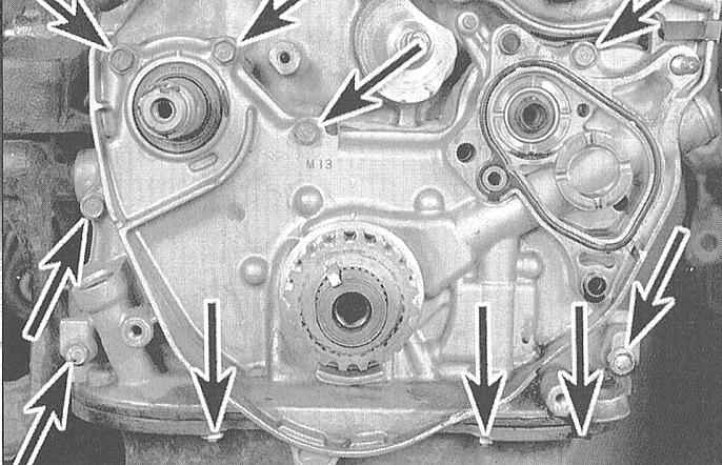
4. Unscrew the mounting bolts and remove the oil…


4. Unscrew the mounting bolts and remove the oil…

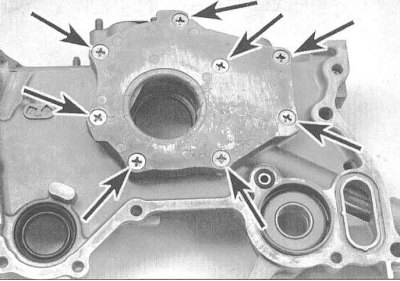
5. Loosen the mounting screws and remove the cover from the pump.


Note: To avoid stripping the slots in the heads of the fastening screws, it is better to loosen them using an impact screwdriver.


Examination
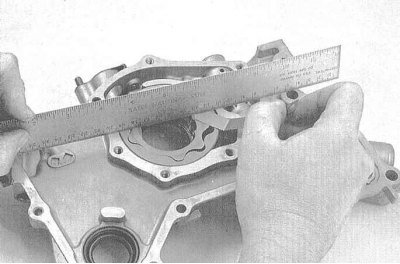


Examination


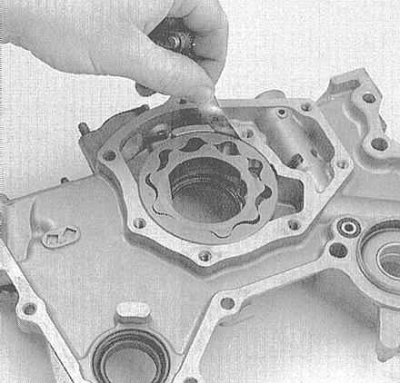
1. Measure the working clearances of the pump gears. Compare the results with the requirements of the Specifications. If the clearances are outside the permissible values, replace the pump.
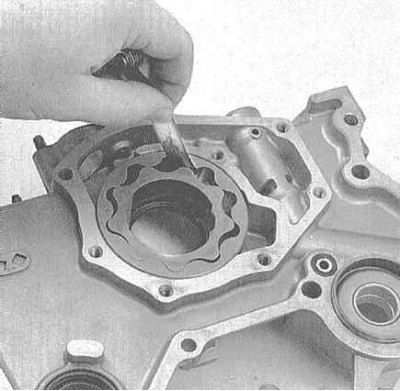
1. Measure the working clearances of the pump…

2. Unscrew the plug of the pressure-reducing valve and remove the valve spring and plunger from the seat in the pump body. Check the spring for deformations, and the plunger for scratches and scoring. Defective components are subject to replacement.


3. Install the gears into the pump body and fill the spaces between their teeth with technical petroleum jelly (as an initial fill during the initial start-up).

4. Lubricate the pump cover mounting screws with anti-seize sealant. Install the cover, screw in the screws and tighten them to the required torque. Install the spring and plunger of the pressure reducing valve into the pump body. After replacing the sealing washer, screw in the plug and tighten it securely.

Installation


1. Lightly coat the pump housing mating surface with RTV sealant. Make sure the guide pin is in place and install the pump, replacing the O-rings first. Coat the threads of the mounting bolts with RTV sealant, screw them in and tighten them to the required torque.

Note: The pump must be installed within 5 minutes after applying the sealant. Make sure that the chamfers on the internal gear of the pump are aligned with the corresponding chamfers on the crankshaft journal.


2. Install the gear assembly with the pinion housing onto the rear balance shaft. Then install the timing belt and balance shaft drive belt.

3. Install the CKP/TDC sensor in place, tightening the bolts securing it to the pump with the required force. Restore the original wiring connection.

4. Reinstall the oil pickup assembly, tightening the mounting bolts to the required torque (remember to replace the sealing gaskets).

5. Install the oil pan (see Section Removal and installation the engine oil pan).

6. Further installation is carried out in the reverse order of dismantling. Finally, do not forget to fill the engine with engine oil and fill the cooling system (see Chapter Settings and ongoing maintenance).


7. Start the engine and check it for any signs of leaks.

Original published on this resource: HondaBook.ru
This article is available at: russian, bulgarian, belarusian, ukrainian, serbian, croatian, romanian, polish, slovak, hungarian
This information has been verified: Timofey Goryachev
Share with friends:
◀ Previous
Accord 6: Four-cylinder engines
Next ▶

Removal and installation the engine oil pan
Removal and installation the cylinder head — removal and installation
Removal, condition check and installation of the camshaft
Replacing the front crankshaft oil seal
Removal, condition check and installation of the timing belt and timing drive…
Removal and installation the flywheel/drive disc
Replacing the rear crankshaft oil seal
Checking the condition and replacing the powertrain suspension supports
Powertrain suspension adjustment system
See also other articles from Honda manuals:
Oil pump — removal, inspection and installation Honda Civic 3 and 4 (1983-1991)
Coolant pump Honda Fit 1 (2001-2008)
Power steering pump Honda CR-V 1 (1995-2001, petrol)
Oil pump — design description Honda HR-V 1 (1998-2006, petrol)
Checking and adjusting the tension of the power steering pump belt Honda Avancier 1 (1999-2003, petrol)
Link in different formats to this article
Comments and feedback from visitors
No comments yet


How much will 40 + 12 ?


Accord 6 (1997-2002) 
  • General information
  • Introduction to the guide
  • User manual
  • Maintenance
  • Power unit
  • Four-cylinder engines
  • Six-cylinder engines
  • Engine overhaul
  • Cooling system
  • Heater and air conditioner
  • Power and exhaust systems
  • Engine electrical equipment
  • Engine management
  • Transmission
  • Mechanical gearbox
  • Automatic gearbox
  • Clutch and drive shafts
  • Chassis and running gear
  • Brake system
  • Car suspension
  • Steering
  • Body and interior
  • Exterior (external elements)
  • Interior (internal elements)
  • Electrical equipment
  • Equipment and devices
  • Electrical circuits
Accord 3 (1985-1989) 
  • General information
  • Maintenance
  • Power unit
  • Engine adjustment
  • Engine repair
  • Engine electrics
  • Emission management
  • Engine management (carburetor)
  • Electronic injection
  • Programmable injection
  • Schematic of emission system
  • Fuel system
  • Feedback management
  • Transmission
  • Manual gearbox
  • Automatic gearbox
  • Clutch
  • Chassis and running gear
  • Front suspension
  • Rear suspension
  • Steering
  • Brake system
  • Electrical equipment
  • Ventilation and heating
  • Air conditioner
  • Cruise control system
  • Equipment and devices
HondaBook.ru © 2018–2026 • Mobile version • Sitemap: EN BG BY UA RS HR RO PL SK HU • Feedback • Driver Information • Search system • Bookmark
Accord 3 (1985-1989) • Accord 6 (1997-2002) • Civic 3 and 4 (1983-1991) • Civic 5 and 6 (1991-2000) • Civic 6 (1995-2000) • Civic 7 (2000-2005) • Civic 8 (2005-2011) • Fit 1 (2001-2008) • CR-V 1 (1995-2001) • CR-V 2 (2002-2006) • HR-V 1 (1998-2006) • Avancier 1 (1999-2003) •
 
This website uses cookies to ensure proper functioning. By clicking "OK," you agree.