
HondaBook.ru
Auto companies Volkswagen Auto companies Ford Auto companies Lada Auto companies Skoda Auto companies BMW Auto companies Mazda Auto companies Peugeot
English Русский
Български
Беларускі
Український
Српски
Hrvatski
Română
Polski
Slovenský
Magyar
Bookmark Contacts Sitemap   


Accord Civic Fit / Jazz CR-V HR-V Others Articles
Accord 3 (1985-1989) Accord 6 (1997-2002)

Powertrain suspension adjustment system (Honda Accord 6)

  • Main
  • Honda Accord
  • 6 (1997-2002)
  • Power unit
  • Four-cylinder engines
  • Powertrain suspension adjustment system
0
Contents: General information ⇊ Examination ⇊

General information


All models equipped with AT are equipped with an electronic control system for adjusting the parameters of the rear support of the power unit. The controlled parameter is the vibration level of the unit at idle speed. Inside the support assembly there are two chambers filled with working fluid. When the engine is idling, the power unit control module (PCM) generates a command to turn on the electromagnetic valve installed on the rear bulkhead of the engine compartment, which controls the supply of vacuum from the intake manifold to the rear support of the power unit suspension. Changing the depth of the vacuum supplied to the assembly leads to a redistribution of the working fluid between the internal chambers of the support, which allows to significantly reduce the level of vibrations transmitted from the engine to the car body. When the engine speed rises above 1000 rpm, the vacuum supply is cut off and the support goes into a passive operating mode, working as a conventional shock absorber cushion.

Examination


1. If the vibration level increases when switching to idle speed, check the vacuum hoses connected to the electromagnetic valve controlling the operation of the rear suspension support of the power unit for signs of leaks and mechanical damage.

2. With the engine warmed up (less than 800 rpm) and idling, ask an assistant to engage the gear (parking brake engaged, foot brake depressed). At this time, turn the power supply to the electromagnetic valve on and off several times (by disconnecting and connecting the electrical connector). If the valve is functioning properly, there should be a noticeable change in the vibration level.
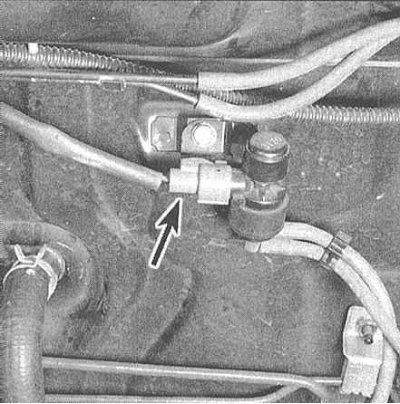


2. With the engine warmed up (less than 800 rpm)…


3. Shift the transmission into "P" or "N", disconnect the wiring harness and check for battery voltage at the black/yellow wire terminal. If there is no voltage, check the circuit from the connector to fuse #6 in the fuse box located under the left instrument panel (see Chapter On-board electrical equipment).

4. Increase the engine speed to 1000 rpm - the voltage should disappear from the black and yellow wire terminal in the valve connector, otherwise check the wiring going to the PCM for signs of a short circuit.

5. Measure the voltage between the terminals of the two connector wires. There should be battery voltage, otherwise check the condition of the circuit between the connector and the PCM.

6. Disconnect the upper vacuum hose from the solenoid valve and apply a vacuum of 228 mm Hg to it using a hand vacuum pump. The vacuum must be maintained for at least 20 seconds, otherwise the hose or the support assembly itself must be replaced.

7. Without turning off the engine, create and release the vacuum several times - there should be a noticeable change in the intensity of vibrations.

8. Disconnect the lower vacuum hose from the electromagnetic valve and check for the presence of a vacuum in the intake manifold. If there is no vacuum, check the condition of the hose. If there is a vacuum, but there is no required response to its supply (see paragraph 7), replace the valve.
This article is available at: russian, bulgarian, belarusian, ukrainian, serbian, croatian, romanian, polish, slovak, hungarian
This information has been verified: Timofey Goryachev
Share with friends:
◀ Previous
Accord 6: Four-cylinder engines
Next ▶

Checking the condition and replacing the powertrain suspension supports
Replacing the rear crankshaft oil seal
Removal and installation the flywheel/drive disc
Removal, inspection and installation of the oil pump
Removal and installation the engine oil pan
 
See also other articles from Honda manuals:
Checking the condition and replacing the powertrain suspension… Honda Civic 6 (1995-2000)
Headlight range correction system Honda Fit 1 (2001-2008)
Valve clearances — adjustment Honda CR-V 1 (1995-2001, petrol)
Anti-lock braking system (ABS) Honda HR-V 1 (1998-2006, petrol)
Seat adjustment Honda Avancier 1 (1999-2003, petrol)
Link in different formats to this article
Comments and feedback from visitors
No comments yet


How much will 17 + 46 ?


Accord 6 (1997-2002) 
  • General information
  • Introduction to the guide
  • User manual
  • Maintenance
  • Power unit
  • Four-cylinder engines
  • Six-cylinder engines
  • Engine overhaul
  • Cooling system
  • Heater and air conditioner
  • Power and exhaust systems
  • Engine electrical equipment
  • Engine management
  • Transmission
  • Mechanical gearbox
  • Automatic gearbox
  • Clutch and drive shafts
  • Chassis and running gear
  • Brake system
  • Car suspension
  • Steering
  • Body and interior
  • Exterior (external elements)
  • Interior (internal elements)
  • Electrical equipment
  • Equipment and devices
  • Electrical circuits
Accord 3 (1985-1989) 
  • General information
  • Maintenance
  • Power unit
  • Engine adjustment
  • Engine repair
  • Engine electrics
  • Emission management
  • Engine management (carburetor)
  • Electronic injection
  • Programmable injection
  • Schematic of emission system
  • Fuel system
  • Feedback management
  • Transmission
  • Manual gearbox
  • Automatic gearbox
  • Clutch
  • Chassis and running gear
  • Front suspension
  • Rear suspension
  • Steering
  • Brake system
  • Electrical equipment
  • Ventilation and heating
  • Air conditioner
  • Cruise control system
  • Equipment and devices
HondaBook.ru © 2018–2026 • Mobile version • Sitemap: EN BG BY UA RS HR RO PL SK HU • Feedback • Driver Information • Search system • Bookmark
Accord 3 (1985-1989) • Accord 6 (1997-2002) • Civic 3 and 4 (1983-1991) • Civic 5 and 6 (1991-2000) • Civic 6 (1995-2000) • Civic 7 (2000-2005) • Civic 8 (2005-2011) • Fit 1 (2001-2008) • CR-V 1 (1995-2001) • CR-V 2 (2002-2006) • HR-V 1 (1998-2006) • Avancier 1 (1999-2003) •
 
This website uses cookies to ensure proper functioning. By clicking "OK," you agree.