
Accord 1985
The air conditioning idle control solenoid valve is initiated when the air conditioner is turned on. When the solenoid valve opens, vacuum is drawn into hose #19 between the solenoid valve and the idle diaphragm. Between black and yellow terminal (+) and white and blue (-) the wiring harness of the control box No. 2 must have a voltage of at least 9 V.
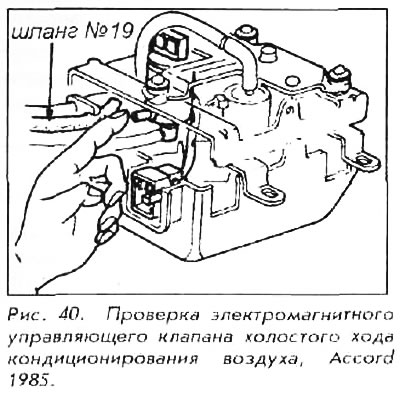
1. Disconnect the wiring harness from control box #2.
2. Disconnect the #19 vacuum hose from the air pipe.
3. Start the engine and check for vacuum (finger) at the inlet of the solenoid valve. There shouldn't be a vacuum.
4. Connect the positive battery terminal to the black/yellow terminal of the control box connector, and the negative terminal to the white/blue terminal.
5. Start the engine and check for vacuum (finger) at the open end of the solenoid valve. There must be a vacuum.
Accord 1986 and Prelude 1986-89
When current is applied to the solenoid valve, vacuum is directed from the #12 vacuum hose to the air conditioning idle speed increase valve through the #19 vacuum hose.
Between black and yellow terminal (+) and red terminal (-) The main wiring harness of the control box must have a voltage of at least 9 V.
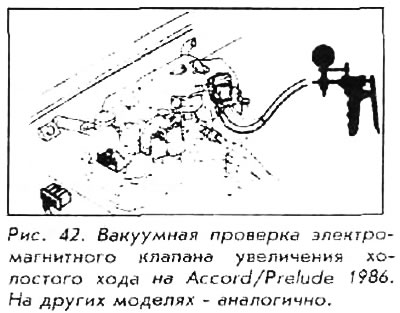
1. Open the cover of the control box and disconnect the six-pin connector from the box.
2. Disconnect the air conditioning idle speed increase solenoid valve lower vacuum hose from the control (verification) valve.
3. Apply vacuum to the hose. The vacuum must be stable. If there is no vacuum, check the check valve. If the control valve is OK, replace the solenoid valve.
4. Connect the positive battery terminal to the black/yellow terminal of the control box connector and the negative terminal to the red terminal.
5. Apply vacuum to the hose. The vacuum must not be held. If vacuum holds, check check valve. If the check valve is OK, replace the solenoid valve.
Accord 1987-89
1. Check the vacuum line for incorrect connections, kinks, blockages or disconnected hoses.
2. Start the engine at idle.
3. Disconnect the vacuum hose between the air conditioning idle speed increase valve and the air chamber from the valve and connect a pressure gauge to the valve. There shouldn't be a vacuum.
4. If there is a vacuum, disconnect the #19 vacuum hose from the air conditioning idle speed increase valve and connect a pressure gauge to the hose.
5. If there is no vacuum, replace the air conditioning idle speed increase valve. If there is a vacuum, GO TO TEST #2 AIR CONDITIONING Idle Speed Up Solenoid Valve.
6. Turn on the air conditioner and fan, check that the compressor and condenser cooling fan are on and running. The pressure gauge should indicate vacuum.
7. If there is no vacuum, disconnect vacuum hose No. 19 from the air conditioning idle speed increase valve and connect a pressure gauge to the hose.
8. If there is a vacuum, replace the air conditioning idle speed increase valve. If there is no vacuum, go to TEST #1 AIR CONDITIONING IDLE INCREASE SOLENOID VALVE.
Air Conditioning Idle Speed Up Solenoid Check #1
Accord 1987-89
1. With the parking brake applied, start the engine at idle.
2. Disconnect the #12 vacuum hose from the intake manifold and check for vacuum.
3. If there is no vacuum, check the vacuum pipe.
4. Disconnect the six-pin connector.
5. Connect the positive voltmeter lead to the black/yellow terminal and the negative lead to the red terminal.
6. Turn on the air conditioner and fan, then check the operation of the compressor and air conditioner fan.
7. If there is voltage, replace the solenoid valve.
8. If there is no voltage - connect the positive probe of the voltmeter to the black-yellow terminal, and the negative probe to the ground wire. Check voltage.
9. If there is no voltage, repair the open circuit in the black/yellow wire between the solenoid valve and the #1 fuse.
10. If there is voltage, check the red wire between the solenoid valve and the on-board computer for a break. If the wire is in order, check the on-board computer.
Air Conditioning Idle Speed Increase Solenoid Valve Check #2
Accord 1987-89
1. Start the engine.
2. Disconnect the six-pin connector.
3. Connect the positive voltmeter lead to the black/yellow terminal and the negative lead to the red terminal.
4. If there is voltage - check for a short circuit in the red wire between the solenoid valve and the on-board computer. If the wire is ok, check your computer.
5. If there is no voltage, replace the solenoid valve.