
Accord 1985
The idle air control solenoid valve opens when the coolant temperature is below 15°C. If the coolant temperature is below IAC, it is initiated only when the atmospheric pressure is 660 mmHg or less. In any case, vacuum is applied by hose #18 between the solenoid valve and the air intake pipe. When the valve is open, a voltage of at least 9 V should be detected between the black/yellow terminal (+) and the black/blue terminal (-) of the wire harness of the control box #1.
1. Disconnect the cable from control box #1.
2. Disconnect vacuum hose #18 from the air duct pipe.
3. Pump air into vacuum hose #18. The valve should not let air through.
4. Connect the positive battery terminal to the black terminal of the control box connector #1 and the (-) battery terminal to the orange terminal.
5. Disconnect vacuum hose #23 from the intake manifold.
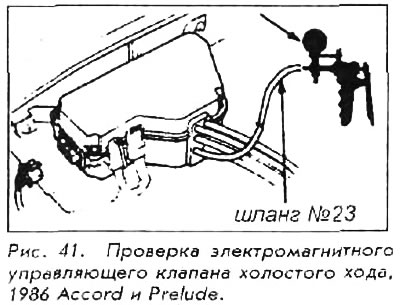
6. Pump air into vacuum hose #18. Air should pass through the valve.
Accord 1988 and Prelude 1988-89
The idle speed control solenoid valve is open when the coolant temperature is below 15°C. If the coolant temperature is below 40°C, it is initiated only if the atmospheric pressure is 660 mmHg or less. In any case, vacuum is supplied by hose No.18 between the solenoid valve and the air duct pipe. Also, the solenoid valve opens when the vehicle speed is more than 15 km/h and the engine speed is more than 2000 rpm. When the valve is open, a voltage of at least 9 V should be detected between the black-yellow terminal (+) and the red-green terminal (-) of the main harness of the control box.
1. Disconnect the six-pin rectangular connector from the control box.
2. Disconnect vacuum hose #23 from the vacuum hose manifold.
3. Apply vacuum to hose #23. The vacuum should hold. If the valve does not hold vacuum, replace the valve.
4. Connect the positive battery terminal to the black/yellow terminal of the control box connector and the negative battery terminal to the orange terminal of the connector.
5. Apply vacuum to hose #23. The valve should not hold vacuum. If it does, replace it.
Accord 1987-89
1. Check the vacuum line for improper connections, kinks, blockages and disconnected hoses.
2. Start the engine at idle speed.
3. Disconnect vacuum hose #23 from the intake manifold and check for vacuum.
4. If vacuum is not detected, check the vacuum port.
5. Turn off the ignition.
6. Connect the B connector of the cable test system (07999-PD6000A or equivalent) to the main wiring harness (not to the trip computer).
7. Disconnect vacuum hose #23 from the vacuum hose manifold and connect a hand pump to the hose.
8. Apply vacuum to the hose. The vacuum should hold.
9. If the vacuum is not maintained, replace the solenoid valve.
10. Turn on the ignition and apply vacuum to the hose. The vacuum should hold.
11. If the vacuum does not hold, repair the short in the red/green wire between the solenoid valve and the computer.
On vehicles with an automatic transmission, also check for a short circuit in the green wire between the automatic transmission idle speed solenoid valve and the trip computer.
12. Connect terminal B4 to terminal A18. Apply vacuum to the hose. The vacuum should not hold.
13. If the vacuum holds, turn off the ignition. Disconnect the six-pin connector, connect the positive probe of the voltmeter to the black-yellow terminal and the negative probe to the red-green terminal. Turn on the ignition.
14. If there is voltage, replace the solenoid valve.
15. If there is no voltage, connect the positive probe of the voltmeter to the black and yellow terminal and the negative probe to the ground wire.
16. If there is no voltage, repair the open in the black/yellow wire between the solenoid and fuse #1.
17. If there is voltage, eliminate the break in the red-green wire between the electromagnetic valve and the computer.
(The text can be found on the website «HONDABOOK.ru»)