
Contents: Accord 1985 ⇊ Accord 1986 and Prelude 1986-89 ⇊ Accord 1987-89 ⇊ Check No.1 of the electromagnetic…⇊ Check No.2 of the electromagnetic…⇊
Accord 1985
The automatic transmission control solenoid valve is activated when the automatic transmission lever is in the D4, D3,2 and R positions. In this case, the solenoid valve opens, allowing vacuum into the vacuum hose #18 between the valve and the air duct.
When the valve is initiated, there should be at least 9 V between the black/yellow terminal (+) and the green terminal (-) of the control box #1 wiring harness.
1. Disconnect the wiring harness from control box #1.
2. Disconnect vacuum hose #18 from the air duct pipe.
3. Pump air into hose #18. Air should not pass through the valve.
4. Connect the positive battery terminal to the black terminal of the control box connector No.1, and the negative battery terminal to the yellow/black terminal.
5. Disconnect vacuum hose #23 from the intake manifold.
6. Pump air into vacuum hose #18. Air should pass through the valve.
Accord 1986 and Prelude 1986-89
The automatic transmission control solenoid is activated when the automatic transmission lever is in gear, allowing air to bypass the throttle valve and providing the desired idle speed.
When the valve is initiated, there should be at least 9 V between the black/yellow terminal (+) and the green terminal (-) of the main wiring harness of the control box.
1. Disconnect the six-slot rectangular connector from the control box.
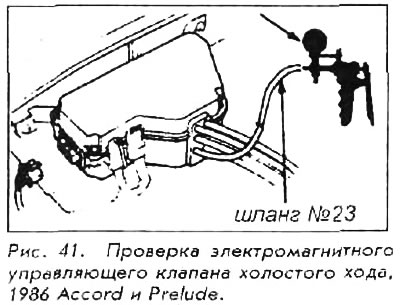
2. Disconnect vacuum hose #23 from the vacuum hose manifold.
3. Create a vacuum in hose #23. The valve should hold the vacuum. If the vacuum does not hold, replace the valve.
4. Connect the positive battery terminal to the black/yellow terminal of the control box connector and the negative terminal to the blue terminal of the connector.
5. Apply vacuum to hose #23. The valve should not hold vacuum. If the valve holds vacuum, replace the valve.
Accord 1987-89
1. Check the vacuum line for proper connections, kinks, blockages and disconnections of the hoses.
2. Warm up the engine to the optimum temperature (before the cooling fan turns on).
Securely apply the parking brake.
3. Disconnect vacuum hose #18 from the air duct and connect a pressure gauge to the hose. The gauge should indicate vacuum.
4. If there is vacuum, proceed to CHECK #2 OF THE AUTOMATIC TRANSMISSION IDLE CONTROL VALVE.
5. Shift the transmission into D3 or D4. The gauge should show vacuum.
6. If there is no vacuum, proceed to CHECK #1 OF THE AUTOMATIC TRANSMISSION IDLE CONTROL VALVE.
Check No.1 of the electromagnetic control valve of the idle speed of the automatic transmission
Accord 1987-89
1. With the parking brake set, start the engine at idle speed.
2. Disconnect vacuum hose #23 from the intake manifold and check for vacuum in it.
3. If there is no vacuum, check the vacuum channel.
4. Disconnect the six-pin connector.
5. Connect the positive probe of the voltmeter to the black and yellow terminal and the negative probe to the green terminal.
6. Shift the transmission to D3 or D4.
7. If the voltmeter shows voltage, replace the solenoid valve.
8. If there is no voltage, connect the positive probe of the voltmeter to the black and yellow terminal and the negative probe to the ground wire. Check the voltage.
9. If there is no voltage, repair the break in the black-yellow wire between the electromagnetic valve and fuse No.1.
10. If there is voltage, check the green wire between the electromagnetic valve and the computer for a break. If the wire is intact, check the on-board computer.
Check No.2 of the electromagnetic control valve of the idle speed of the automatic transmission
Accord 1987-89
1. After setting the parking brake, start the engine.
2. Disconnect the six-pin connector.
3. Connect the positive probe of the voltmeter to the black and yellow terminal and the negative probe to the green terminal.
4. If the voltmeter shows voltage, check for a short circuit in the green wire between the electromagnetic valve and the computer. If the wire is OK, check the on-board computer.
5. If there is no voltage, replace the solenoid valve.