
Note:
- Always install a new cylinder head gasket.
- The contact surfaces of the cylinder head and block must be clean.
- The "UP" mark on the camshaft pulley should be on top.
- Turn the crankshaft so that the piston of cylinder No.1 is at TDC.
- Before installation, clean the oil jet.
- Do not use the top and bottom covers to store removed components.
- Before installation, clean the top and bottom covers.
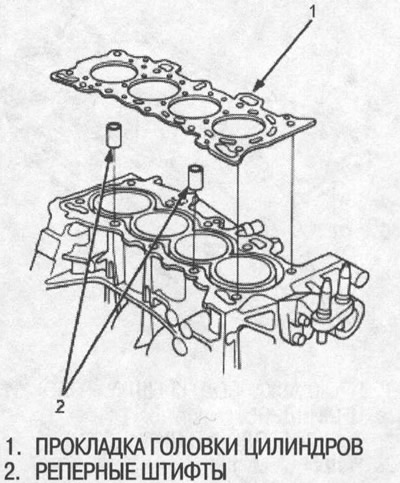
1. The cylinder head reference pins must be aligned (figure in the right column above).
2. Position the camshaft correctly (see above).
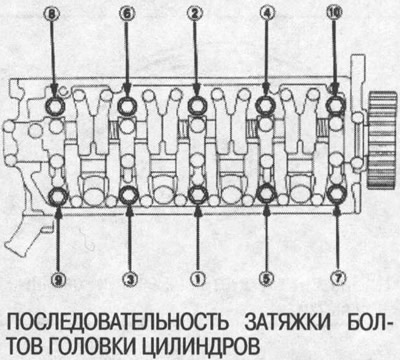
3. Tighten the cylinder head bolts in four passes in sequence:
- 1st pass: (1)-(10) 20 Nm (2.0 kgf/m)
- 2nd pass: (1)-(10) 49 Nm (5.0 kgf/m)
- 3rd pass: (1)-(10) 67 Nm (6.8 kgf/m)
- 4th pass: (1), (2) 67 Nm (6.8 kgf/m)
Note:
- We recommend using a torque wrench with a swing arm. When using a torque wrench with a fixed torque, tighten slowly and do not overtighten.
- If the bolt makes any noise when tightening, loosen it and retighten it, starting from the 1st pass.
4. Install the intake manifold and tighten the nuts in a crisscross pattern in two or three passes, starting with the inner nuts.
5. Install the exhaust manifold and tighten the nuts in a crisscross pattern in two or three passes, starting with the inner nuts.
6. Install the exhaust manifold bracket, then the exhaust pipe A and bracket, then the cover.
7. Put on the timing belt (see above).
8. Adjust the valve clearances (see above).
9. Place the cylinder head cover gasket in the cylinder head cover groove. First place it in the camshaft recesses, then in the groove along the outer edges.
Note:
- Before installing the gasket under the cylinder head cover, thoroughly clean the groove from sealant.
- When installing, make sure that the cylinder head cover gasket is securely in place at the corners of the recesses, leaving no gaps.
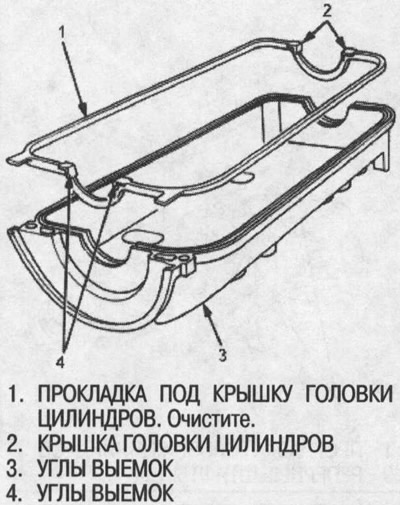
10. Apply sealant to the cylinder head cover gasket at the four corners of the recesses.
Note:
- Use sealant P/N 08С70 - К0234М, 08С70 - К0334М or 08С70 - Х0331S.
- Before applying sealant, ensure that the contact surfaces are clean and dry.
- Do not install components if more than five minutes have passed since applying the sealant. Instead, reapply the sealant, removing any traces of the old one.
- After assembly, wait at least 30 minutes before adding oil to the engine.
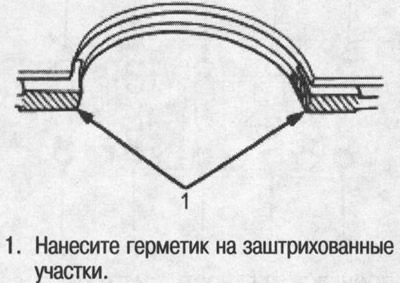
11. When installing the cylinder head cover, hold the gasket in the groove by placing your fingers on the contact surfaces of the camshaft brackets (semi-circular at the top).
Install the spark plug seals onto the spark plug tube. After installing the cover onto the cylinder head, move the cover slightly to seat the gasket under the cylinder head cover.
Note:
- Before installing the cylinder head cover, clean the contact surfaces of the cylinder head with a napkin.
- Do not touch areas where sealant has been applied.
- When installing the cylinder head cover, be careful not to damage the spark plug seal.
- Visually inspect the spark plug seal for damage.
- Replace the washer if it is damaged or worn out.
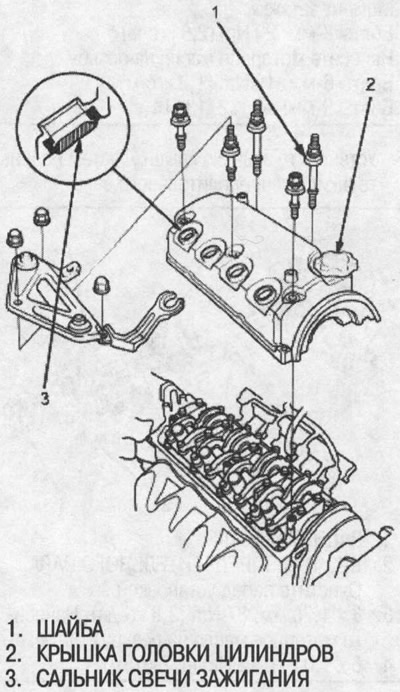
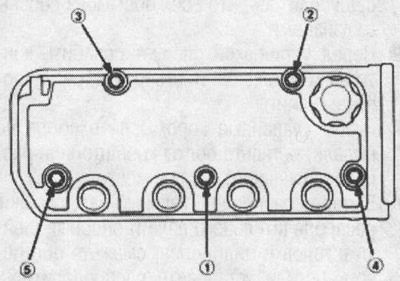
12. Tighten the nuts in two or three passes. In the final pass, tighten all bolts sequentially to 9.8 Nm (1.0 kgf/m).
Note: After assembly, wait at least 30 minutes before adding oil to the engine.
13. After installation, make sure all tubes, hoses and fittings are installed correctly.