
HondaBook.ru
Auto companies Volkswagen Auto companies Ford Auto companies Lada Auto companies Skoda Auto companies BMW Auto companies Mazda Auto companies Peugeot
English Русский
Български
Беларускі
Український
Српски
Hrvatski
Română
Polski
Slovenský
Magyar
Bookmark Contacts Sitemap   


Accord Civic Fit / Jazz CR-V HR-V Others Articles
HR-V 1 (1998-2006, petrol)

Camshaft, rocker arms, oil seal and camshaft pulley (Honda HR-V 1)

  • Main
  • Honda HR-V
  • 1 (1998-2006, petrol)
  • Power unit
  • Engine repair
  • Camshaft, rocker arms, oil seal and camshaft pulley
0

Installation


Note:
  • When tightening the rocker arm mounting bolts, make sure that all rocker arms are aligned with the valves.
  • Before installation, loosen the valve locknuts and unscrew the adjusting screws.
  • To prevent the rocker arm assembly from falling out, leave the camshaft bracket bolts in place.


1. After wiping the camshaft, camshaft seal and bearing journals in the cylinder head, lubricate both surfaces and install the camshaft.

2. Clean and install the oil jet, installing a new O-ring.
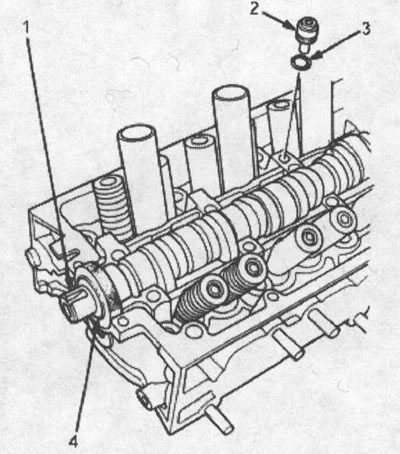
1. camshaft. keyway upwards; 2. Oil jet. Clean…

1. camshaft. keyway upwards; 2. Oil jet. Clean it; 3. Replace the O-ring; 4. camshaft oil seal. The oil seal holder must be dry. Apply a thin layer of oil to the camshaft and the inner edge of the oil seal


3. Turn the camshaft until the keyway is on top (with the piston of cylinder No.1 at TDC).

4. Apply sealant (P/N 08C70 - K0234M, 08C70 - K0334M or 08C70 - X0331S) to the contact surface of the cylinder head under brackets No.1 and No.5 of the camshaft.

Note: Before applying sealant, clean and dry the cylinder head mating surfaces.
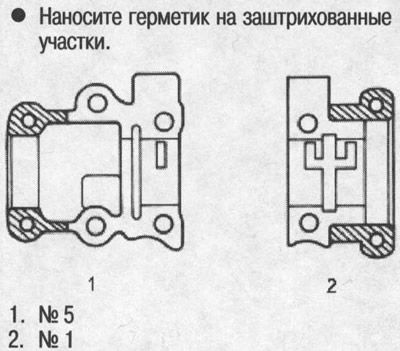

Note: Before applying sealant, clean and dry the…


5. Install the rocker arm assemblies and tighten the bolts. Make sure the rocker arms are seated correctly on the valve stems.


6. To prevent the rocker arms from sticking to the valves, tighten the bolts two turns at a time in the sequence shown below.

Note: Remove excess sealant from camshaft brackets #1 and #5 with a napkin.
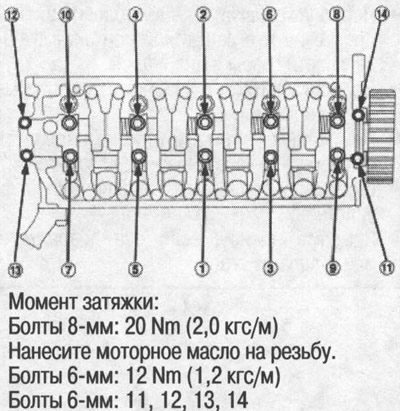

Note: Remove excess sealant from camshaft…


7. Install the rear cover, then put on the camshaft pulley.
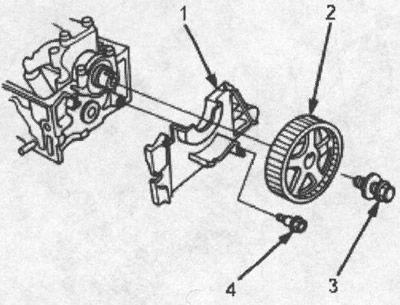
1. Back cover

1. Back cover
2. Camshaft pulley. Clean before installation.
3. 8x1.25 mm, 37 Nm (3.8 kgf/m). Apply engine oil to the bolt threads.
4. 6x1.0 mm, 12 Nm (1.2 kgf/m).
This article is available at: russian, bulgarian, belarusian, ukrainian, serbian, croatian, romanian, polish, slovak, hungarian
This information has been verified: Emil Safonov
Share with friends:
◀ Previous
HR-V 1: Engine repair
Next ▶

Valves, Springs and Seats — Installation
Valve guides — replacement
Valve seats — restoration
Cylinder head — warpage check
Valve guides — check
Cylinder head — installation
Cylinder block and piston group
Flywheel and drive disk — replacement
Piston and connecting rod — design description
Connecting rod and crankshaft — axial play
See also other articles from Honda manuals:
Camshaft Sprockets — Removal and Installation Honda Accord 3 (1985-1989)
Camshaft Pulley, Camshaft, Rocker Arms and Seal — Installation Honda Civic 5 and 6 (1991-2000)
Disassembling the rocker shaft assembly with the rocker arms Honda Fit 1 (2001-2008)
Rocker Arms and Rocker Arm Shafts (CR-V Models) Honda CR-V 1 (1995-2001, petrol)
Checking the intake valve rocker arms as a whole Honda Avancier 1 (1999-2003, petrol)
Link in different formats to this article
Comments and feedback from visitors
No comments yet


How much will 49 + 11 ?


HR-V 1 (1998-2006, petrol) 
  • General information
  • User manual
  • Maintenance
  • Power unit
  • Engine repair
  • Lubrication system
  • Cooling system
  • Fuel injection and control
  • Power and exhaust system
  • Engine electrical equipment
  • Transmission
  • Clutch
  • Mechanical gearbox
  • Automatic gearbox
  • Rear differential
  • Drive shafts and cardan
  • Chassis and running gear
  • Steering
  • Car suspension
  • Brake system
  • Body and interior
  • Exterior (external elements)
  • Interior (internal elements)
  • Doors, locks and windows
  • Electrical equipment
  • Equipment and devices
  • Lighting system
  • Electrical circuits
HondaBook.ru © 2018–2026 • Mobile version • Sitemap: EN BG BY UA RS HR RO PL SK HU • Feedback • Driver Information • Search system • Bookmark
Accord 3 (1985-1989) • Accord 6 (1997-2002) • Civic 3 and 4 (1983-1991) • Civic 5 and 6 (1991-2000) • Civic 6 (1995-2000) • Civic 7 (2000-2005) • Civic 8 (2005-2011) • Fit 1 (2001-2008) • CR-V 1 (1995-2001) • CR-V 2 (2002-2006) • HR-V 1 (1998-2006) • Avancier 1 (1999-2003) •
 
This website uses cookies to ensure proper functioning. By clicking "OK," you agree.