
Note: Before installing the right cover and oil pump housing, apply sealant to their contact surfaces. Use sealant P/N 08С70 - К0234М, 08С70 - К0334М or 08С70 - X0331S. When assembling, lubricate all internal parts with engine oil.
Models for Europe, Australia and South Africa
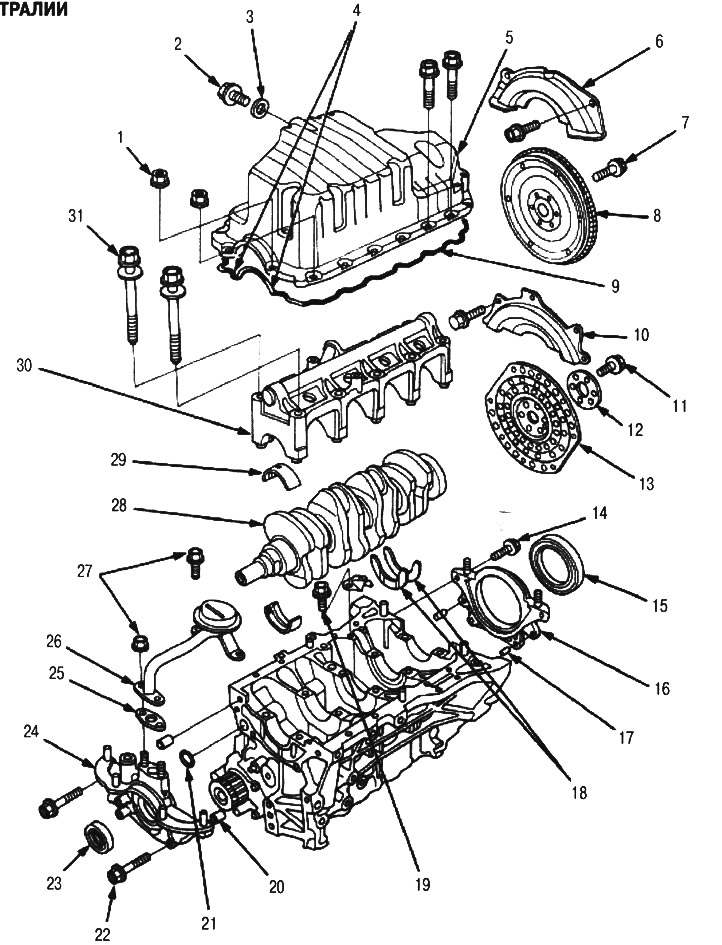
1. 6x1.0 mm, 12 Nm (1.2 kgf/m)
2. DRAIN BOLT, 39 Nm (4.0 kgf/m)
3. WASHER, Replace.
4. Apply sealant to these areas.
5. OIL PAN. Installation (see below).
6. FLYWHEEL COVER (manual gearbox)
7. 12x1.0 mm, 118 Nm (12.0 kgf/m)
8. FLYWHEEL (MANUAL TRANSMISSION)
9. OIL PAN GASKET. Replace.
10. DRIVE PLATE COVER (CVT)
11. 12x1.0 mm, 74 Nm (7.5 kgf/m)
12. WASHER
13. DRIVE PLATE (CVT) Check for cracks.
14. 6x1.0 mm, 11 Nm (1.1 kgf/m)
15. CRANKSHAFT SEAL. Installation (see below). Replace.
16. RIGHT COVER. Apply sealant to the contact surface.
17. REFERENCE PIN
18. THRUST WASHERS. The grooved sides face outward. The thickness of the thrust washer is constant and should not be changed by grinding or installing shims.
19. VENTILATION DUCT COVER FASTENING BOLTS, 6x1.0 mm, 11 Nm (1.1 kgf/m). Apply sealant to the bolt threads.
20. REFERENCE PIN
21. O-RING. Replace.
22. 6x1.0 mm, 11 Nm (1.1 kgf/m)
23. CRANKSHAFT OIL SEAL. Replace.
24. OIL PUMP Apply sealant to the contact surface.
25. GASKET. Replace.
26. OIL FILTER
27. 6x1.0 mm, 11 Nm (1.1 kgf/m)
28. CRANKSHAFT.
29. MAIN BEARINGS.
Note: New main bearings must be selected according to the identification marks on the crankshaft and cylinder block.
30. MAIN BEARING CAP
31. 11x1.5 mm, 51 Nm (5.2 kgf/m). Apply engine oil to the bolt threads.
Note: After tightening each cap, rotate the crankshaft to ensure it does not bind.
Except for European, Australian and South African models
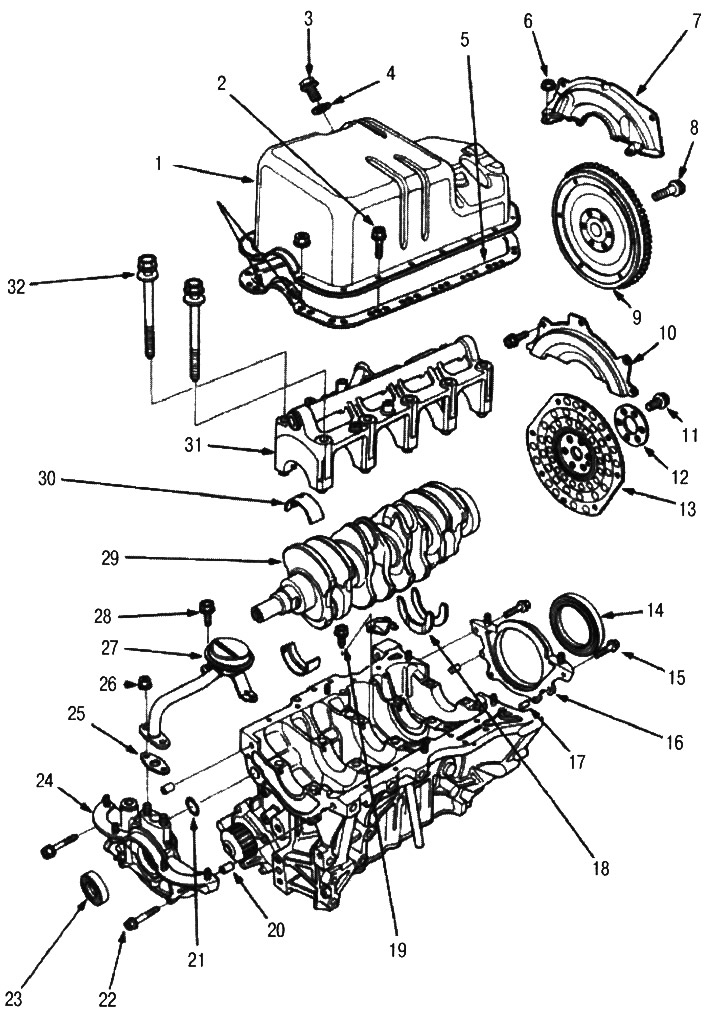
1. OIL PAN. Installation (see below).
2. 6x1.0 mm, 12 Nm (1.2 kgf/m)
3. DRAIN BOLT, 44 Nm (4.5 kgf/m)
4. WASHER, Replace.
5. OIL PAN GASKET. Replace.
6. 6x1.0 mm, 12 Nm (1.2 kgf/m)
7. FLYWHEEL COVER (manual gearbox)
8. 12x1.0 mm, 118 Nm (12.0 kgf/m)
9. FLYWHEEL (MANUAL TRANSMISSION)
10. DRIVE DISC COVER (AT)
11. 12x1.0 mm, 74 Nm (7.5 kgf/m)
12. WASHER
13. DRIVE PLATE (CVT) Check for cracks.
14. CRANKSHAFT SEAL. Installation (see below). Replace.
15. 6x1.0mm, 11 Nm (1.1 kgf/m)
16. RIGHT COVER. Apply sealant to the contact surface.
17. REFERENCE PIN
18. THRUST WASHERS. Grooved sides facing outward.
Note: The thickness of the thrust washer is constant and should not be changed by grinding or shim installation.
19. VENTILATION DUCT COVER FASTENING BOLTS, 6 x 1.0 mm, 11 Nm (1.1 kgf/m). Apply sealant to the bolt threads.
20. REFERENCE PIN
21. O-RING. Replace
22. 6x1.0 mm, 11 Nm (1.1 kgf/m)
23. CRANKSHAFT OIL SEAL. Replace.
24. OIL PUMP Apply sealant to the contact surface.
25. GASKET. Replace.
26. 6x1.0 mm, 11 Nm (1.1 kgf/m)
27. OIL FILTER
28. 6x1.0 mm, 11 Nm (1.1 kgf/m)
29. CRANKSHAFT. Replace.
30. MAIN BEARINGS.
Note: New main bearings must be selected according to the identification marks on the crankshaft and cylinder block.
31. MAIN BEARING CAP
32. 11x1.5 mm, 51 Nm (5.2 kgf/m). Apply engine oil to the bolt threads.
Note: After tightening each cap, rotate the crankshaft to ensure it does not bind.
(Original article on the website: www.hondabook.ru)