HondaBook.ru
Auto companies Volkswagen Auto companies Ford Auto companies Lada Auto companies Skoda Auto companies BMW Auto companies Mazda Auto companies Peugeot
English Русский
Български
Беларускі
Український
Српски
Hrvatski
Română
Polski
Slovenský
Magyar
Bookmark Contacts Sitemap   


Accord Civic Fit / Jazz CR-V HR-V Others Articles
CR-V 1 (1995-2001, petrol) CR-V 2 (2002-2006, petrol)

Replacing a punctured tire (Honda CR-V 2)

  • Main
  • Honda CR-V
  • 2 (2002-2006, petrol)
  • General information
  • User manual
  • Replacing a punctured tire
0
Contents: Removal the jack ⇊ Installing the jack ⇊ Spare tire cover ⇊ Spare wheel ⇊ Spare tire for emergency use ⇊ Wheel replacement ⇊ Laying a standard wheel ⇊

Removal the jack


1. Turn the handle and remove the cover.
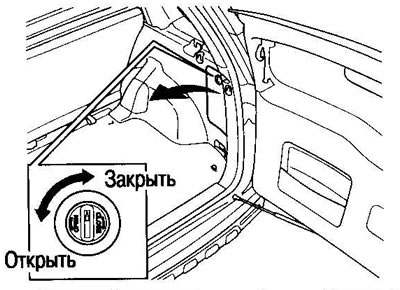
1. Turn the handle and remove the cover.


2. Loosen the jack and remove it.
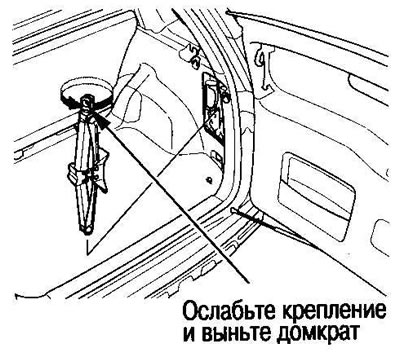
2. Loosen the jack and remove it.


3. When folding the jack, do not use a screwdriver, as this may damage the jack fastenings.

Installing the jack


1. Stop the vehicle on a level, hard surface.

2. Firmly apply the parking brake and block the wheel located on the diagonal opposite side of the jack.

3. Place the jack on the ground and rotate it until its groove fits into the mounting location on the body.
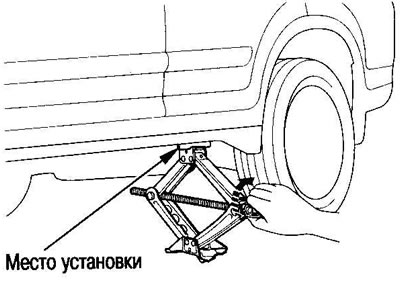
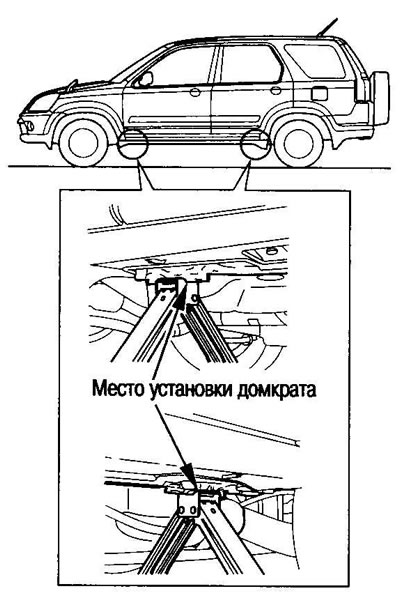
3. Place the jack on the ground and rotate it…


3. Place the jack on the ground and rotate it…


3. Place the jack on the ground and rotate it…


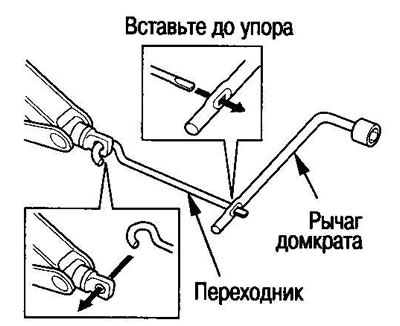
4. Rotate the jack using the lever and adapter to raise the vehicle so that the tire is slightly raised off the ground.


Warning! A vehicle raised with a jack is in an unstable position, so it is dangerous to be under the vehicle at this time.


Attention: For safe use of the jack it is necessary:
  • Turn off the engine.
  • The ground surface must be firm and level.
  • Do not lift a loaded vehicle.
  • There should be no objects above or below the jack.
  • Use the jack only for changing wheels or putting on snow chains.


Note: Use only the jack that comes with your vehicle. Other jacks may vary in lifting force or shape.


Spare tire cover


Models with spare wheel on the rear door


Removal


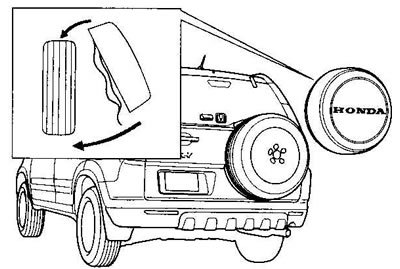
1. Unfasten the locks on the left and right, remove the cover.

2. Pull the bottom of the cover towards you and up to remove it.
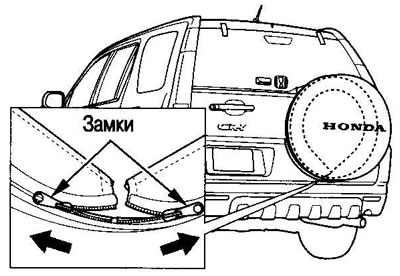
2. Pull the bottom of the cover towards you and…


2. Pull the bottom of the cover towards you and…


Installation


1. Make sure the cover fits the correct size wheel.


2. Holding the cover so that the writing on it is horizontal, place the top part on the spare tire.
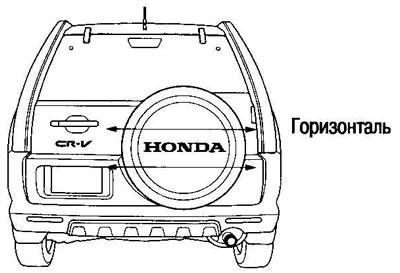
2. Holding the cover so that the writing on it is…


3. Fasten the locks on the right and left completely.
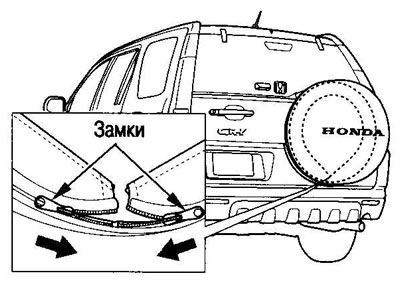
3. Fasten the locks on the right and left…


Spare wheel


Models with spare wheel on the rear door


Removal


Using a wheel wrench, remove the nuts in the order shown in the diagram.
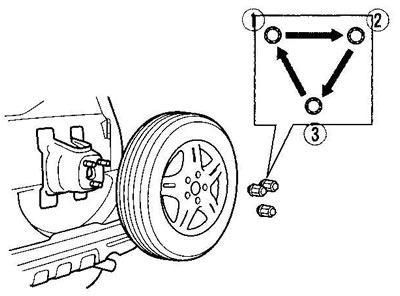
Using a wheel wrench, remove the nuts in the…


Installation


Tighten the nuts in the reverse order of removal.


Tightening torque: 49-59 Nm (5-6 kg m)

Spare tire for emergency use


Models without spare wheel on rear door


Removal


Loosen the mounting bolt.
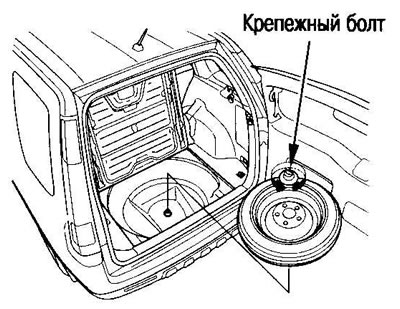
Loosen the mounting bolt.


This spare tire is only used in case of a flat tire.
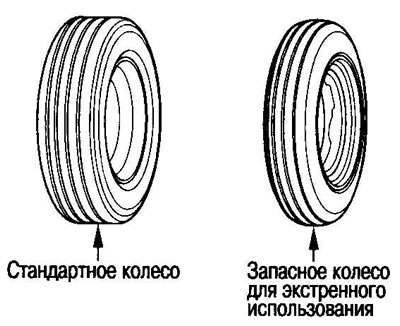
This spare tire is only used in case of a flat…


When using the spare tire, observe the following rules.
  • Check tire pressure periodically and maintain it within the specified limits of 420 kPa (4.2 kg/cm²).
  • After installing the spare tire, drive at a speed of no more than 100 km/h and try to replace it with a standard one as quickly as possible.
  • The spare tire and rim are designed for this vehicle only. Do not install another spare tire or wheel on your vehicle, or install wheels from your vehicle on others.
  • Snow chains must not be fitted to the spare wheel. If it is necessary to use a chain in the event of a puncture of the front wheel, the spare wheel must be placed in the back and the freed rear wheel in the front, then the chain must be put on.


Wheel replacement


1. Before you start working


1. Stop the car in a safe place on a level, hard surface, remove the tools and spare tire.

2. Apply the parking brake securely. The wheel located diagonally from the punctured one must be blocked at the front and back.
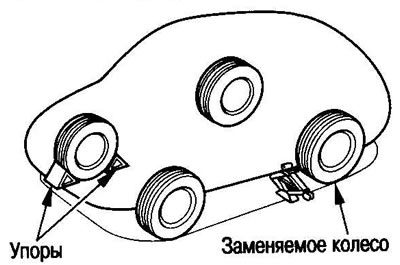
2. Apply the parking brake securely. The wheel…


3. Place the spare tire under the car, next to the punctured one.
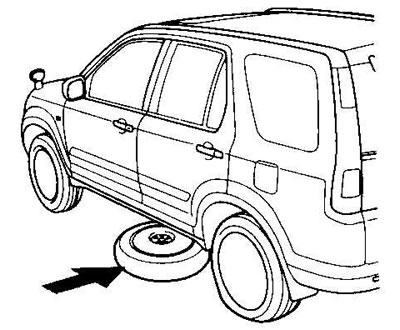
3. Place the spare tire under the car, next to…


2. Raise the car with a jack


1. Install the jack.

2. Loosen the nuts slightly with a wheel wrench (approx. 1 turn)
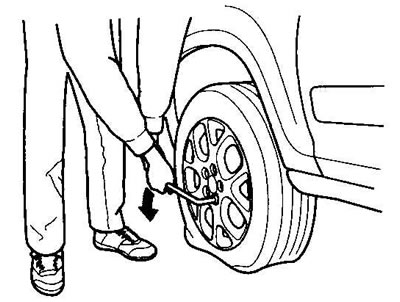
2. Loosen the nuts slightly with a wheel wrench…


3. Raise the vehicle with a jack until the wheel is slightly raised off the ground.
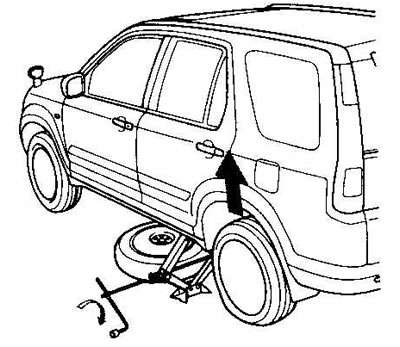


3. Raise the vehicle with a jack until the wheel…


3. Replacing the wheel


1. Unscrew the nuts and remove the wheel.
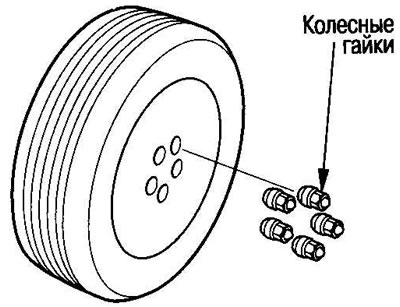
1. Unscrew the nuts and remove the wheel.


Note: Place the wheel face up on the ground.


2. Wipe the contact surfaces on the hub and wheel disc.
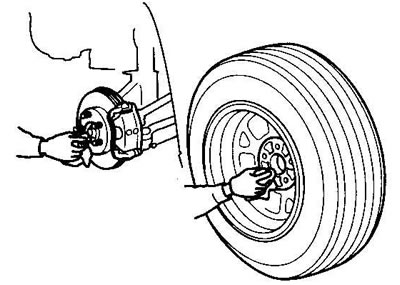
2. Wipe the contact surfaces on the hub and wheel…


3. Tighten the nuts so that they fit into the recesses of the disk and the wheel does not wobble.
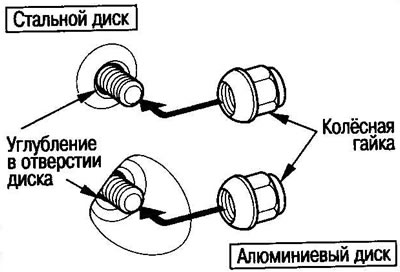
3. Tighten the nuts so that they fit into the…


4. Lower the jack and finally tighten the nuts in 2-3 steps in the order shown in the diagram.
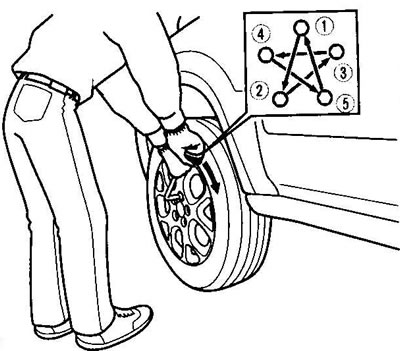
4. Lower the jack and finally tighten the nuts in…


Tightening torque: 98-118 N·m (10-12 kg m)

Laying a standard wheel


1. Wrap the punctured tire in a bag and place it in the center of the luggage compartment.

2. Secure the wheel with the luggage net.
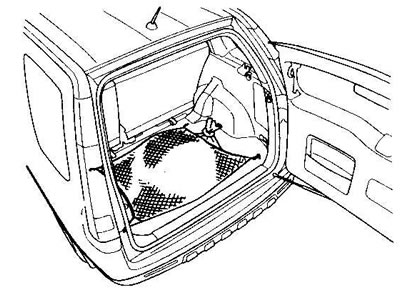
2. Secure the wheel with the luggage net.


Note: On 4WD vehicles, as well as on vehicles with the VSA system, all wheels must be the same size, brand, and degree of wear. If you use a spare tire, try to replace it with a standard one as soon as possible.
This article is available at: russian, bulgarian, belarusian, ukrainian, serbian, croatian, romanian, polish, slovak, hungarian
This information has been verified: Mikhail Kopasov
Share with friends:
◀ Previous
CR-V 2: User manual
Next ▶

Towing another vehicle
On-board tool, jack, spare wheel, squib
Salon equipment part 5 (table, refrigerator, handrails)
Salon equipment part 4 (holders and boxes)
Interior equipment part 3 (sun visor, socket)
Electrical equipment failures
Replacing lamps part 1 (lamp locations)
Replacing lamps part 2 (headlights, fog lights)
Replacing lamps part 3 (lights)
If the hatch does not close (models with hatch)
See also other articles from Honda manuals:
Replacing hoses Honda Accord 3 (1985-1989)
Tire pressure and tire control Honda Civic 3 and 4 (1983-1991)
Replacing the cabin filter Honda Fit 1 (2001-2008)
Replacing light bulbs Honda HR-V 1 (1998-2006, petrol)
In case of a puncture of a tire — use a jack Honda Avancier 1 (1999-2003, petrol)
Link in different formats to this article
Comments and feedback from visitors
No comments yet


How much will 20 + 42 ?


CR-V 2 (2002-2006, petrol) 
  • General information
  • User manual
  • Technical data
  • Maintenance
  • Power unit
  • Engine repair
  • Lubrication system
  • Cooling system
  • Exhaust system
  • Fuel system
  • Engine management
  • Engine electrical equipment
  • Transmission
  • Clutch
  • Manual gearbox
  • Automatic gearbox
  • Rear differential
  • Drive shafts
  • Chassis and running gear
  • Steering
  • Front suspension
  • Rear suspension
  • Brake system
  • Body and interior
  • Exterior (external elements)
  • Interior (internal elements)
  • Doors, locks and windows
CR-V 1 (1995-2001, petrol) 
  • General information
  • Maintenance
  • Tips for car owner
  • Power unit
  • Engine repair
  • Engine overhaul
  • Cooling and lubrication system
  • Engine electrical equipment
  • Control system
  • Fuel system
  • Transmission
  • Clutch and drive shafts
  • Car gearbox
  • Chassis and running gear
  • Front suspension
  • Rear suspension
  • Steering
  • Brake system
  • Body and interior
  • Body service
  • Exterior (external elements)
  • Interior (internal elements)
  • Electrical equipment
  • Equipment and devices
  • Electrical circuits
HondaBook.ru © 2018–2026 • Mobile version • Sitemap: EN BG BY UA RS HR RO PL SK HU • Feedback • Driver Information • Search system • Bookmark
Accord 3 (1985-1989) • Accord 6 (1997-2002) • Civic 3 and 4 (1983-1991) • Civic 5 and 6 (1991-2000) • Civic 6 (1995-2000) • Civic 7 (2000-2005) • Civic 8 (2005-2011) • Fit 1 (2001-2008) • CR-V 1 (1995-2001) • CR-V 2 (2002-2006) • HR-V 1 (1998-2006) • Avancier 1 (1999-2003) •
 
This website uses cookies to ensure proper functioning. By clicking "OK," you agree.