
HondaBook.ru
Auto companies Volkswagen Auto companies Ford Auto companies Lada Auto companies Skoda Auto companies BMW Auto companies Mazda Auto companies Peugeot
English Русский
Български
Беларускі
Український
Српски
Hrvatski
Română
Polski
Slovenský
Magyar
Bookmark Contacts Sitemap   


Accord Civic Fit / Jazz CR-V HR-V Others Articles
CR-V 1 (1995-2001, petrol) CR-V 2 (2002-2006, petrol)

Removal and installation the steering column (Honda CR-V 2)

  • Main
  • Honda CR-V
  • 2 (2002-2006, petrol)
  • Chassis and running gear
  • Steering
  • Removal and installation the steering column
0
Contents: Removal ⇊ Installation ⇊
Note. Components of the optional Inflatable Airbag System (SRS) are located on this site. Before performing repairs or maintenance, review information on the location of SRS system components, precautions, and procedures.

Note. Components of the optional Inflatable…


Removal


1. Write down the frequencies of the preset radio stations and disconnect the battery.

2. Remove the driver's airbag assembly and steering wheel

3. Remove the lower instrument panel covers on the driver's side.

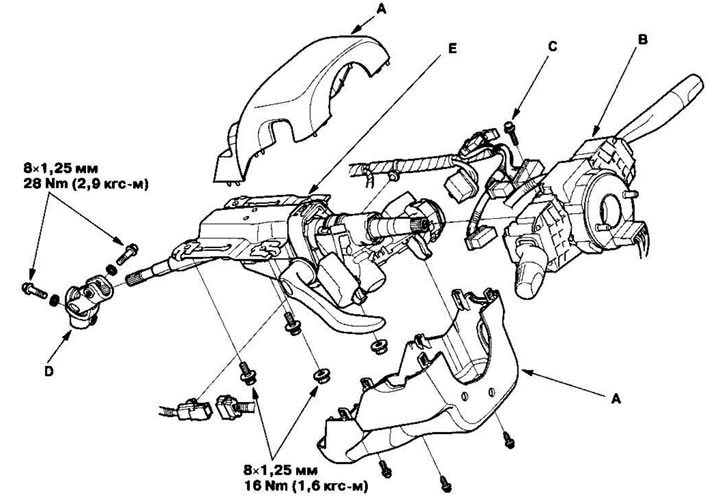
4. Remove the covers (A) from the steering column (drawing above).

5. Disconnect the wiring harness connectors from the combination switch assembly (B).

6. Remove the combination switch assembly from the steering gear shaft by removing the combination switch screw (C).

7. Disconnect the connectors from the ignition switch and loosen the wiring harness clamps on the steering column.

8. Disconnect the steering column joint (D) and remove it from the steering gear shaft.

9. Remove the steering column (E) by unscrewing the mounting nuts and bolts.

Installation


1. The steering column is installed in the reverse order of removal, taking into account the following:


  • Do not allow the sliding inserts to fall out when installing the steering column.
  • Make sure that the wires are not pinched or compressed by other parts.

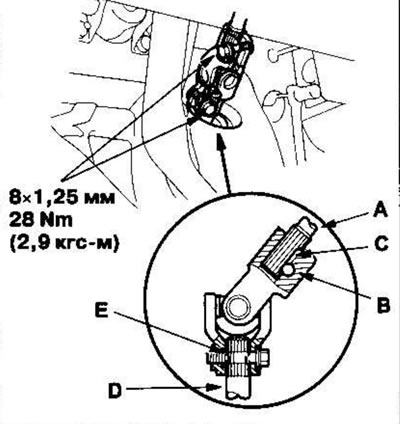
2. Connect the upper end of the steering column joint to the steering gear shaft (A) (align the bolt hole (B) with the flat section (C) on the shaft).
2. Connect the upper end of the steering column…


3. Connect the lower end of the steering column joint to the worm shaft (D) (align the bolt hole with the groove (E) around the shaft) and thread the lower bolt into the joint. Make sure the lower hinge bolt fits securely into the groove on the worm shaft.

4. Pull the steering column joint and make sure it is fully seated. Then insert the top bolt into the hinge and tighten it. Tighten the lower hinge bolt to the specified torque.

5. Complete the installation taking into account the following:
  • Make sure the wiring harness is properly routed and secured.
  • Make sure the connectors are connected securely.
  • Install the steering wheel.
  • Connect the battery.
  • Check the operation of the horn and turn signal switch.
  • If necessary, check the front wheel alignment angles.
This article is available at: russian, bulgarian, belarusian, ukrainian, serbian, croatian, romanian, polish, slovak, hungarian
This information has been verified: Mikhail Kopasov
Share with friends:
◀ Previous
CR-V 2: Steering
Next ▶

Installing the steering wheel
Steering wheel disassembly/assembly
Removal the steering wheel
Power steering pump repair
Replacing the power steering pump
Checking the operation of the steering column tilt mechanism
Checking/Adjusting the Steering Column Tilt Adjustment Lever
Checking the tilt adjustment lever preload
Replacing the steering column lock
Adjusting the steering rack guide
See also other articles from Honda manuals:
Steering column — removal and installation Honda Accord 3 (1985-1989)
Removal and installation the steering column cover Honda Civic 6 (1995-2000)
Removal and installation the steering column Honda Fit 1 (2001-2008)
Steering column — design description Honda HR-V 1 (1998-2006, petrol)
Adjusting the steering column and mirrors Honda Avancier 1 (1999-2003, petrol)
Link in different formats to this article
Comments and feedback from visitors
No comments yet


How much will 27 + 50 ?


CR-V 2 (2002-2006, petrol) 
  • General information
  • User manual
  • Technical data
  • Maintenance
  • Power unit
  • Engine repair
  • Lubrication system
  • Cooling system
  • Exhaust system
  • Fuel system
  • Engine management
  • Engine electrical equipment
  • Transmission
  • Clutch
  • Manual gearbox
  • Automatic gearbox
  • Rear differential
  • Drive shafts
  • Chassis and running gear
  • Steering
  • Front suspension
  • Rear suspension
  • Brake system
  • Body and interior
  • Exterior (external elements)
  • Interior (internal elements)
  • Doors, locks and windows
CR-V 1 (1995-2001, petrol) 
  • General information
  • Maintenance
  • Tips for car owner
  • Power unit
  • Engine repair
  • Engine overhaul
  • Cooling and lubrication system
  • Engine electrical equipment
  • Control system
  • Fuel system
  • Transmission
  • Clutch and drive shafts
  • Car gearbox
  • Chassis and running gear
  • Front suspension
  • Rear suspension
  • Steering
  • Brake system
  • Body and interior
  • Body service
  • Exterior (external elements)
  • Interior (internal elements)
  • Electrical equipment
  • Equipment and devices
  • Electrical circuits
HondaBook.ru © 2018–2026 • Mobile version • Sitemap: EN BG BY UA RS HR RO PL SK HU • Feedback • Driver Information • Search system • Bookmark
Accord 3 (1985-1989) • Accord 6 (1997-2002) • Civic 3 and 4 (1983-1991) • Civic 5 and 6 (1991-2000) • Civic 6 (1995-2000) • Civic 7 (2000-2005) • Civic 8 (2005-2011) • Fit 1 (2001-2008) • CR-V 1 (1995-2001) • CR-V 2 (2002-2006) • HR-V 1 (1998-2006) • Avancier 1 (1999-2003) •
 
This website uses cookies to ensure proper functioning. By clicking "OK," you agree.