
HondaBook.ru
Auto companies Volkswagen Auto companies Ford Auto companies Lada Auto companies Skoda Auto companies BMW Auto companies Mazda Auto companies Peugeot
English Русский
Български
Беларускі
Український
Српски
Hrvatski
Română
Polski
Slovenský
Magyar
Bookmark Contacts Sitemap   


Accord Civic Fit / Jazz CR-V HR-V Others Articles
HR-V 1 (1998-2006, petrol)

Differential — checking and replacing elements (Honda HR-V 1)

  • Main
  • Honda HR-V
  • 1 (1998-2006, petrol)
  • Transmission
  • Automatic gearbox
  • Differential — checking and replacing elements
0
Contents: Checking the gear clearance in…⇊ Bearing replacement ⇊ Replacing the differential cup ⇊ Removal the oil seal ⇊ Installing the seal ⇊ Checking the side clearance ⇊

Checking the gear clearance in engagement


1. Secure the differential assembly to the prisms and install both axle shafts.

2. Install the indicator.

3. Measure the clearance between both axle gears and satellites. Standard: 0.05-0.15 mm.
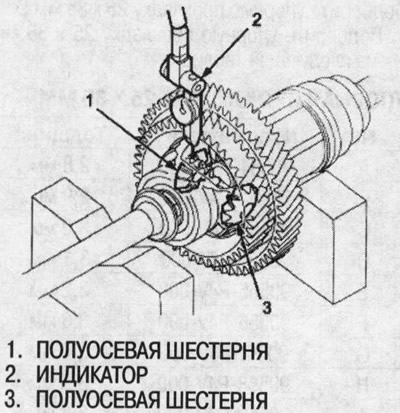
3. Measure the clearance between both axle gears…


4. If the clearance differs from the standard, replace the differential cup.

Bearing replacement


Note: Check the bearings for wear and smooth rotation. If the bearing is OK, no removal is required.


1. Remove the bearings using a puller.
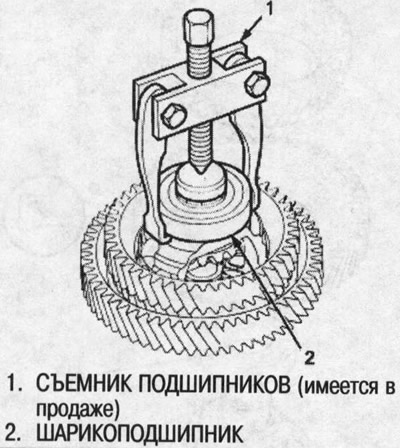
1. Remove the bearings using a puller.


2. Install new bearings using a special tool and a press.
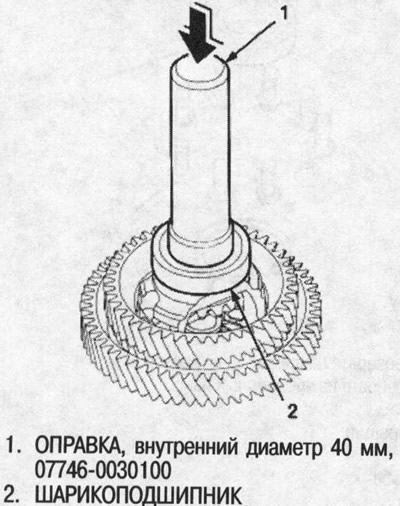


2. Install new bearings using a special tool and…


Replacing the differential cup


2WD models


1. Remove the final drive driven gear from the differential cup.

Note: The final drive driven gear bolts have left-hand threads.


2. Install the final drive driven gear with the beveled side facing the differential cup.

3. Tighten the mounting bolts to the required torque in a cross pattern.
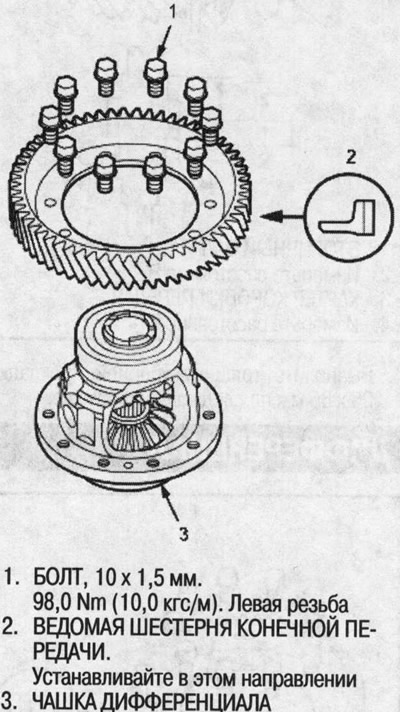
3. Tighten the mounting bolts to the required…


4WD models


1. Remove the transfer case pinion gear and final drive driven gear from the differential housing.

Note: The final drive driven gear bolts have left-hand threads.


2. Install the final drive driven gear with the beveled side facing the differential cup, then install the transfer case drive gear onto the final drive driven gear.

3. Tighten the mounting bolts to the specified torque in a crisscross pattern.
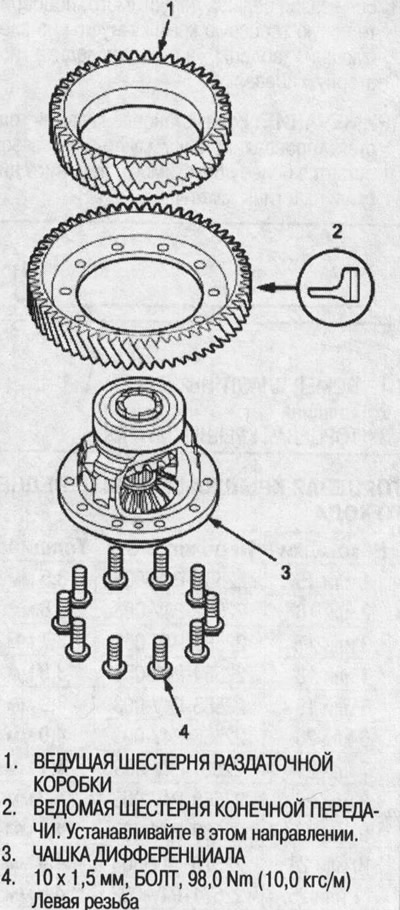


3. Tighten the mounting bolts to the specified…


Removal the oil seal


1. Remove the differential assembly.

2. Knock out the oil seal from the gearbox housing.
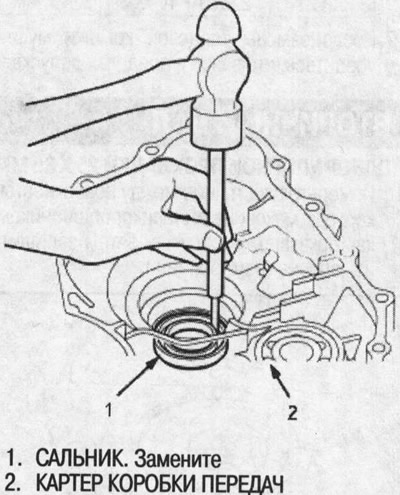
2. Knock out the oil seal from the gearbox…


3. Knock out the oil seal from the flywheel housing.
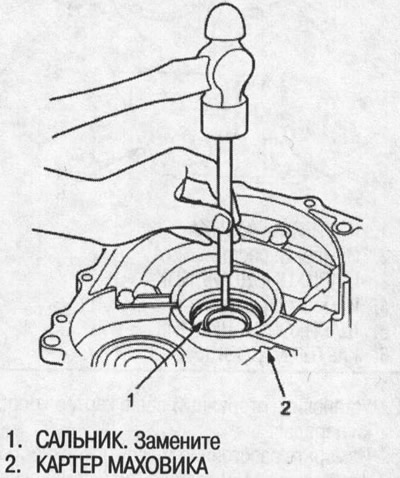
3. Knock out the oil seal from the flywheel…


Installing the seal


1. Using a special tool, press the oil seal into the gearbox housing.
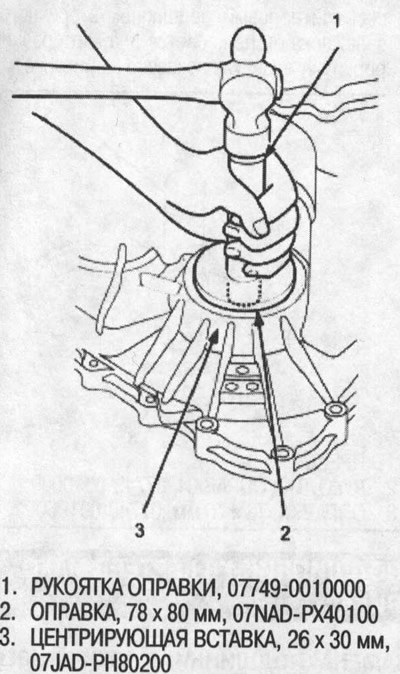
1. Using a special tool, press the oil seal into…


2. Using a special tool, press the oil seal into the flywheel housing.
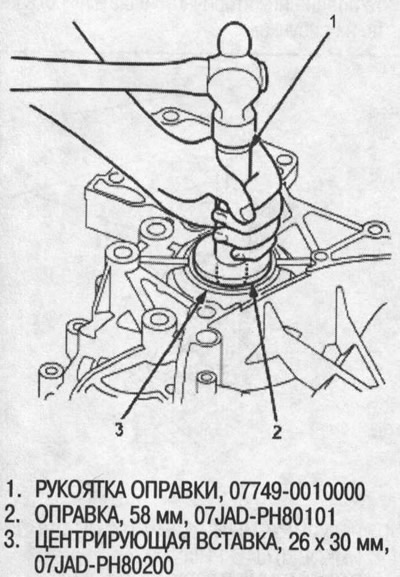


2. Using a special tool, press the oil seal into…


Checking the side clearance


1. Install the 80mm, 2.50mm thick snap ring into the transmission housing.
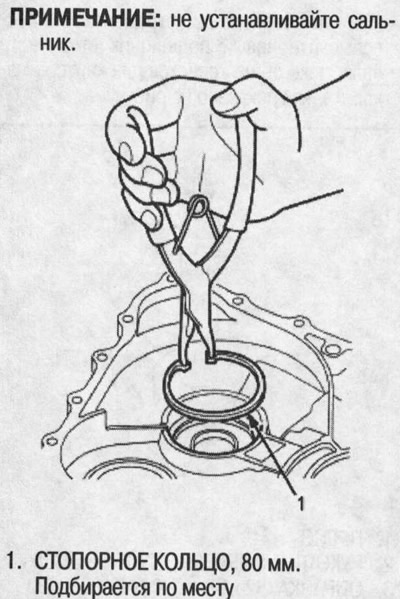
1. Install the 80mm, 2.50mm thick snap ring into…


2. Install the differential assembly onto the gearbox housing and, using a special tool, press it into the housing without tilting.
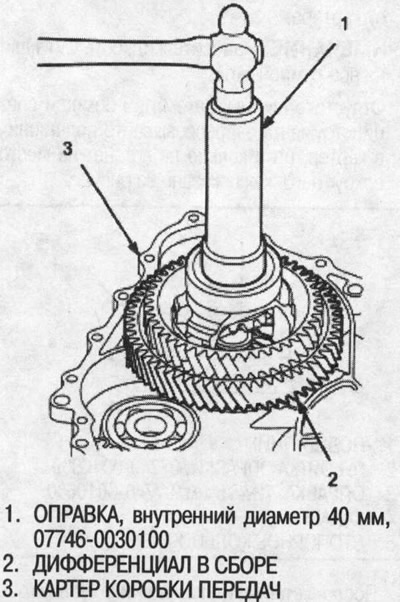
2. Install the differential assembly onto the…


3. Install the flywheel housing with a new gasket, reference pin and connector bracket.


4. Tighten the bolts to the required torque.
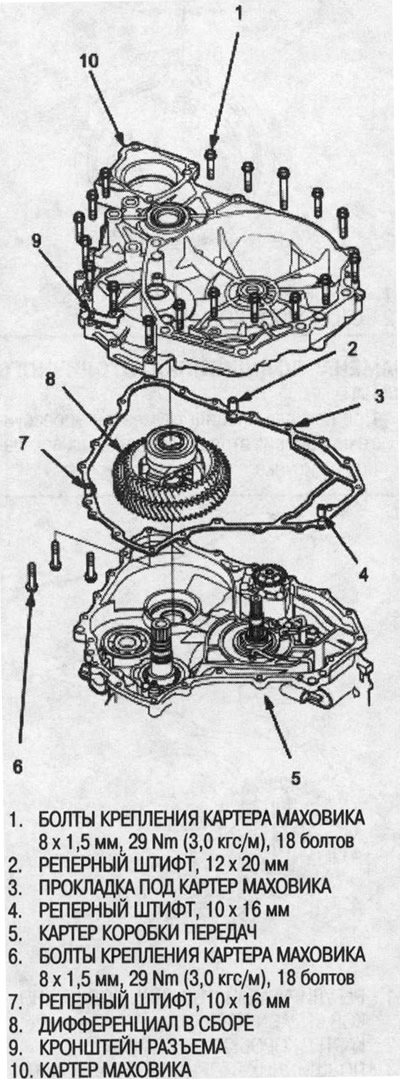
4. Tighten the bolts to the required torque.


5. Measure the side clearance between the 80mm snap ring and the outer ring of the ball bearing in the gearbox housing. Standard: 0-0.15mm.
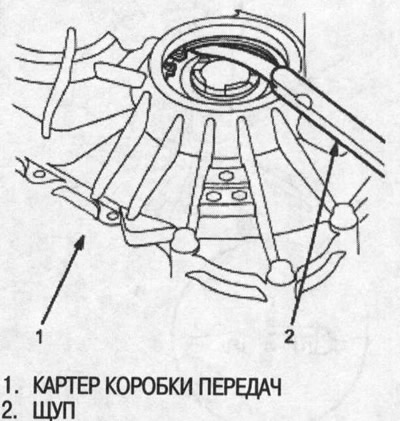
5. Measure the side clearance between the 80mm…


6. If the clearance exceeds the specified limit, select a new retaining ring from the table and install it.

Retaining ring, 80 mm


Catalogue NoThickness
90414-689-002.50 mm
90415-689-002.60 mm
90416-689-002.70 mm
90417-689-002.80 mm
90418-689-002.90 mm
90419-RN8-003.00 mm

Note: If the gap measured in step 5 is within the permissible limits, there is no need to perform steps 7 and 8.


7. Remove the flywheel housing.

8. Replace the 2.50 mm retaining ring with an 80 mm ring of the required thickness selected in step 5.

[The article was copied from the website hondabook]
This article is available at: russian, bulgarian, belarusian, ukrainian, serbian, croatian, romanian, polish, slovak, hungarian
This information has been verified: Emil Safonov
Share with friends:
◀ Previous
HR-V 1: Automatic gearbox
Next ▶

Differential — design description
Secondary shaft — selection of thrust pad 25x35 mm
Forward clutch — assembly
Forward clutch — disassembly
Manual control valve body
Flywheel housing input shaft seal — replacement
Gearbox housing bearings — replacement
Flywheel housing bearings — replacement
Ring gear bearing — replacement
Control shaft assembly — removal and installation
See also other articles from Honda manuals:
Checking the condition and replacing spark plugs Honda Accord 6 (1997-2002)
Checking the oil level in the rear differential (4WD models) Honda Civic 3 and 4 (1983-1991)
Checking and replacing fuses Honda Fit 1 (2001-2008)
Checking and replacing differential fluid Honda CR-V 2 (2002-2006, petrol)
Rear Differential Oil — Checking and Replacing Honda Avancier 1 (1999-2003, petrol)
Link in different formats to this article
Comments and feedback from visitors
No comments yet


How much will 26 + 18 ?


HR-V 1 (1998-2006, petrol) 
  • General information
  • User manual
  • Maintenance
  • Power unit
  • Engine repair
  • Lubrication system
  • Cooling system
  • Fuel injection and control
  • Power and exhaust system
  • Engine electrical equipment
  • Transmission
  • Clutch
  • Mechanical gearbox
  • Automatic gearbox
  • Rear differential
  • Drive shafts and cardan
  • Chassis and running gear
  • Steering
  • Car suspension
  • Brake system
  • Body and interior
  • Exterior (external elements)
  • Interior (internal elements)
  • Doors, locks and windows
  • Electrical equipment
  • Equipment and devices
  • Lighting system
  • Electrical circuits
HondaBook.ru © 2018–2026 • Mobile version • Sitemap: EN BG BY UA RS HR RO PL SK HU • Feedback • Driver Information • Search system • Bookmark
Accord 3 (1985-1989) • Accord 6 (1997-2002) • Civic 3 and 4 (1983-1991) • Civic 5 and 6 (1991-2000) • Civic 6 (1995-2000) • Civic 7 (2000-2005) • Civic 8 (2005-2011) • Fit 1 (2001-2008) • CR-V 1 (1995-2001) • CR-V 2 (2002-2006) • HR-V 1 (1998-2006) • Avancier 1 (1999-2003) •
 
This website uses cookies to ensure proper functioning. By clicking "OK," you agree.