HondaBook.ru
Auto companies Volkswagen Auto companies Ford Auto companies Lada Auto companies Skoda Auto companies BMW Auto companies Mazda Auto companies Peugeot
English Русский
Български
Беларускі
Український
Српски
Hrvatski
Română
Polski
Slovenský
Magyar
Bookmark Contacts Sitemap   


Accord Civic Fit / Jazz CR-V HR-V Others Articles
Accord 3 (1985-1989) Accord 6 (1997-2002)

Relays — general information and checking the correct functioning (Honda Accord 6)

  • Main
  • Honda Accord
  • 6 (1997-2002)
  • Electrical equipment
  • Equipment and devices
  • Relays — general information and checking the correct functioning
0
Relays are used to supply power or a control signal to some of the electrical consumers in the vehicle (such as fuel injection system components, horn, starter, cooling fan(s), fog lights, etc.). In fact, a relay is an electric key that ensures the closure of the high-voltage circuit by a low-voltage signal. If a relay fails, the corresponding consumer will fail. Most relays are located in the mounting block located in the engine compartment, while others are scattered around the vehicle. A description of how to check the proper functioning of a relay is given below. Failed relays must be replaced.

Examination


1. If you cannot figure out how to connect the relay to the corresponding electrical circuit using the electrical connection diagrams, you should remember that the approach to checking any relay is basically the same in all cases.

2. In most relays, the control circuit is always connected to two of the contact terminals. When low-voltage voltage is applied to these terminals, the current begins to circulate through the relay control winding, which results in the closing of the large contacts of the working circuit of the consumer of electrical energy. The remaining terminals are the terminals of the working (high-voltage) circuit.

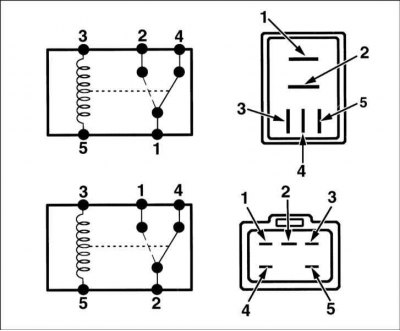
3. In order to facilitate the identification of the relay terminals, explanatory markings with an image of the key connection diagram are usually applied to its body.
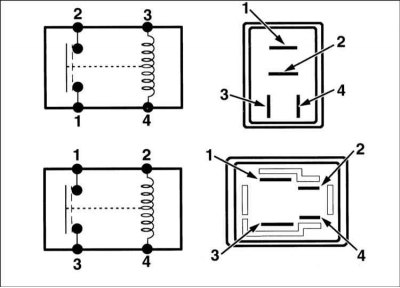
3. In order to facilitate the identification of…

4. Connect a fused jumper wire between one of the relay control terminals and the positive battery terminal. Use a second jumper wire to ground the other control terminal - the relay should click. Some relays require that the polarity of the connection be observed - if there is no click, try reversing the polarity of the control terminals.


5. With the jumper wires connected, check for conductivity between the terminals of the high-voltage circuit by connecting an ohmmeter in accordance with the key diagram on the relay body.

6. If the test result is negative, replace the relay.

Refer to the original source on the website HondaBook
This article is available at: russian, bulgarian, belarusian, ukrainian, serbian, croatian, romanian, polish, slovak, hungarian
This information has been verified: Timofey Goryachev
Share with friends:
◀ Previous
Accord 6: Equipment and devices
Next ▶

Circuit breakers
Fuses — General Information
Search for causes of electrical equipment failures
Location of fuses and relays
General information and precautions
Checking and replacing the turn signal/hazard warning flasher
Checking the serviceability and replacing the steering column switches
Checking and replacing the ignition switch and steering column lock
Checking and replacing instrument panel switches
Checking the serviceability of the instrument cluster meters
See also other articles from Honda manuals:
Relays — general information and checking the correct functioning Honda Civic 6 (1995-2000)
Checking tire pressure and condition Honda Fit 1 (2001-2008)
Battery — Checking, Removing and Installing Honda CR-V 1 (1995-2001, petrol)
Checking the starter brushes Honda HR-V 1 (1998-2006, petrol)
Checking and replacing fuses Honda Avancier 1 (1999-2003, petrol)
Link in different formats to this article
Comments and feedback from visitors
No comments yet


How much will 33 + 20 ?


Accord 6 (1997-2002) 
  • General information
  • Introduction to the guide
  • User manual
  • Maintenance
  • Power unit
  • Four-cylinder engines
  • Six-cylinder engines
  • Engine overhaul
  • Cooling system
  • Heater and air conditioner
  • Power and exhaust systems
  • Engine electrical equipment
  • Engine management
  • Transmission
  • Mechanical gearbox
  • Automatic gearbox
  • Clutch and drive shafts
  • Chassis and running gear
  • Brake system
  • Car suspension
  • Steering
  • Body and interior
  • Exterior (external elements)
  • Interior (internal elements)
  • Electrical equipment
  • Equipment and devices
  • Electrical circuits
Accord 3 (1985-1989) 
  • General information
  • Maintenance
  • Power unit
  • Engine adjustment
  • Engine repair
  • Engine electrics
  • Emission management
  • Engine management (carburetor)
  • Electronic injection
  • Programmable injection
  • Schematic of emission system
  • Fuel system
  • Feedback management
  • Transmission
  • Manual gearbox
  • Automatic gearbox
  • Clutch
  • Chassis and running gear
  • Front suspension
  • Rear suspension
  • Steering
  • Brake system
  • Electrical equipment
  • Ventilation and heating
  • Air conditioner
  • Cruise control system
  • Equipment and devices
HondaBook.ru © 2018–2026 • Mobile version • Sitemap: EN BG BY UA RS HR RO PL SK HU • Feedback • Driver Information • Search system • Bookmark
Accord 3 (1985-1989) • Accord 6 (1997-2002) • Civic 3 and 4 (1983-1991) • Civic 5 and 6 (1991-2000) • Civic 6 (1995-2000) • Civic 7 (2000-2005) • Civic 8 (2005-2011) • Fit 1 (2001-2008) • CR-V 1 (1995-2001) • CR-V 2 (2002-2006) • HR-V 1 (1998-2006) • Avancier 1 (1999-2003) •
 
This website uses cookies to ensure proper functioning. By clicking "OK," you agree.