
HondaBook.ru
Auto companies Volkswagen Auto companies Ford Auto companies Lada Auto companies Skoda Auto companies BMW Auto companies Mazda Auto companies Peugeot
English Русский
Български
Беларускі
Український
Српски
Hrvatski
Română
Polski
Slovenský
Magyar
Bookmark Contacts Sitemap   


Accord Civic Fit / Jazz CR-V HR-V Others Articles
Accord 3 (1985-1989) Accord 6 (1997-2002)

Removal and installation the radio antenna (Honda Accord 6)

  • Main
  • Honda Accord
  • 6 (1997-2002)
  • Electrical equipment
  • Equipment and devices
  • Removal and installation the radio antenna
0
1. The models of cars under consideration are equipped with a wire-type antenna fixed to the rear window. The signal received by the antenna is amplified by an electromagnetic coil installed under the rear shelf of the passenger compartment.

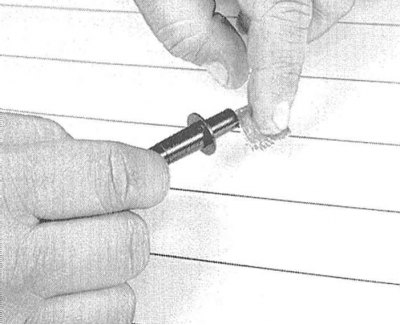
2. If you have problems receiving radio signals, check for conductivity in the antenna connecting wiring.
2. If you have problems receiving radio signals,…


3. Wrap the ohmmeter probes in aluminum foil and probe the antenna's receiving array threads with it. One probe is pressed against one of the antenna terminals, and the other is moved along the array threads until a break point is detected.

4. If a break is detected, the grid is restored in a manner similar to that described in Section Checking the correct operation and repairing the rear window heater for repair of the conductive grille of the rear window heating.
4. If a break is detected, the grid is restored…


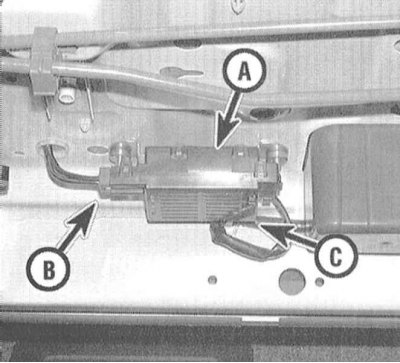
5. If the receiving grid is OK, check the condition of the electromagnetic coil of the antenna amplifier. Disconnect the two wiring harnesses from the amplifier assembly. On the coil side of the 1-pin connector, check for continuity between the single terminal and ground. If there is continuity, replace the coil.


Note: To make it easier to disconnect the connectors, release the two lid fastening latches on the bottom of the amplifier. Read the ohmmeter readings only a few seconds after connecting it. At first, the device may register conductivity, which may drop to zero after 20 seconds. This test also checks the conductivity of the coil.


6. Check for continuity between the two terminals of the 2-pin connector on the opposite side of the amplifier assembly. If there is continuity, replace the coil (see Note to paragraph 5).
6. Check for continuity between the two terminals…


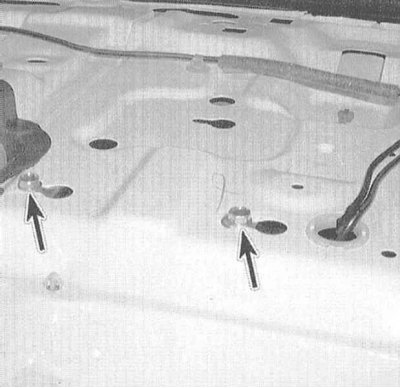
7. To replace the coil, remove the rear shelf (see Chapter Body) and remove the two mounting screws.

(The original is located on the website «HondaBook.ru»)
This article is available at: russian, bulgarian, belarusian, ukrainian, serbian, croatian, romanian, polish, slovak, hungarian
This information has been verified: Timofey Goryachev
Share with friends:
◀ Previous
Accord 6: Equipment and devices
Next ▶

Removal and installation the radio and speakers
Removal and installation the instrument cluster
Checking the serviceability of the instrument cluster meters
Checking and replacing instrument panel switches
Checking and replacing the ignition switch and steering column lock
Replacing headlight bulbs
Adjusting the direction of the optical axes of the headlights
Headlight replacement
Replacing lamps
Daytime running lights (DRL)
See also other articles from Honda manuals:
Radio and antenna — removal and installation Honda Civic 3 and 4 (1983-1991)
Radio tape recorder — main points of operation Honda Fit 1 (2001-2008)
Radio Antenna — Replacement Honda CR-V 1 (1995-2001, petrol)
Antenna — General Information Honda Avancier 1 (1999-2003, petrol)
Link in different formats to this article
Comments and feedback from visitors
No comments yet


How much will 22 + 43 ?


Accord 6 (1997-2002) 
  • General information
  • Introduction to the guide
  • User manual
  • Maintenance
  • Power unit
  • Four-cylinder engines
  • Six-cylinder engines
  • Engine overhaul
  • Cooling system
  • Heater and air conditioner
  • Power and exhaust systems
  • Engine electrical equipment
  • Engine management
  • Transmission
  • Mechanical gearbox
  • Automatic gearbox
  • Clutch and drive shafts
  • Chassis and running gear
  • Brake system
  • Car suspension
  • Steering
  • Body and interior
  • Exterior (external elements)
  • Interior (internal elements)
  • Electrical equipment
  • Equipment and devices
  • Electrical circuits
Accord 3 (1985-1989) 
  • General information
  • Maintenance
  • Power unit
  • Engine adjustment
  • Engine repair
  • Engine electrics
  • Emission management
  • Engine management (carburetor)
  • Electronic injection
  • Programmable injection
  • Schematic of emission system
  • Fuel system
  • Feedback management
  • Transmission
  • Manual gearbox
  • Automatic gearbox
  • Clutch
  • Chassis and running gear
  • Front suspension
  • Rear suspension
  • Steering
  • Brake system
  • Electrical equipment
  • Ventilation and heating
  • Air conditioner
  • Cruise control system
  • Equipment and devices
HondaBook.ru © 2018–2026 • Mobile version • Sitemap: EN BG BY UA RS HR RO PL SK HU • Feedback • Driver Information • Search system • Bookmark
Accord 3 (1985-1989) • Accord 6 (1997-2002) • Civic 3 and 4 (1983-1991) • Civic 5 and 6 (1991-2000) • Civic 6 (1995-2000) • Civic 7 (2000-2005) • Civic 8 (2005-2011) • Fit 1 (2001-2008) • CR-V 1 (1995-2001) • CR-V 2 (2002-2006) • HR-V 1 (1998-2006) • Avancier 1 (1999-2003) •
 
This website uses cookies to ensure proper functioning. By clicking "OK," you agree.