
Precautionary measures
For a number of reasons, working on the exhaust system can be the most dangerous job you can do on your vehicle. Always observe the following precautions:
- Securely anchor the vehicle.
- Wear safety goggles. Exhaust system components are always rusty and metal dust can get into your eyes.
- When using any heat source, keep it away from the fuel tank or fuel lines.
- When working with a hammer, be careful not to damage the brake or fuel lines. Inspect all lines and hoses where worn out.
WARNING: Be very careful when working on or near the catalytic converter. Surface temperatures can rise up to 500°C, causing severe burns. Removal or installation must only be carried out on a cold exhaust system.
It is very useful to use a special solvent to clean rusted bolts and flanges. Moisten the rusted parts late in the evening before the day's work, this can greatly speed up the work of unscrewing the rusted parts.
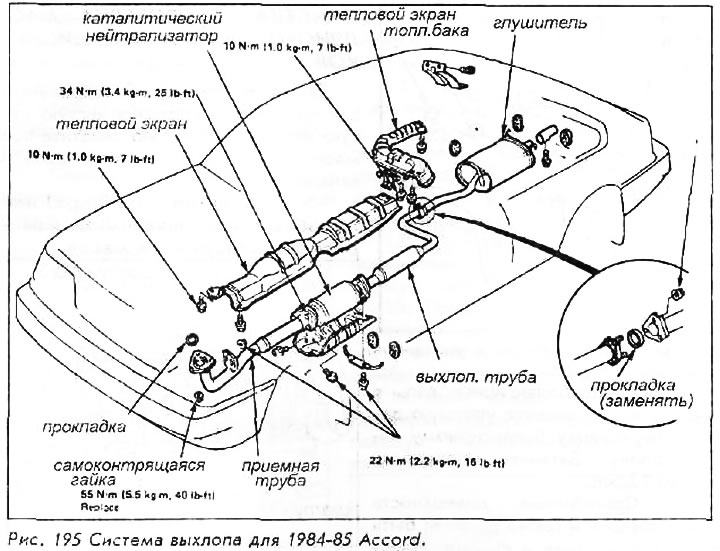
The exhaust system on the Accord and Prelude is made up of several parts. Luckily, parts are usually bolted and nutted rather than riveted. Each bolted connection contains a gasket that must be replaced each time a repair is made.
The first section of pipe connects the outlet manifold to the catalytic converter. The catalytic converter is a sealed, maintenance-free assembly that can be easily unscrewed from the system and replaced if necessary. The exhaust system is attached to the body with several welded hooks and flexible rubber hangers; these suspensions absorb vibrations and isolate the system from the body of the car. The hangers must be in place and properly installed to avoid vibration and contact with the hull. A series of metal heat shields extend along the exhaust pipes, protecting the underbody from excessive heat.
Heat shields can be the source of some annoying noises, including a hum or rumble, related to the speed of the machine. Make sure screens are securely fastened and free from gravel.
The system ends with a muffler and a tail pipe at the rear of the vehicle. The inlet pipe, muffler and tail pipe are one piece and must be replaced as a whole.
When inspecting or replacing exhaust system components, make sure that all appropriate clearances are present at every point on the body to avoid possible underbody overheating. Check the entire system for damage, missing or poorly placed parts. Rumble and vibrations in the exhaust system are usually caused by misalignment of parts. When aligning the parts of the system, leave all the bolts and nuts loose until all are in their proper positions, then tighten the parts, working from the front to the back. Take into account the movement of the engine, body and suspension when replacing parts.
Uninstalling and installing components
ALWAYS use new gaskets for any pipe joint when disassembling it. Use new bolts and nuts to securely fasten all joints. These two simple rules will help prevent future leaks.
Catalytic converter
1. Raise and secure the vehicle.
2. Remove the heat shield (s).
3. Remove the three bolts at the front and rear of the converter.
4. Remove the converter and gaskets.
5. Using new gaskets, connect the converter to the exhaust pipes. Tighten the bolts to 35 Nm.
Silencer and/or tailpipe
Chrome-plated tail extension is a separate item (unlike muffler and tailpipe); if yours is still in good shape, remove it by loosening the set of screws at the bottom of the extension. To remove the muffler and tail pipe:
1. Raise and secure the rear of the vehicle.
2. Disconnect the nuts holding the muffler and/or tailpipe on the mating pipes.
3. Remove or disconnect the clamps and props holding the pipe at all ends. Leave the supports closest to the center.
4. Remove the last props or hooks and lower the assembly to the ground. NEVER leave a muffler hanging partially suspended; you can break the next component in the line.
When replacing a muffler or tailpipe due to rust or corrosion, check adjacent pipes for similar damage. All system components are damaged at the same rate.
5. Lift the new assembly into place and loosely attach hooks or props to support it. Move it a little to properly install the muffler.
6. Using new gaskets, connect each end to the adjacent pipe. Tighten the connecting bolts and nuts to 25-35 Nm.
7. Tighten the props and hooks. Make sure the rubber fasteners are securely attached to their fastening points.
Whole system
When completely replacing the exhaust system, it is easier to remove the entire system as a whole than to remove each part separately. Disconnect the first pipe at the manifold joint and work towards the rear of the vehicle, removing the brackets and hooks as you go. Remove the rear muffler bracket and remove the entire exhaust system from under the car.
The new system can then be assembled on a workbench and easily checked for correct tightening and gasket integrity. When mounting a new assembly, hang it first from the flexible hooks, and only then attach it to the mounting brackets. Always use new self-locking nuts, especially at the junction of the manifold with the downpipe. Tighten the manifold nuts to 55 Nm. Check the gaps on the body and suspension and install the manifold joint bolts, tighten them correctly.