
HondaBook.ru
Auto companies Volkswagen Auto companies Ford Auto companies Lada Auto companies Skoda Auto companies BMW Auto companies Mazda Auto companies Peugeot
English Русский
Български
Беларускі
Український
Српски
Hrvatski
Română
Polski
Slovenský
Magyar
Bookmark Contacts Sitemap   


Accord Civic Fit / Jazz CR-V HR-V Others Articles
HR-V 1 (1998-2006, petrol)

Oil pan — installation (Honda HR-V 1)

  • Main
  • Honda HR-V
  • 1 (1998-2006, petrol)
  • Power unit
  • Engine repair
  • Oil pan — installation
0
Contents: Models for Europe, Australia and…⇊ Except for European, Australian and…⇊

Models for Europe, Australia and South Africa:


Note:
  • Use sealant P/N 08C70-K0234M, 08C70-K0334M or 08C70-X0331S.
  • Before applying sealant, ensure that the contact surfaces are clean and dry.
  • Apply the sealant evenly, distributing it over the entire contact surface.
  • To prevent oil leakage, apply sealant to the threads of the bolt holes.
  • Do not install components if more than five minutes have passed since applying the sealant. Instead, reapply the sealant, removing any traces of the old one.
  • After assembly, wait at least 30 minutes before adding oil to the engine.


1. Install the oil pan gasket onto the oil pan.
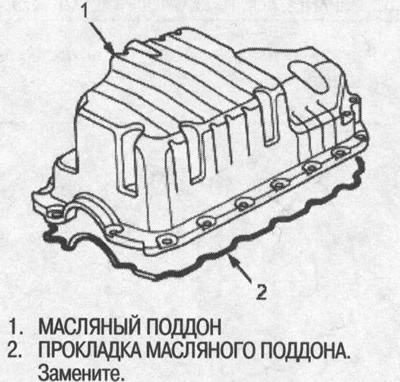
1. Install the oil pan gasket onto the oil pan.


2. Apply sealant to the contact surface of the cylinder block on the oil pan side, then install the oil pan.
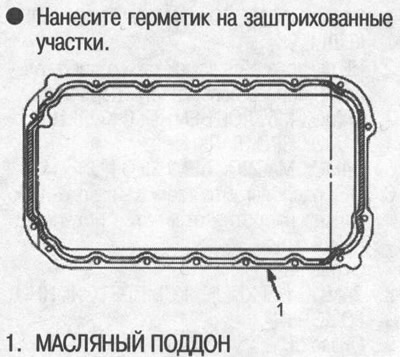
2. Apply sealant to the contact surface of the…


3. Tighten the nuts by hand at six points as shown below.
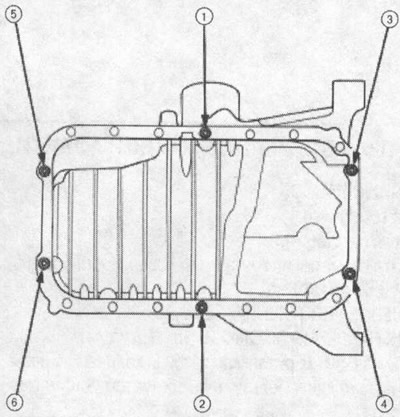


3. Tighten the nuts by hand at six points as…


4. Tighten all bolts and nuts clockwise in three passes, starting with the nut (1). Tightening torque: 12 Nm (1.2 kgf/m).

Note: Overtightening may cause oil pan gasket deformation and oil leakage.


Except for European, Australian and South African models:


Note:
  • Use sealant P/N 08C70-K0234M, 08C70-K0334M or 08C70-X0331S.
  • Before applying sealant, ensure that the contact surfaces are clean and dry.
  • Apply the sealant evenly, distributing it over the entire contact surface.
  • To prevent oil leakage, apply sealant to the threads of the bolt holes.
  • Do not install components if more than five minutes have passed since applying the sealant. Instead, reapply the sealant, removing any traces of the old one.
  • After assembly, leave the engine for at least 30 minutes before adding oil.


1. Apply sealant to the contact areas of the oil pump and right cover as shown below:
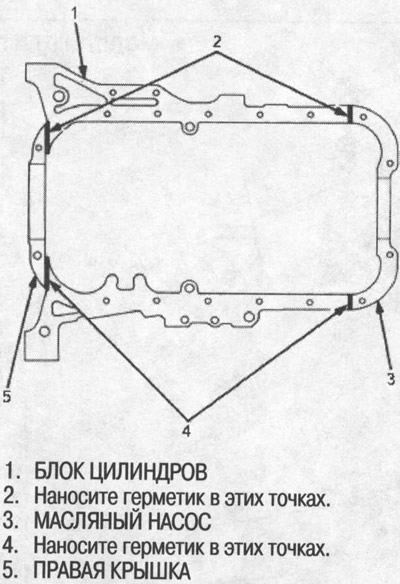
1. Apply sealant to the contact areas of the oil…


2. Install the oil pan gasket and oil pan.
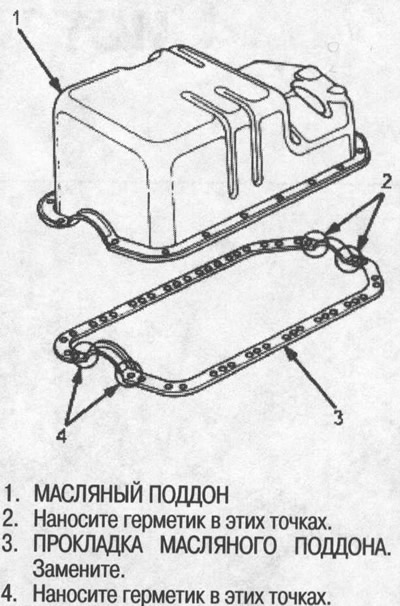


2. Install the oil pan gasket and oil pan.


Note:
  • Place a new gasket under the oil pan.
  • Install the oil pan no more than five minutes after applying the sealant.


3. Tighten the nuts by hand at six points as shown below.

4. Tighten all bolts and nuts clockwise in three passes, starting with the nut (1) as shown in the figure. Tightening torque: 12 Nm (1.2 kgf/m).
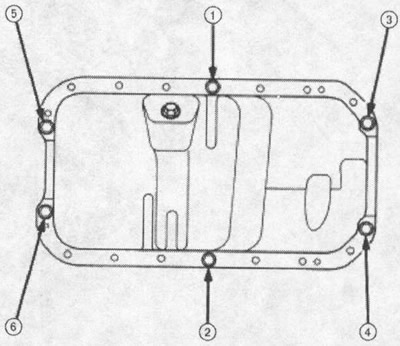
4. Tighten all bolts and nuts clockwise in three…


Note: Overtightening may cause oil pan gasket deformation and oil leakage.
This article is available at: russian, bulgarian, belarusian, ukrainian, serbian, croatian, romanian, polish, slovak, hungarian
This information has been verified: Emil Safonov
Share with friends:
◀ Previous
HR-V 1: Engine repair
Next ▶

Crankshaft — installation
Pistons — installation
Crankshaft oil seal — installation
Piston rings — checking and replacing
Piston pins — installation and inspection
Cylinder Head and Valve Train Specifications
Cylinder Block Specifications
Link in different formats to this article
Comments and feedback from visitors
No comments yet


How much will 37 + 26 ?


HR-V 1 (1998-2006, petrol) 
  • General information
  • User manual
  • Maintenance
  • Power unit
  • Engine repair
  • Lubrication system
  • Cooling system
  • Fuel injection and control
  • Power and exhaust system
  • Engine electrical equipment
  • Transmission
  • Clutch
  • Mechanical gearbox
  • Automatic gearbox
  • Rear differential
  • Drive shafts and cardan
  • Chassis and running gear
  • Steering
  • Car suspension
  • Brake system
  • Body and interior
  • Exterior (external elements)
  • Interior (internal elements)
  • Doors, locks and windows
  • Electrical equipment
  • Equipment and devices
  • Lighting system
  • Electrical circuits
HondaBook.ru © 2018–2026 • Mobile version • Sitemap: EN BG BY UA RS HR RO PL SK HU • Feedback • Driver Information • Search system • Bookmark
Accord 3 (1985-1989) • Accord 6 (1997-2002) • Civic 3 and 4 (1983-1991) • Civic 5 and 6 (1991-2000) • Civic 6 (1995-2000) • Civic 7 (2000-2005) • Civic 8 (2005-2011) • Fit 1 (2001-2008) • CR-V 1 (1995-2001) • CR-V 2 (2002-2006) • HR-V 1 (1998-2006) • Avancier 1 (1999-2003) •
 
This website uses cookies to ensure proper functioning. By clicking "OK," you agree.