
HondaBook.ru
Auto companies Volkswagen Auto companies Ford Auto companies Lada Auto companies Skoda Auto companies BMW Auto companies Mazda Auto companies Peugeot
English Русский
Български
Беларускі
Український
Српски
Hrvatski
Română
Polski
Slovenský
Magyar
Bookmark Contacts Sitemap   


Accord Civic Fit / Jazz CR-V HR-V Others Articles
Fit 1 (2001-2008)

Road test (Honda Fit 1)

  • Main
  • Honda Fit
  • 1 (2001-2008)
  • Transmission
  • Automatic gearbox
  • Road test
0
1. Start and warm up the engine.

2. Apply the parking brake and place chocks under the wheels.

3. Move the selector to position "D" and press the brake pedal. Press the accelerator pedal and release it sharply. The engine should not stall.

4. Repeat the procedures described in point "3" for all positions of the automatic transmission selector.

5. Connect the scan tool to the DLC (A) and enter the "A/T Mode Menu".

6. Select the "High Speed" icon.

7. Select the following parameters: -VSS veh speed;
  • Output Shaft (Countershaft) Speed;
  • Input Shaft (Malnshaft) Speed (rpm);
  • RPM engine speed;
  • RelativeTP Sensor;
  • APP Sensor D;
  • ATP Temp sensor;
  • Battery voltage;
  • Shift control;
  • Brake Switch.

8. Set the following parameters by selecting "Trigger Type":
  • the voltage value of "APP Sensor B" is more than 1 V;
  • "recording time" - 60 seconds;
  • "Trigger point" - 30 seconds.

9. Click "OK" when you are ready to run the test and start the test.

10. Press the accelerator pedal until the voltage of "APP Sensor B" becomes equal to 1 V.

11. Keep the pedal in this position until the car shifts to fifth gear. Then slow down and stop.

12. Save the measured values or increase the "recording time" value to the required value and repeat steps "9" and "10".

13. Set the "APP Sensor B" value to 2.5 V.

14. Press the accelerator pedal until the voltage of "APP Sensor B" becomes equal to 2.5 V.

15. Keep the pedal in this position until the car shifts to fifth gear. Then slow down and stop.

16. Save the measured values or increase the "recording time" value to the required value and repeat steps "14" and "15".


17. Press the accelerator pedal all the way down.

18. Keep the pedal in this position until the car shifts to third gear. Then slow down and stop.

19. Save the measured values.

20. Compare the stored data with the values given in the "Gear shift timing" tables.

Table. Gear shifting moments (upshifts).
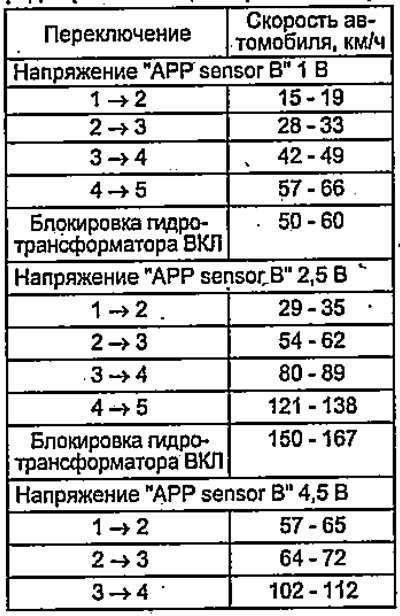
Table. Gear shifting moments (upshifts).

Table. Gear shifting moments (downshifts).
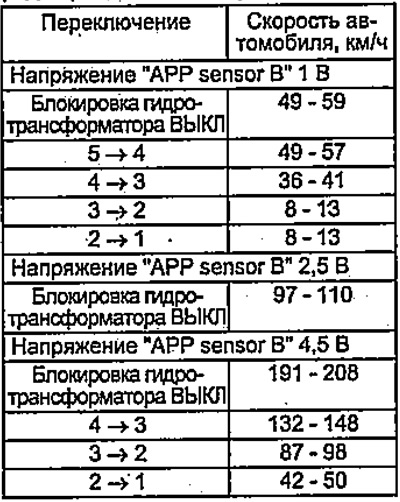
Table. Gear shifting moments (downshifts).

21. Drive the vehicle in fourth or fifth gear (selector in position "D"). Move the selector to position "2" (models without manual shift mode) or to position "S" (second gear) (models with manual shift mode). Make sure that engine braking is present.

22. Move the selector lever to position "1" (models without manual shift mode) or to position "S" (first gear) (models with manual shift mode). Make sure that engine braking is present.


23. Stop and move the selector to the "R" position and fully depress the accelerator pedal. Make sure there are no extraneous noises or sounds from the gearbox.

24. Place the vehicle on a slope (approximately 16°) and move the selector to the "P" position. Make sure that the output shaft locking mechanism retains the vehicle in place.
This article is available at: russian, bulgarian, belarusian, ukrainian, serbian, croatian, romanian, polish, slovak, hungarian
This information has been verified: Varvara Vereshchagina
Share with friends:
◀ Previous
Fit 1: Automatic gearbox
Next ▶

Pressure check
Stall test with vehicle at full braking (Stall test)
Automatic transmission diagnostics
Automatic transmission — device
General information about automatic transmission
Checking the level and replacing the working fluid of the automatic transmission
Replacing the working fluid filter
Selector Lock Solenoid Valve
Selector position sensor
Start inhibit switch
See also other articles from Honda manuals:
Ignition Coil Test Honda Accord 3 (1985-1989)
Road test (S4NA) Honda Civic 5 and 6 (1991-2000)
Vacuum Brake Booster — Leak Test Honda CR-V 1 (1995-2001, petrol)
Road test of automatic transmission Honda HR-V 1 (1998-2006, petrol)
Rear Differential (4WD Models) — Test Sequence Honda Avancier 1 (1999-2003, petrol)
Link in different formats to this article
Comments and feedback from visitors
No comments yet


How much will 42 + 35 ?


Fit 1 (2001-2008) 
  • General information
  • User manual
  • Maintenance
  • Power unit
  • Engine repair
  • Cooling and lubrication system
  • Injection and power system
  • Control system
  • Engine electrical equipment
  • Transmission
  • Clutch
  • Mechanical gearbox
  • Automatic gearbox
  • Variator (CVT)
  • Drive shafts and gearbox
  • Chassis and running gear
  • Car suspension
  • Steering
  • Brake system
  • Body and interior
  • Exterior (external elements)
  • Interior (internal elements)
  • Doors, locks and windows
  • Heater and air conditioner
  • Safety system
  • Electrical equipment
  • Equipment and devices
  • Wiring diagrams (since 06.2001)
  • Wiring diagrams (since 06.2004)
HondaBook.ru © 2018–2026 • Mobile version • Sitemap: EN BG BY UA RS HR RO PL SK HU • Feedback • Driver Information • Search system • Bookmark
Accord 3 (1985-1989) • Accord 6 (1997-2002) • Civic 3 and 4 (1983-1991) • Civic 5 and 6 (1991-2000) • Civic 6 (1995-2000) • Civic 7 (2000-2005) • Civic 8 (2005-2011) • Fit 1 (2001-2008) • CR-V 1 (1995-2001) • CR-V 2 (2002-2006) • HR-V 1 (1998-2006) • Avancier 1 (1999-2003) •
 
This website uses cookies to ensure proper functioning. By clicking "OK," you agree.