
Checking the e / m valve "A"
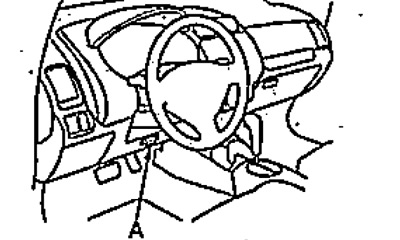
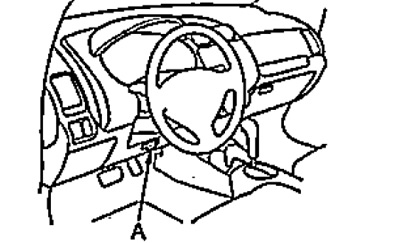
1. Connect the diagnostic tool to the diagnostic socket DLC (A).
2. Select "Clutch Pressure Control (Linear) Solenoid A" on the menu "Miscellaneous" device.
3. Check.
If necessary, check the resistance of the valve solenoid "A".
4. Check of resistance e/m of the valve "A".
A) Remove the air filter housing (see chapter "Maintenance and general inspection and adjustment procedures").
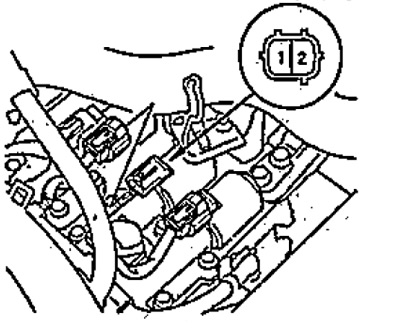
b) Disconnect the connector from the valve "A" pressure control.
V) Measure resistance between conclusions Ý/m the valve.
- Resistance - 3-10 Ohm
If the resistance is out of specification, replace the solenoid valve. If resistance corresponds to norm, check up operability e/m of the valve.
G) Check the operation of the e / m valve.
(1) Vehicle check.
Connect Lead "2" e / m valve to the negative terminal of the battery, and the output "1" - to positive and check that the sound of the valve operation is heard. If the sound of work is not audible, remove the electrovalve and check up its serviceability.
(2) Checking the e / m valve removed from the car.
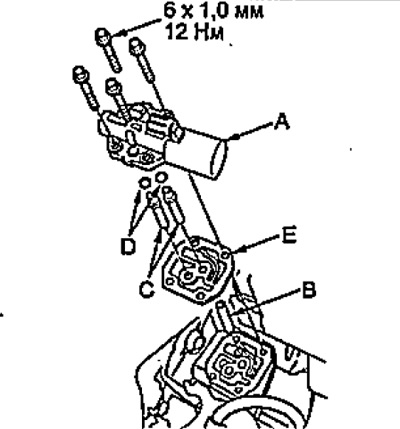
- Turn away bolts and remove the e/m valve "A".
- Remove tubes (B and C), O-rings (D) and gasket (E).
- Make sure that the channels of the solenoid valve are not dirty.
- Connect Lead "2" e / m valve to the negative terminal of the battery, and the output "1" - to positive and make sure that the solenoid valve moves.
 | 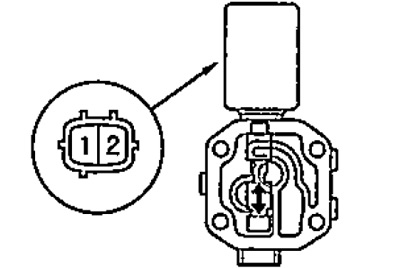 |
- Disconnect the wire from one of the leads and connect it to the valve body. Make sure the solenoid valve moves. If the solenoid valve sticks or does not move at all, replace the solenoid valve.
- Clean the valve contact surface and install the valve, o-rings, gasket and tubing.
d) Make sure that there is no rust, dirt or oil on the solenoid valve connector and connect the solenoid valve connector "A".
e) Install the air filter housing (see chapter "Maintenance and general inspection and adjustment procedures").
Replacing the e / m valve "A"
1. Remove the air filter housing (see chapter "Maintenance and general inspection and adjustment procedures").
2. Disconnect the connector of the valve "A" pressure control.
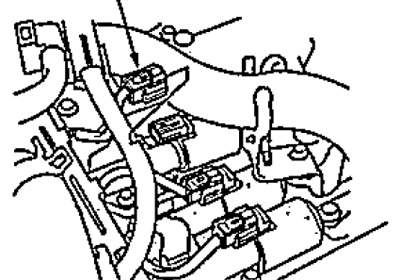
3. Turn away bolts and remove the e/m valve "A" pressure control.
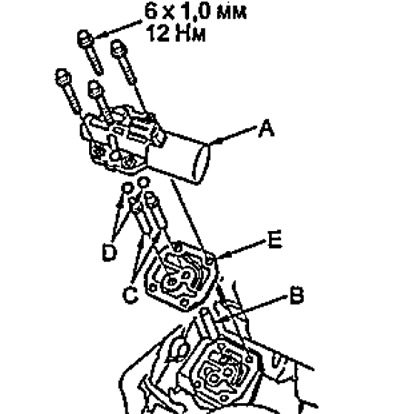
4. Remove tubes (B and C), O-rings (ABOUT) and gasket (E)
Note:
- Installation is made in an order, the return to removal.
- When installing, use only new O-rings and gasket.
Checking e / m valves "IN" And "WITH"
1. Connect the diagnostic tool to the diagnostic socket DLC (A).
2. Select "Clutch Pressure Control (Linear) Solenoid B" or "Clutch Pressure Control (Linear) Solenoid C" on the menu "Miscellaneous" device.
3. Check.
If necessary check up resistance e/m of the valve.
4. Check of resistance e/m of the valve.
A) Remove the air filter housing (see chapter "Maintenance and general inspection and adjustment procedures").
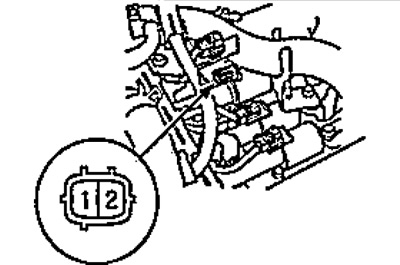
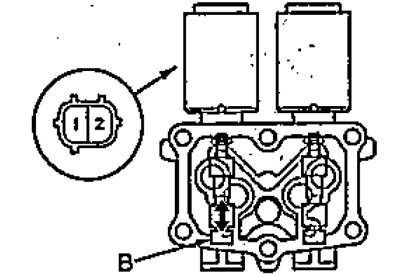
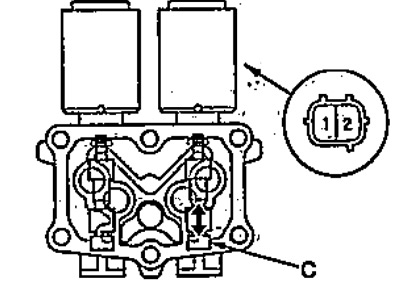
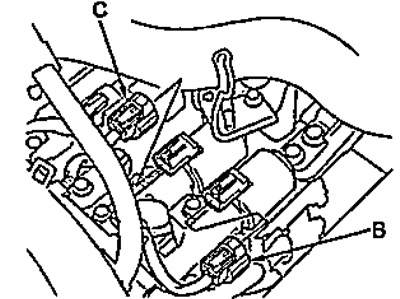
b) Disconnect the pressure control valve e/m connector.
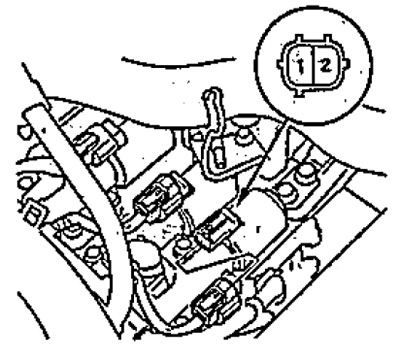
Connector e / m valve "IN"
Connector e / m valve "C"
V) Measure resistance between conclusions Ý/m the valve.
- Resistance - 3-10 Ohm
If the resistance is out of specification, replace the solenoid valve. If resistance corresponds to norm, check up operability e/m of the valve.
G) Check the operation of the e / m valve.
(1) Vehicle check.
Connect Lead "2" e / m valve to the negative terminal of the battery, and the output "1" - to positive and check that the sound of the valve operation is heard. If the sound of work is not audible, remove the electro-valve and — check up its serviceability.
(2) Checking the e / m valve removed from 1 car.
- Loosen the bolt and remove the bracket (A).
- Turn away bolts and remove e/m valves "IN" And "WITH".
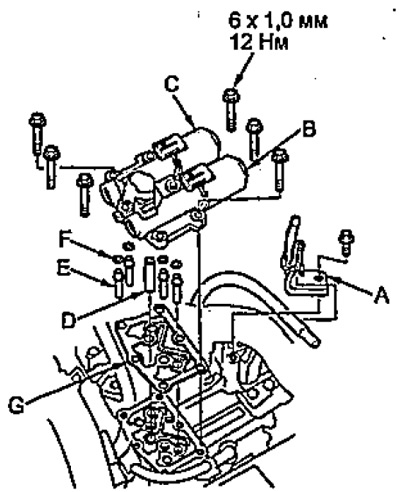
- Remove tubes (D and E), O-rings (F) and gasket (G).
- Make sure that the channels of the solenoid valve are not dirty.
- Connect Lead "2" e / m valve to the negative terminal of the battery, and the output "1" - to positive and make sure that the solenoid valve moves.
Solenoid valve "IN"
Solenoid valve "WITH"
- Disconnect the wire from one of the leads and connect it to the valve body. Make sure the solenoid valve moves. If the solenoid valve sticks or does not move at all, replace the solenoid valve.
- Clean the valve contact surface and install the valve, o-rings, gasket and tubing.
d) Make sure that there is no rust, dirt or oil on the valve solenoid connector and connect the valve solenoid connector.
e) Install the air filter housing (see chapter "Maintenance and general "Inspection and Adjustment Procedures").
Replacing e / m valves "IN" And "WITH"
1. Remove the air filter housing (see chapter "Maintenance and general inspection and adjustment procedures").
2. Disconnect connectors, e/m valves "IN" And "WITH" pressure control.
3. Turn away a bolt and remove an arm "A".
4. Turn away bolts and remove e/m valves "IN" And "WITH" pressure control.
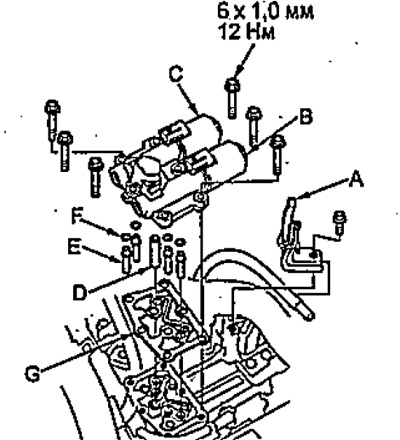
5. Remove tubes (D and E), O-rings (F) and gasket (G).
Note:
- Installation is made in an order, the return to removal.
- When installing, use only new O-rings and gasket.