
Contents: Action ⇊ Testing and servicing 1984-85 Accord…⇊ 1985 Accord Fuel Injected ⇊ Carbureted 1986-89 Accord and…⇊ Carburetor Thermovalve - Accord Only ⇊ Accord 1986-90 and Prelude 1988-94 ⇊ Accord 1990-91 ⇊
Action
This system prevents gasoline vapors from escaping into the atmosphere from the gas tank and carburetor. The design of the system varies among models of different years of production, and also depends on the equipment of the car. Cleaning control - the admission of fresh air to the fuel tank - is carried out mechanically (temperature and vacuum control) or electrically by the engine management system (on-board computer). Note that on later models, especially the Prelude, computer control of the carburetors is used, but the use of computers is not limited to cars with fuel injection.
Gasoline vapors accumulate in the expansion tank, fuel tank, and fuel lines. When the gasoline vapor pressure exceeds a certain value, a one-way valve opens and releases the vapors into the charcoal canister. When the engine is stopped or idling, the charcoal canister cleaning valve is closed and the vapors accumulate in the canister, and when the throttle is partially open, the valve is opened by manifold vacuum. Any excess increase or decrease in gasoline vapor pressure in the fuel tank is compensated for by a two-way valve located in the filler cap or fuel line.
Testing and servicing 1984-85 Accord and Prelude with carburetor
Thermovalve A
Cold engine
The engine must be cold. The coolant temperature must be below the temperature threshold of the temperature sensor and the temperature sensor must be shorted.
1. Remove the upper hose from the carbon filter cleaning valve and connect a vacuum pump to the free end of the hose.
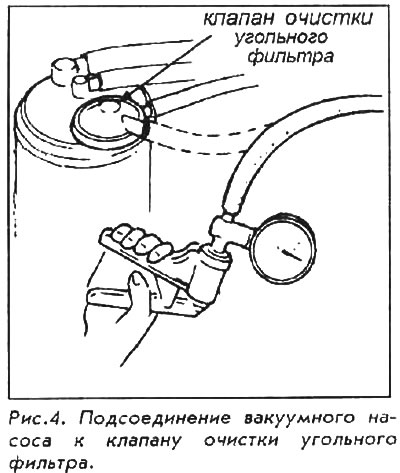
2. Run the engine at idle speed. No vacuum should be detected.
3. If vacuum is detected, replace Temperature Sensor A on the Accord or Temperature Sensor B on the Prelude.
Hot engine
1. The engine must be well warmed up (the cooling fan has turned on at least once). Using a hand vacuum pump, disconnect the upper hose from the carbon filter cleaning valve and connect the free end of the hose to a pressure gauge.
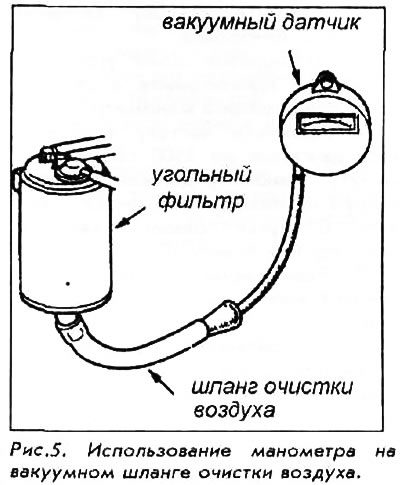
2. Start the engine in idle mode; a vacuum must be developed.
3. If there is no vacuum, inspect thermostat valve A on the Accord and thermostat valve B on the Prelude by checking for finger suction on the air cleaner. If there is vacuum at the carbon canister, reinstall the thermostat valve. If there is no vacuum, inspect hose #19 to the intake manifold for possible leaks or blockages.
Carbon filter
These actions are performed when the engine is hot.
1. Connect the tachometer to the engine. Start and warm up the engine (the cooling fan starts at least once).
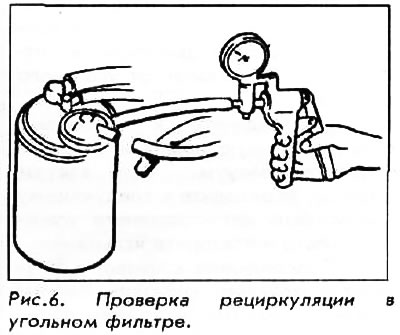
2. Remove the fuel filler cap.
3. Disconnect the carbon filter hose and attach a pressure gauge to the free end of the hose.
4. Increase the engine speed to 3500 rpm. The pressure gauge should show a vacuum no later than 1 minute. If a vacuum appears, proceed to step 10.
5. If a vacuum does not appear, the following procedures should be performed:
- a) Disconnect the pressure gauge and install the fuel filler cap.
- 6) Remove the carbon filter and check for defects and damage.
- c) If necessary, replace the filter.
6. Stop the engine and disconnect the PCV valve from the charcoal canister.
7. Connect a hand pump to the carbon filter and create a vacuum in the filter. If the vacuum is stable, proceed to the next step, if not, replace the carbon filter and repeat the test.
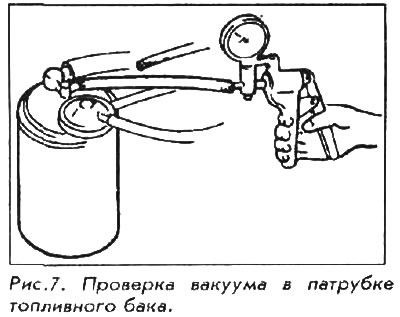
8. Connect the PCV hose to the filter and start the engine. The vacuum in the carbon filter cleaning hose should disappear. If the vacuum does not disappear, replace the filter and repeat the test.
9. If the vacuum in the carbon canister cleaning hose disappears, connect a hand pump to the PCV filter and create a vacuum. The vacuum should be stable. If the vacuum is stable, disconnect the pump and check the operation of the thermostat valve A. If the vacuum decreases, replace the filter and repeat the test.
1985 Accord Fuel Injected
Carbon filter
1. Connect the tachometer to the engine, start the engine, warm it up to normal temperature. The cooling fan should turn on at least once.
2. Remove the fuel filler cap.
3. Disconnect the carbon filter hose and attach a pressure gauge to the free end.
4. Increase the engine speed to 3500 rpm; the pressure gauge should show vacuum no later than a minute later. If the vacuum is registered within the time limit, proceed to step 10.
5. If vacuum does not appear, perform the following procedures:
- a) Disconnect the pressure gauge and install the fuel filler cap.
- b) Remove the carbon filter and check for defects and damage.
- c) Replace the filter if necessary.
6. Connect a vacuum pump to the carbon filter cleaning port and create a vacuum. The vacuum should be stable. If the vacuum decreases, replace the filter and check it.
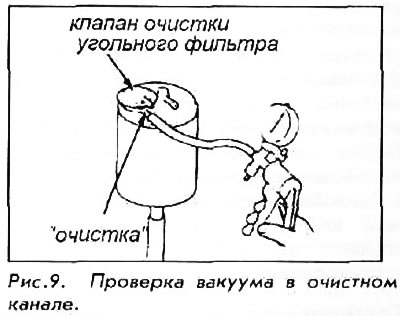
7. Using the second hand pump, pump out the air through the filter PCV-hose. The vacuum in the carbon filter cleaning hose should disappear. If the vacuum does not disappear, change the filter and check it.
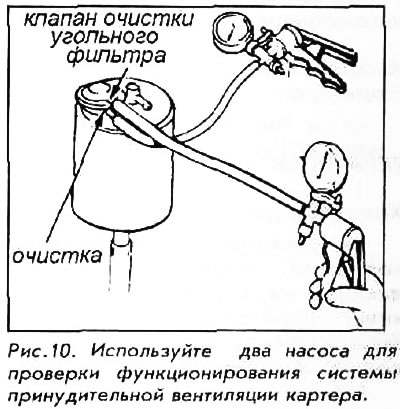
8. Disconnect the hand pump from the cleaning pipe. Create a vacuum in the PCV system. The vacuum should be stable, if not - replace the filter.
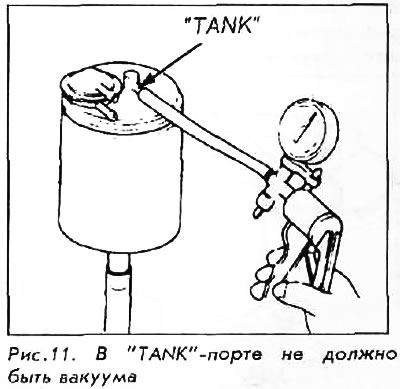
9. Connect a vacuum pump with a container to collect gasoline vapors and try to create a vacuum. It should NOT occur. If so, install the filler cap and the test can be considered complete. If there is a vacuum, replace the filter and repeat the test.
Two-way valve
1. Remove the cap from the gas tank.
2. Raise and secure the vehicle.
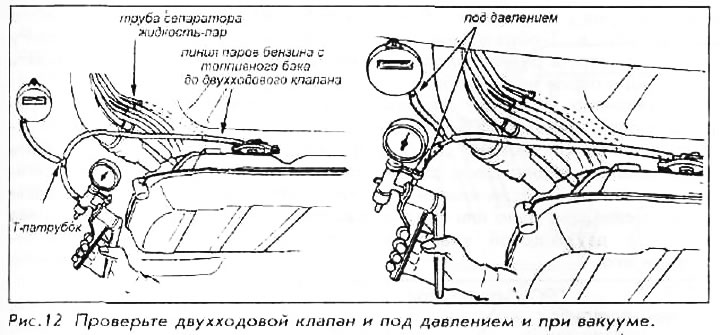
3. Disconnect the gasoline vapor discharge hose from the liquid-vapor separator located on the gas tank. Connect a pressure gauge to the T-shaped pipe, as well as a hand pump that goes through the hose into the gas tank.
4. Slowly, under the control of the pressure gauge, create a vacuum. The vacuum is stabilized by a two-way valve that opens in the pressure range of 5-15 mm Hg. If the valve opens too early or too late, replace and check it.
5. Move the hand pump hose from the suction to the discharge pipe, connect the pressure gauge.
6. Slowly, under the control of the pressure gauge, increase the pressure in the gasoline vapor discharge hose. The pressure should stabilize between 25 and 55 mm Hg. If so, the valve is OK. If the pressure stabilizes too early or too late, replace the valve.
Carbureted 1986-89 Accord and 1986-90 Prelude
Thermal valve A or B
The engine is cold
1. The engine coolant temperature must be below 55°C on the Accord or 40°C on the Prelude. Disconnect the vacuum hose from the canister purge valve on top of the canister. Attach a hand pump to the free end of the hose.
2. Run the engine at idle speed - there should be no vacuum. If there is, replace thermostat A on the Accord or B on the Prelude and check them.
The engine is hot
1. The engine coolant temperature must be higher than the set temperature of the temperature sensor. Disconnect the hose from the carbon filter cleaning valve and connect the free end of the hose to the hand pump.
2. Start the engine. When the engine is warm, the vacuum should be registered. If not, disconnect the vacuum hose from the thermostatic valve and check the hose for leaks. If the hose is leaky, replace the thermostatic valve.
3. Disconnect the hand pump and reconnect the hose.
4. Remove the fuel filler cap.
5. Disconnect the air filter cleaning hose from the filter and connect it to the pressure gauge.
6. Increase the engine speed to 3500 rpm. The vacuum should be registered by the pressure gauge for 1 min. If the vacuum is not detected, turn off the engine. Install the gas tank cap. Remove the carbon filter and inspect it for physical damage. Replace it if necessary.
7. If vacuum appears in step 6, turn off the engine, disconnect the hose from the PCV reservoir pipe. Attach a hand pump to the filter and create a vacuum. The vacuum should be stable. If the vacuum decreases, replace the filter.
8. Restart the engine, connect the PCV hose to the assembled filter. The vacuum on the cleaning pipe should disappear. If the vacuum has not completely disappeared, replace the filter.
9. If the vacuum is completely gone, connect the vacuum hose to the PCV system and create a vacuum. The vacuum should be stable. Otherwise, replace the filter and check it.
10. Connect a hand pump to the vapor collection port on the carbon filter and create a vacuum. If a vacuum is registered, replace the filter.
Carburetor Thermovalve - Accord Only
1. Start checking on a cold engine. The coolant temperature should be below 30°C.
2. Disconnect the hose from the carburetor thermovalve, connect a hand pump to the valve. Create a vacuum of 200 mm Hg, it should be stable. If not, replace the thermovalve.
3. Reconnect the vacuum hose to the carburetor thermostat valve. Start the engine and let it warm up to the optimum temperature. The coolant temperature should be above 40X.
4. Repeat steps 2. The vacuum should not be maintained. If the vacuum is maintained, replace the carburetor thermowell.
Accord 1986-90 and Prelude 1988-94
System check
1. Start the test with the engine cold. The coolant temperature should be above 55°C. Check the vacuum lines for possible cracks, blockages and the conformity of the hoses to the connection points.
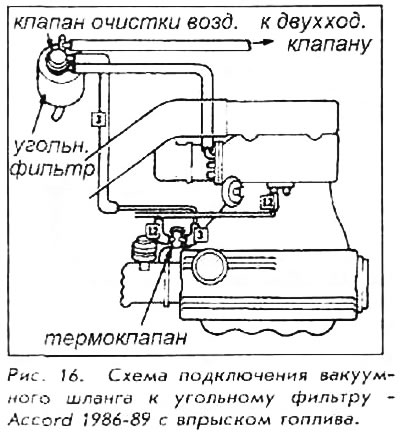
2. Disconnect vacuum hose number three from the carbon canister cleaning valve and connect the free end of the hose to a pressure gauge.
3. Run the engine at idle speed. There should be no vacuum while the engine is cold. If there is, replace the thermostat valve and check it.
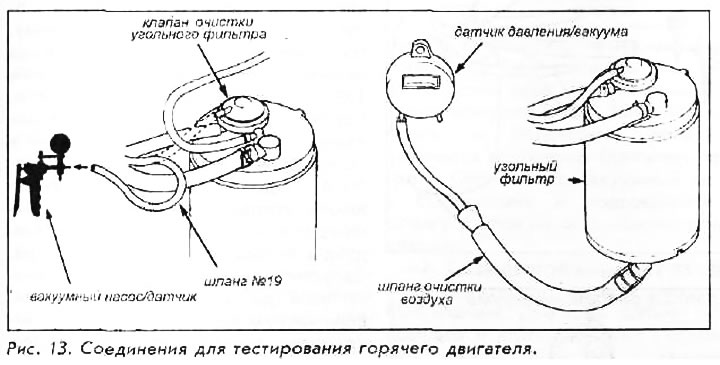
4. Warm up the engine to the optimum temperature. Vacuum will start to register as the coolant temperature reaches 55°C. If vacuum is not registered with the engine warmed up, replace the thermostat valve.
5. Disconnect the pressure gauge and reconnect the hose.
6. Remove the fuel tank filler cap.
7. Remove the air cleaning hose and connect the free end of the hose to the pressure gauge.
8. Increase engine speed to 3500 rpm. The pressure gauge should register a vacuum for 1 min. If not, turn off the engine, install the gas cap. Remove the carbon filter and check for mechanical damage and incorrect connection.
9. If vacuum is detected in step 6, turn off the engine, disconnect the hose from the PCV reservoir pipe. Connect a hand pump to the cleanout pipe and create a vacuum. The vacuum should remain stable. If the vacuum disappears, replace the carbon filter.
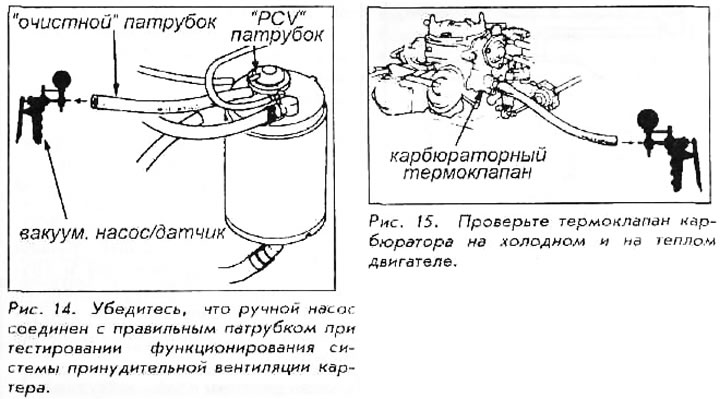
10. Restart the engine. Connect the PCV hose to the pipe. The vacuum in the cleaning channel should disappear. If not, replace the filter.
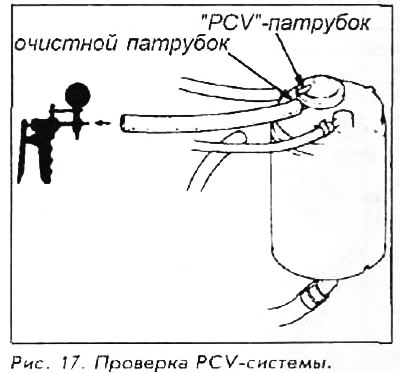
11. If vacuum disappears in the purge line, connect a hand pump to the PCV pipe and create a vacuum. The vacuum should be stable. If not, replace the filter and check it.
Two-way valve
1. Remove the cap from the gas tank.
2. Raise and securely support the vehicle.
3. Disconnect the vapor collection line from the liquid-vapor separator tube on the fuel tank. Connect a pressure gauge to the T-piece and a hand pump to the vapor collection hose on the gas tank.
4. Slowly create a vacuum under the control of the pressure gauge. The vacuum is stabilized by opening the two-way valve in the pressure range of 5-15 mm Hg. If the valve opens too early or too late - replace the two-way valve and check it.
5. Move the hand pump hose from the suction port to the discharge port and connect the pressure gauge.
6. Carefully, under the control of the pressure gauge, increase the pressure in the gasoline vapor collection line. The pressure should be stable between 25 and 55 mm Hg. If so, the valve is OK. If the pressure is established too early or too late, replace the valve.
Accord 1990-91
1. With the engine cold, disconnect the vacuum hose from the upper port of the carbon canister cleaning valve and connect a pressure gauge to the hose. You can use a pressure gauge on a hand pump.
2. With the engine cold and idling, the solenoid valve should be closed. The pressure gauge should not register a vacuum at the very beginning of the engine. As the engine warms up, the valve opens and opens the carbon filter cleaning valve.
3. If by the time the cooling fan turns on, the vacuum has not appeared, check the cut-off solenoid and the wires to it. The black and yellow wire of the solenoid should detect a voltage of 12 V with the ignition on. The on-board computer is the closing link in the regulation circuit and also affects the operation of the valve.
4. Connect a vacuum line to the valve and attach a pressure gauge to the fresh air intake at the base of the carbon canister. Start the engine until the engine speed reaches 3500 rpm. If vacuum is not registered when the solenoid valve opens, the canister is likely damaged. Check the two-way valve and make sure the gas cap is not leaking.
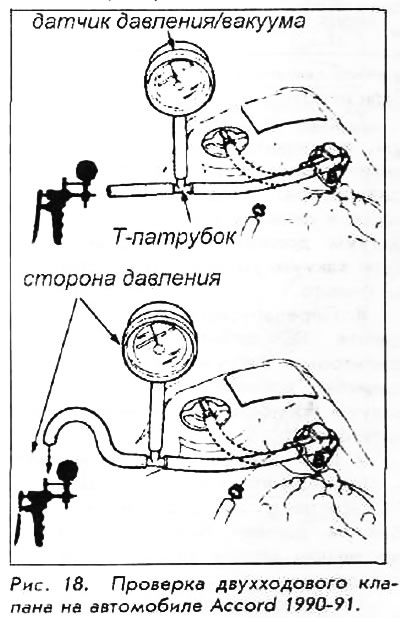
5. Stop the engine. To check the two-way valve, remove the cap from the gas tank, disconnect the hose that removes gasoline vapors from the gas tank, connect a hand pump to the hose and create a vacuum. The vacuum should immediately stabilize within 5-15 mm Hg.
6. Now create positive pressure in the same hose. It should immediately stabilize within 10-35 mm Hg. Stabilization in both cases is performed by a two-way valve, providing proper ventilation.
(Information obtained from this source: HondaBook)