
HondaBook.ru
Auto companies Volkswagen Auto companies Ford Auto companies Lada Auto companies Skoda Auto companies BMW Auto companies Mazda Auto companies Peugeot
English Русский
Български
Беларускі
Український
Српски
Hrvatski
Română
Polski
Slovenský
Magyar
Bookmark Contacts Sitemap   


Accord Civic Fit / Jazz CR-V HR-V Others Articles
CR-V 1 (1995-2001, petrol) CR-V 2 (2002-2006, petrol)

Shock absorbers — removal and installation (Honda CR-V 1)

  • Main
  • Honda CR-V
  • 1 (1995-2001, petrol)
  • Chassis and running gear
  • Rear suspension
  • Shock absorbers — removal and installation
0
Contents: 4-cylinder Odyssey ⇊ Odyssey V6 ⇊ Examination ⇊

4-cylinder Odyssey


Removal


1. Remove the cup holder from the top of the right rear side trim panel. From the left rear side panel, remove the cup holder, storage tray and jack.

2. Raise the car.

3. Remove the rear wheels.

4. Place a jack under the lower arm and lift it up.

5. Unscrew the lower shock absorber mounting bolt and the bolt on the knuckle.

6. Unscrew the shock absorber mounting nuts from the interior side and remove the shock absorber.

Installation


7. Check the condition of the bushings; replace damaged bushings.

8. Install the shock absorber. Screw on new self-locking nuts.

9. Raise the lower arm with a jack. Make sure the spring is installed correctly.

10. Screw on the shock absorber mounting bolt and the shock absorber to the knuckle.

11. Raise the jack so that it supports the weight of the car. Tighten the bolts to 103 Nm.

12. Remove the jack. Install the wheels and lower the vehicle.

13. Tighten the shock absorber mounting nuts to 39 Nm, the shock absorber rod nut to 29 Nm. Install the remaining removed parts.

14. Check and adjust the rear wheel alignment.

Odyssey V6


Removal


1. Raise the vehicle.

2. Remove the wheel.

3. Place a jack under the lower arm and lift it up.

4. Unscrew the upper shock absorber mounting bolt.

5. Unscrew the self-locking nuts on the knuckle studs.

6. Squeeze the shock absorber with your hand and remove it.

Installation


7. Compress the shock absorber with your hand and install it on the steering knuckle.


8. Screw on the lower self-locking nut of the shock absorber.

9. Spread the shock absorber and tighten the upper mounting bolt.

10. Raise the lower arm with a jack so that the jack supports the weight of the car. Tighten the top bolt and self-locking nut to 64 Nm.

11. Check and adjust the rear wheel alignment.

Examination


Rear shock absorbers are hydraulic or pneumatic. To check the shock absorber, rock the corner of an unloaded vehicle. If the shock absorber is in good condition, the body quickly returns to its original position after 1 oscillation. If the car body returns to its original position after 2-3 oscillations, then the shock absorber is faulty. It is recommended to replace shock absorbers in pairs per axle.
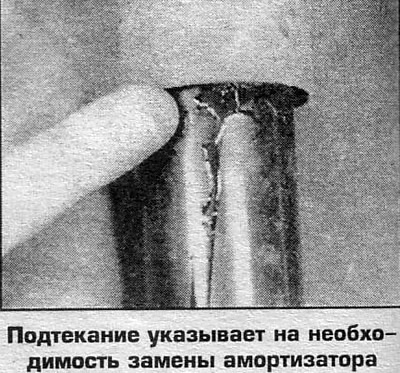
Rear shock absorbers are hydraulic or pneumatic.…


(The text of the article is available on the website: HondaBook.ru)
This article is available at: russian, bulgarian, belarusian, ukrainian, serbian, croatian, romanian, polish, slovak, hungarian
This information has been verified: Emil Safonov
Share with friends:
◀ Previous
CR-V 1: Rear suspension
Next ▶

Springs — removal and installation
Rear suspension — design description
Rear suspension parts
Rack (CR-V) — Removal and Installation
Rear suspension arms — removal and installation
Anti-roll bar — removal and installation
Rear Hub and Bearings (CR-V)
Rear Hub and Bearings (Odyssey)
See also other articles from Honda manuals:
Checking shock absorbers Honda Accord 3 (1985-1989)
Rear shock absorbers — removal and installation Honda Civic 3 and 4 (1983-1991)
Rear shock absorber — removal Honda Fit 1 (2001-2008)
Disposal of shock absorbers Honda HR-V 1 (1998-2006, petrol)
Rear shock absorbers Honda Avancier 1 (1999-2003, petrol)
Link in different formats to this article
Comments and feedback from visitors
No comments yet


How much will 40 + 34 ?


CR-V 2 (2002-2006, petrol) 
  • General information
  • User manual
  • Technical data
  • Maintenance
  • Power unit
  • Engine repair
  • Lubrication system
  • Cooling system
  • Exhaust system
  • Fuel system
  • Engine management
  • Engine electrical equipment
  • Transmission
  • Clutch
  • Manual gearbox
  • Automatic gearbox
  • Rear differential
  • Drive shafts
  • Chassis and running gear
  • Steering
  • Front suspension
  • Rear suspension
  • Brake system
  • Body and interior
  • Exterior (external elements)
  • Interior (internal elements)
  • Doors, locks and windows
CR-V 1 (1995-2001, petrol) 
  • General information
  • Maintenance
  • Tips for car owner
  • Power unit
  • Engine repair
  • Engine overhaul
  • Cooling and lubrication system
  • Engine electrical equipment
  • Control system
  • Fuel system
  • Transmission
  • Clutch and drive shafts
  • Car gearbox
  • Chassis and running gear
  • Front suspension
  • Rear suspension
  • Steering
  • Brake system
  • Body and interior
  • Body service
  • Exterior (external elements)
  • Interior (internal elements)
  • Electrical equipment
  • Equipment and devices
  • Electrical circuits
HondaBook.ru © 2018–2026 • Mobile version • Sitemap: EN BG BY UA RS HR RO PL SK HU • Feedback • Driver Information • Search system • Bookmark
Accord 3 (1985-1989) • Accord 6 (1997-2002) • Civic 3 and 4 (1983-1991) • Civic 5 and 6 (1991-2000) • Civic 6 (1995-2000) • Civic 7 (2000-2005) • Civic 8 (2005-2011) • Fit 1 (2001-2008) • CR-V 1 (1995-2001) • CR-V 2 (2002-2006) • HR-V 1 (1998-2006) • Avancier 1 (1999-2003) •
 
This website uses cookies to ensure proper functioning. By clicking "OK," you agree.