
Warning! The vehicles covered in this manual are equipped with the SRS Supplemental Safety System, better known as the airbag. Before doing any work near the cushion or steering column assembly, be sure to turn off the system to avoid injury from accidental operation (see chapter Onboard electrical equipment). The insulation and connectors of the SRS wiring harness are bright yellow. Do not connect any diagnostic devices to this circuit!
The air conditioning system is constantly under high pressure. Never disconnect refrigeration lines or remove any system components without first discharging the system. The discharge of the air conditioning system must be carried out by an experienced specialist in a car service workshop. When disconnecting the refrigeration lines, be sure to wear protective goggles!
Withdrawal
1. Removing the heater assembly on the models under consideration is a rather difficult task for the average amateur mechanic. Its implementation requires patience and care from the performer. Many of the electrical wiring connectors and fasteners are located under the instrument panel, which is why access to them is extremely limited. Usually, the dismantling of the heater requires the preliminary removal of the instrument panel and the discharge of the refrigeration path of the air conditioning system. It is also necessary to disable the driver and passenger airbags and remove the steering column stop.
2. If the car is equipped with K / V, discharge the system in a specialized workshop. Disconnect the negative cable from the battery.
Attention! If the stereo system installed in the car is equipped with a security code, before disconnecting the battery, make sure that you have the correct combination to activate the audio system!
3. Empty the cooling system (see chapter Settings and ongoing maintenance), - see the warning at the beginning of the Section Antifreeze - general information.
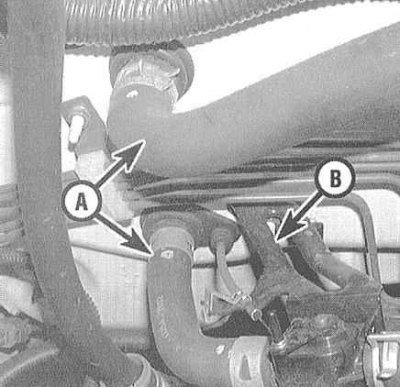
4. In the engine compartment, disconnect the engine cooling path hoses from the inlet and outlet pipes of the heater heat exchanger on the rear bulkhead of the engine compartment. To collect the spilled liquid, put a drain container under the nozzles.
Note. Disconnect one of the hoses from the heat exchanger and lower it into a drain container, then supply low-pressure air to the nozzle of the second hose - the coolant present in the heat exchanger should be squeezed out of its internal cavities, which will significantly reduce the risk of liquid getting on the upholstery elements during assembly dismantling.
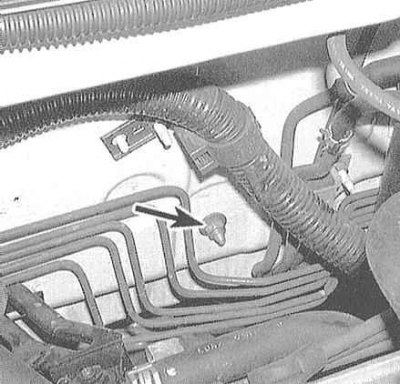
5. Disconnect the drive cable from the control damper of the heater heat exchanger, then release the nut that secures the heater assembly to the bulkhead of the engine compartment, - the nut is released from the side of the engine compartment.
Attention! Be careful not to bend or otherwise damage the fuel lines and brake pipes that run near the nut.
6. Remove the center console, glove box and instrument panel (see chapter Body).
7. Disconnect the electrical wiring connectors and the drive cable for controlling the mixing of the air supplied to the passenger compartment from the heater assembly (see Section Removing and installing the assembly of the control panel for the operation of the heater and air conditioner, adjusting the drive cable)
8. On models without A/C, remove the air duct sleeve laid between the assemblies of the heater casings and its fan. On A/C equipped models, also remove the evaporator (see Section Removal and installation of the K/V evaporator with the expansion valve).

9. Remove the upper fasteners of the heater assembly to the bulkhead of the engine compartment from the cabin side. Remove assembly.
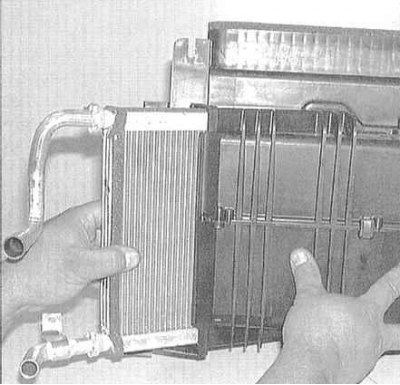
10. Loosen the clamps fastening to the casing of the intake pipes of the heating path and remove the heat exchanger.
 |  |
Installation
1. Installation is carried out in the reverse order. Do not forget to check the correct functioning of the control dampers. If necessary, make the necessary refurbishment by replacing broken or deformed components. Check that the electrical components are functioning properly.
2. Fill the cooling system and remove air pockets from it (see chapter Settings and ongoing maintenance). Connect the battery and start the engine. Check heating system components for signs of leaks and proper operation. If equipped, have the air conditioning system charged at a specialist workshop.