
Contents: Removal ⇊ Installation ⇊
Warning! The air conditioning system is under constant high pressure. Never disconnect refrigeration lines or remove any system components without first discharging the system. Discharging the air conditioning system must be done by an experienced technician in a car service workshop. Always wear safety glasses when disconnecting refrigeration lines!
When replacing air conditioning system components, a certain amount of replacement refrigeration oil will be required to fill the volume of the new unit. Use only oil suitable for use in R-134a systems (check the container label carefully).
The air conditioning compressor is not one of the components subject to repair and, in the event of failure, must be replaced together with the receiver-dryer.
Removal
1. Discharge the air conditioning system in a specialized workshop.
2. Disconnect the negative cable from the battery.
Warning! If the car stereo system is equipped with a security code, make sure you have the correct combination to activate the audio system before disconnecting the battery!
3. Set the parking brake and chock the rear wheels. Jack up the front of the car and place it on supports.
4. Remove the drive belt (see Chapter Settings and ongoing maintenance).
5. On V6 models, remove the alternator (see Chapter Engine electrical equipment) and the K/V condenser fan with casing (see Section Checking the condition of the cooling system fans and their switching circuits; replacement of fans).
6. Disconnect the electrical wiring from the compressor clutch.
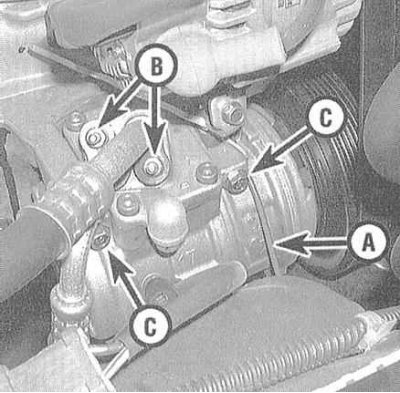
7. Disconnect the refrigeration lines from the compressor. Immediately plug the open ends of the tubes and fittings to prevent dirt and moisture from entering the system.
8. Unbolt the compressor from the support bracket and remove it from the vehicle.
Installation
1. The clutch must be removed and transferred to the new compressor.
2. The calculation of the volume of refrigerant required to fill the volume of the new compressor is performed as follows:
- a) Drain the refrigeration oil from the compressor removed from the vehicle into a measuring container through the suction connection;
- b) Subtract the measurement result from the value 160 ml;
- c) The volume of refrigerant obtained as a result of subtraction should be poured into the new compressor.
3. Further installation is carried out in the reverse order of dismantling. Do not forget to replace the sealing rings of the refrigeration line nipple connections.
4. Charge the system and check it for leaks in a specialized workshop.
The text of the article is available on the website www.hondabook.ru